
Loading...
Loading...
Loading...
Loading...
Loading...
Loading...
Loading...
Loading...
Loading...
Loading...
Loading...
Loading...
Loading...
Loading...
Loading...
Loading...
Loading...
Loading...
Loading...
Loading...
Loading...
Loading...
Loading...
Loading...
Loading...
Loading...
Loading...
Loading...
Loading...
Loading...
Loading...
Loading...
Loading...
Loading...
Loading...
Loading...
Loading...
Loading...
Loading...
Loading...
Loading...
Loading...
Loading...
Loading...
Loading...
Loading...
Loading...
Loading...
Loading...
Loading...
Loading...
Loading...
Loading...
Loading...
Loading...
Loading...
Loading...
Loading...
Loading...
Loading...
Loading...
Loading...
Loading...
Dependency: This is what may be referred to as a component in other systems. It is the firmware, software, patches, or operating system that is installed on the physical representations of your device (e.g., Windows, OpenSSL). In this help center, it is referred to as a component. Note: We are in the process of moving from using the term, dependency, to component in our UI (and therefore, docs), thus you will see these terms used interchangeably during this transition. Currently, both of these terms refer to the same thing.
Component: Currently this means the same as dependency. See note above.
Version: This is the component’s version (e.g., 10.1 for Windows).
Supplier: This is the component’s version (e.g., 10.1 for Windows).
Badges: These are used like tags. They may also be referred to as chips.
In the editable state, they include an x to remove them.
Depending on the use case, some chip states can only be removed by unchecking the drop-down options.
Panels: Panels refer to panels that slide-out from the right of the main page. You can close a panel to return to the main (or parent) page from which it was launched.
You can now use Medcrypt's SBOM generation tool! Contact us to get access.
spdx-sbom-generator tool enables generation of SPDX SBOMs with current package managers. It automatically determines which package managers or build systems are actually being used by your software components.
Works with Linux, Mac, and Windows.
Comes with a Dockerfile for you to maintain your own image.
has CLI (command-line interface) to generate SBOMs info, including components, licenses, copyrights, and security references of your software supply chain using SPDX v2.2 spec and aligning with NTIA known minimum elements.
Refer to Generate SBOM with Yocto on Linux.
bom is a utility to create, view, and transform your Software Bills of Materials (SBOMs). It can generate SPDX packages from directories, container images, single files, and other sources. It also has a built-in license classifier that recognizes over 400 licenses in the SPDX catalog.
Supports Golang dependency analysis and full .gitignore support when scanning git repositories.
Microsoft's SBOM generation tool (microsoft.sbom.tool) apparently can detect NPM, NuGet, PyPI, CocoaPods, Maven, Golang, Rust Crates, RubyGems, Linux packages within containers, Gradle, Ivy, GitHub public repos, and more. It uses Component Detection to generate your SBOM.
Generate your SBOM using Syft's CLI tool and Go library.
Our expert Services team of former FDA reviewers and analysts can provide expert assessment, guidance, and design of anything from building cybersecurity and continuous improvement into your product development lifecycle to your Public Key Infrastructure cryptography to FDA letters and most anything in between. to see how we can help!
From any page in Helm, you can search on which products are impacted by a particular vulnerability across all products using the global search box in the top navigation bar. This enables you to quickly prioritize new threats.
In the global search box on any page, select Vuln ID from the search drop-down. Alternately, you can go directly to the Discover page to run searches. Either way, your last search results will display on this page, if you need to return to them.
Type in a vulnerability ID (e.g., CVE-123-4567), then press Enter to run the search.
From Actions > …, you can then jump to either viewing Software Bill of Materials (SBOM) or Vulnerabilities.
If you jump to this product, you’ll be able to see which product and product versions contain that component and version. From the Actions > … button, you can choose to view more details, add a review note, view review history, and more.
If you jump to vulnerabilities for this dependency component, you can view the applicable vulnerabilities. From the Actions > … button, you can manage each vulnerability.
From any page in Helm, you can search on components (SBOM) across all products in your current workspace using the global search box in the top navigation bar. For example, you may want to find all products that are running the Windows 10 operating system.
In the global search box on any page, select SBOM from the search drop-down. Alternately, you can go directly to the Discover page to run searches. Either way, your last search results will display on this page, if you need to return to them.
Type in a component name, such as Windows 10, then press Enter to run the search.
From Actions > …, you can then jump to either viewing Components or Vulnerabilities.
If you jump to this product, you’ll be able to see which product and product versions contain that component and version. From the Actions > … button, you can manage each component.
If you jump to vulnerabilities for this component, you can view the applicable vulnerabilities. From the Actions > … button, you can manage each vulnerability.
You can send the details of any vulnerability to your R&D team for future prioritization. To do so:
In Vulnerabilities, click Actions > ... > Email vulnerability. This will display an email with the vulnerability information.
Add any information you need to help your team assess and prioritize this vulnerability accordingly, then send it to your R&D team.
Stay on top of the latest vulnerabilities to impact your sofware supply chain. You can choose to receive daily, weekly, and/or monthly digests. These alerts ensure that you stay updated on potential risks and can take prioritize and mitigate risk promptly.
Click on your user avatar located in the top navigation area of Helm.
Select My profile from the dropdown menu.
Toggle on the Send me vulnerability email digests switch if it's not already on.
Check one or more frequencies.
If you prefer not to receive email alerts, toggle off the Send me vulnerability email digests switch.
Click Save.
Daily: You’ll receive your first daily vulnerability email on the next business day.
Weekly: You’ll receive your first weekly vulnerability email on the next Monday.
Monthly: You’ll receive your first monthly vulnerability email on the 1st of every month.
In the Vulnerabilities page, you can export all vulnerabilities for a particular product, as well as all notes your team has made in identifying the risk each vulnerability poses to your organization.
There are two ways to export vulnerabilities, either from the Reports page or directly from the Vulnerabilities table.
Export vulnerabilities from Reports
Click the Reports item in the sidebar to display the Reports page.
Click the Export vulnerabilities button on the Vulnerabilities CSV card.
Export vulnerabilities from the Vulnerabilities page
In Vulnerabilities, select the product name and either all versions or a particular version.
Click Export vulnerabilities. This will export any vulnerabilities that you have not otherwise filtered out.
Your dashboard provides an overview of your overall security posture. You can get to your dashboard by clicking the home icon on the sidebar.
This represents your total SBOMs and vulnerabilities across all time. The date range filter does not apply to these widgets.
Total products: This shows the total number of products that you have managed since you began using Helm.
Ratio of product versions with SBOMs: This percentage shows you the number of product versions that your team has created/uploaded SBOMs for.
These widgets represent your vulnerabilities for a selected date range. You can view this for all versions within a product or for a particular product version.
Vulnerabilities: This shows the number of vulnerabilities that you have for the selected criteria.
Critical severity vulnerabilities: This shows the number of critical-level (CVSS score of 9-10) vulnerabilities that you have for the selected criteria.
Unremediated vulnerabilities: This shows the number of unremediated vulnerabilities that you have for the selected criteria.
Each donut chart represents the total number of vulnerabilities that have been detected in each of your products across all of their respective SBOM components, within the selected date range, products, and versions, as well as the percentage of vulnerabilities in each level of severity.
You can view these widgets across all of your products and versions, or filter down to view particular products and versions.
Severity:
Total vulns (in donut chart): This is the total number of vulnerabilities across this product within the selected date range.
Critical severity: This is the number of critical severity vulnerabilities that have been detected in each of your products across all of their respective SBOM components, within the selected date range, products, and versions.
High severity: This is the number of high severity vulnerabilities that have been detected in each of your products across all of their respective SBOM components, within the selected date range, products, and versions.
Medium severity: This is the number of medium severity vulnerabilities that have been detected in each of your products across all of their respective SBOM components, within the selected date range, products, and versions.
Get more details: Click the View details button to drill down into details for that product.
This shows your top 5 most vulnerable components within the selected date range, products and versions.
Dependency name: This shows the name of the component that is contained within your selected products and versions.
Version: This shows the version for the component that is contained within your selected products and versions.
Supplier: This shows the supplier for the component that is contained within your selected products and versions.
Total vulnerabilities:
In the product drop-down, click Create product.
Click this to specify the product name, then click Save.
To view your new product, click the Products option in the sidebar. Your new product will be selected in the products drop-down.
You’ll now need to add a version for this product. In the version drop-down
Skip the conversion tools and scripts! You can now import CSV and Excel SBOMs directly to Helm.
The one that we’ve used is . You will have to install and run this locally, so if this is outside your realm of expertise, so we can get your SBOM converted.
Install CycloneDX-CLI.
Add these metadata columns shown in this into your CSV file: Supplier, Type, Name, Version. You may already have these columns. They are required in order for Helm to be able to successfully identify matches for your components.
Add the metadata field to your CSV file. See the for more information.
You can write a custom script in Python or your favorite language to convert the file from CSV to CycloneDX JSON.
Our Azure DevOps extension for Helm enables seamless integration of Helm into your CI/CD workflows, automating the creation of product versions and the uploading of SBOMs to Helm. This extension can be used independently or incorporated into your existing Azure DevOps pipelines, ensuring comprehensive and up-to-date documentation of your product's components, dependencies, and vulnerabilities with minimal effort.
Once configured, Helm will automatically add or update SBOMs for the appropriate product versions based on your event trigger when new or updated SBOMs are added to your connected Azure repository.
Get the Medcrypt advantage with the only FDA expert-crafted SBOM that ensures you meet FDA SBOM requirements. We also provide a suite of other reports to enable you to export exactly what you need to meet auditor requirements. This will export your enriched FDA SBOM for all selected products in Excel format, including includes additional CPE/PURL, license, vulnerability remediation data, level of support and EOS/EOL data.
You can export your FDA SBOM from the Reports page.
From the reports page:
If you need your organization name modified to accommodate company name changes, mergers, or acquisitions, just !
Accuracy and consistency: Ensures that every change in your codebase is reflected in your SBOMs.
Seamless integration: Fits naturally into your existing Azure DevOps workflows, enhancing your DevOps practices without disruption.
Compliance and transparency: Facilitates adherence to regulatory requirements and enhances transparency with stakeholders by providing detailed and up-to-date SBOMs.
Getting started:
To get started, you'll need Helm API access and the API credentials, as well as our Helm API URL (api-base-url). These credentials are your client ID and client secret. These are your Helm email and API key, respectively. Contact us to get access to the Helm API.
Sign in to your Azure DevOps account, then go to Azure Marketplace.
Navigate to our Helm extension, then click the Get it free button to install it to your organization.
In your Azure DevOps project, navigate to Azure Pipelines and select your existing pipeline or create a new one.
Add the Medcrypt Helm Upload SBOM task to the new or existing task.
Configure the Medcrypt Helm Upload SBOM task with the necessary parameters, including your Helm API credentials and the path to your SBOM file.
Run the task. The task log will provide trace info and diagnostics during the run.
By integrating this extension into your Azure DevOps environment, you can enhance your software supply chain security and maintain accurate SBOMs with minimal effort.
If you're just starting your SBOM, click the Add SBOM drop-down button > Add dependency. Note that if you've already created or uploaded any SBOMs, this button will change to Manage SBOM and will have additional options, including checking file status.
In the panel that displays, specify the product and version in the first section.
In the next section, provide any information you have for your component. The only required field is the name, so if you don't have information (e.g., version), you can always add this later. However, Helm will need the version to attempt to accurately identify the matching known software.
Click Add. Helm will analyze your component for matches in supported package managers and the NVD, so this will take a few seconds. If you've provided a PURL or CPE, Helm will analyze our package managers and other data sources to ensure that you have the correct string. If not, Helm will automatically fix this for you.
If you don't see your component display, you can refresh it. If Auto-refresh is on, we will automatically be updating this, but if you're not seeing anything, turn Auto-refresh off, then click the manual Refresh button.
On the component you want to edit, click Actions ... > Manage component.
Click Edit on the section you would like to edit. Note that you cannot edit the Match details section.
If you edit the component details, then save your changes, you will be prompted to reload this component. Note that this will assess the component anew, which will lose any previous metadata, including matching, EOS/EOL, licensing, or review information that you have manually added.
If you edit the lifecycleIn the panel that displays, make any necessary changes, then save. This will automatically reload your component, which will no longer retain any review information you've already added for this component.
If you don't see your updated component display, make sure Auto-refresh is on or click Refresh to manually update the page.
To combine SBOMs from various systems into one SBOM, you can simply upload another SBOM to Helm. This will automatically merge that SBOM into your existing one, de-duping any components that are on both SBOMs.
You can add components to an existing SBOM or you can create an SBOM from scratch by adding each one manually. You can also merge SBOMs to combine all components for multiple systems into one.
If you're just starting your SBOM, click the Add SBOM drop-down button > Add dependency. Note that if you've already created or uploaded any SBOMs, this button will change to Manage SBOM and will have additional options, including checking file status. This will display the Add component modal.
In the panel that displays, specify the product and version in the first section. If you haven't created any products or product versions yet, click the create button in this drop-down. If you've already added products and versions, select the appropriate ones.
In the next section, provide any information you have for your component. The only required field is the name, so if you don't have information (e.g., version), you can always add this later. However, Helm will need the version to attempt to accurately identify the matching known software.
Click Add. Helm will analyze your component for matches in supported package managers and the NVD, so this will take a few seconds. If you've provided a PURL or CPE, Helm will analyze our package managers and other data sources to ensure that you have the correct string. If not, Helm will automatically fix this for you. If you don't see your component display, try refreshing your browser.
On the component you want to edit, click Actions ... > Manage component.
In the panel that displays, make any necessary changes, then click Save changes. This will automatically reload your component, which will no longer retain any review information you've already added for this component. If you don't see your updated component display, make sure Auto-refresh is on or click Refresh to manually update the page.
To combine SBOMs from various systems into one SBOM, you can simply upload another SBOM to Helm. This will automatically merge that SBOM into your existing one, de-duping any components that are on both SBOMs.
Click the Archive icon (often represented by a trash can).
Result: The product is archived and will no longer appear in active lists.
To Unarchive a Product or Create a New One with the Same Name:
Add a new product using the exact same name as the archived product.
The application will present you with two options:
Unarchive the existing product: Restores the archived product and all its versions to the active list.
Discard the existing and create a new product: Permanently deletes the archived product and creates a brand new product with the same name.
Select the option that matches your scenario and click Save.
To Archive a Product Version:
In the Products page, select the product and then open the product version drop-down list, hover over the specific version you wish to archive.
Click the Archive icon (often represented by a trash can).
Result: The product version is archived and will no longer appear in active lists for that product.
To Unarchive a Product Version or Create a New One with the Same Name:
Attempt to add a new product version using the exact same version name as the archived version.
The application will present you with two options:
Unarchive the existing product version: Restores the archived version to the active list.
Discard the existing and create a new product version: Permanently deletes the archived version and creates a brand new version with the same name.
Select the appropriate option and click Save.
In the Reports page, click the product version drop-down. You can select one or multiple product versions from this page.
Click the export button on the FDA SBOM card. This will export your enriched FDA SBOM for all selected products in Excel format. This includes additional CPE/PURL, license, vulnerability remediation data, level of support and EOS/EOL data. If you want to customize your export for a single product version only, you can do so from the components page.
CPE follows this format: cpe:<cpe_version>:<part>:<vendor>:<product>:<version>:<update>:<edition>:<language>:<sw_edition>:<target_sw>:<target_hw>:<other>
cpe_version: This is the version of the CPE definition. As of this writing, the latest CPE definition version is 2.3.
part: This can be one of three values: a for Applications, h for Hardware, o for Operating systems. It is sometimes referred to as type.
vendor: This identifies the person or organization that manufactured or created this dependency component.
product: This is the name of the system/package/component.
version: This is the version of the system/package/component.
update: This shows any update or service pack information, also known as minor versions.
edition: This describes the build of the system/package/component beyond version.
sw_edition (2.3 only): This indicates the language of the system/package/component, such as en-us for US English.
target_sw (2.3 only): This indicates the language of the system/package/component, such as en-us for US English.
target_hw (2.3 only): This indicates the language of the system/package/component, such as en-us for US English.
other (2.3 only): This indicates the language of the system/package/component, such as en-us for US English.
Anything that is a wildcard (*) means that no particular value was provided for that section, so it will encompass any applicable value in that section.
Examples
Application:
If the URI is cpe:/a:microsoft:office:2007:sp2:professional then the CPE string is:
cpe:2.3:a:microsoft:office:2007:sp2:-:*:professional:*:*:*
Operating system:
If the URI is
cpe:/o:microsoft:windows_7:-:sp1:x64 then the CPE string is:
cpe:2.3:o:microsoft:windows_7:-:sp1:-:*:*:*:x64:*
Hardware (not supported in an SBOM):
If the URI is cpe:/h:3com:3c13612 then the CPE string is:
cpe:2.3:h:3com:3c13612:-:*:*:*:*:*:*:*
What does a wildcard indicate? Anything that is a wildcard (*) means that no particular value was provided for that section, so it will encompass any applicable value in that section.
After ingesting your SBOM, Helm will automatically match your components to known software in the NVD and package managers, which will bring forth potential vulnerabilities. Your VEX report contains all of your vulnerabilities that you have added a CycloneDX VEX status to, as well as any rescore information for your vulnerabilities.
Click the Reports item in the sidebar.
Click the product version drop-down. You can select one or multiple product versions.
In the Export VEX report card, click Export VEX report. This will export your VEX for all selected products in JSON format.
Our VDR (Vulnerability Disclosure Reports) report offers comprehensive insights into identified vulnerabilities, these reports equip you with proactive mitigation strategies, bolstering your defense against emerging threats. Your VDR report contains all of your components, as well as all of your vulnerabilities, regardless of their remediation status.
Click the Reports item in the sidebar.
Click the product version drop-down. You can select one or multiple product versions.
In the Export VDR report card, click Export VDR report. This will export your VDR for all selected products in JSON format.
Vulnerabilities can be identified through the use of three fields: CPE, PURL, and SWID. Helm supports CPE and PURL. CPE stands for Common Platform Enumeration.
NIST defines CPE as a structured naming scheme for IT systems, software, and packages. It is based on the generic syntax for Uniform Resource Identifiers (URI) and includes a formal name format, a method for checking names against a system, and a description format for binding text and tests to a name. The CPE specification was designed for operating systems, applications, and hardware devices. It is maintained by the NVD.
Inherit create-spdx class: Ensure that your Yocto configuration file inherits the create-spdx class by adding the following line:
Build the image: Proceed with building the image using the standard Yocto build process.
Locate the SBOM files: After the build process, you'll see three different outputs. All are provided here to guide you, but you must only use the third one (in bold). These items are copied directly from Yocto documentation.
SPDX output in JSON format as in IMAGE-MACHINE.spdx.json in tmp/deploy/images/MACHINE in your build directory.
This top-level file also has an IMAGE-MACHINE.spdx.index.json containing an index of SPDX files for individual recipes
The compressed archive IMAGE-MACHINE.spdx.tar.zst, which contains the index and files for the single recipes.
Navigate to the directory that has the .zst file.
Run this command to unzip this file, which contains your individual SBOM files. Replace filename with your actual file name (in the bullets above from Yocto's docs, this is their IMAGE-MACHINE).
tar --zstd -xvf filename.zst
Create a directory with the name of what you want to name your zip file.
Navigate into that directory, then create the subdirectory, packages, in this directory.
Copy the individual SBOM files into this directory.
Run this command to zip the parent directory. In this example, we've used zst_sbom as the file name.
Create .tar.gz
Create .zip
When creating a .zip for Mac, add: -x '**/__MACOSX' after the command. This does not work for creating a .tar.gz.
Once you've converted the file to either .tar.gz or .zip, you can upload your SBOM to Helm.
INHERIT += "create-spdx"COPYFILE_DISABLE=1 tar -zcvf zst_sbom.tar.gz zst_sbom -x zip -r zst_sbom.zip zst_sbom -x '**/.*'Low severity: This is the number of low severity vulnerabilities that have been detected in each of your products across all of their respective SBOM components, within the selected date range, products, and versions
Products impacted: This shows the number of your products that are impacted by this component, meaning that the corresponding SBOM contains this component. If you are viewing one product, this will show 1/1, but if you are viewing all of your products, this will show 1/n, with n being your current number of products.
Products impacted %: This shows the number of your products impacted by this component across your selected products. If you are viewing 1 product, this will show 100%, but if you are viewing all of your products, this will show the percentage of your products that are impacted.
Actions: You can click the View button to drill down to view how many times a component is used across your selected products and versions.
From the search results, click Jump to product or Jump to vulnerabilities. If you jump to this product, you’ll be able to see which product and product versions contain that component and version.
From the Actions > … button, you can choose to view more details, add a review note, view review history, and more.
If you jump to vulnerabilities for this component, you can view the applicable vulnerabilities. From the Actions > … button, you can manage each vulnerability, including adding review notes and setting the Resolution. If you change this resolution, it will update the Product impact status.
Specify the version, then click Save. Your new product version will be selected. You’re now ready to upload your SBOM.
Get started
Don't have an SBOM yet?
Match components
Auto-enrich data
Automate & integrate
Leverage AI guidance
When reviewing match sources and their reliability:
Organization-wide sources: All match sources (NVD, CPE, package managers, aliases) are organization-wide resources
Match reliability: Source strength and reliability apply consistently across all workspaces
Alias benefits: Aliases created by admins in any workspace benefit component matching organization-wide
Workspace focus: While sources are organization-wide, you only see components and their match sources for your current workspace
Alias: This indicates that the component was matched by an alias rule. This could have been created by someone on your account or by the Helm team. This is considered a very strong match.
NVD: This component/version/supplier combo had an exact match in the National Vulnerability Database (NVD).
Package managers:
Cargo: This was exactly matched to a component in the Cargo package manager from a Package URL (PURL) uploaded in your SBOM file.
NuGet: This was exactly matched to a component in the NuGet package manager from a Package URL (PURL) uploaded in your SBOM file.
NPM: This was exactly matched to a component in the NPM package manager from a Package URL (PURL) uploaded in your SBOM file.
PyPI: This was exactly matched to a component in the PyPI package manager from a Package URL (PURL) uploaded in your SBOM file.
Other sources:
CPE: This was exactly matched to a component from a CPE string uploaded in your SBOM file. CPE is considered the strongest match.
Name: This component name/version/supplier combo exactly matches an existing component name/version/supplier combo in our system.
Introducing Helm by Medcrypt
Helm is a comprehensive Software Bill of Materials (SBOM) and vulnerability management tool designed especially for medical device manufacturers (MDMs) to provide full visibility over your software supply chain and help you prioritize and remediate cybersecurity risks effectively. You can also track multiple software versions across devices, enabling you to easily handle the complex needs of medical devices with long lifespans and infrequent updates. Learn more about how Helm helps you meet FDA cybersecurity expectations.
FDA compliance
Supports NTIA and FDA cybersecurity requirements for SBOMs.
Provides tools for Secure Product Development Framework (SPDF).
Automated lifecycle management: Lifecycle rules automatically apply Level of Support and End-of-Life (EOL)/End-of-Support (EOS) information to components across your product portfolio, ensuring consistency and compliance with FDA cybersecurity requirements. EOL/EOS tracking enables you to identify and reduce risk due to outdated components that no longer receive security updates.
Broad ecosystem visibility
Tracks both open-source software (OSS) and commercial third-party software.
Supports real-time operating systems (RTOS) and other operating systems to give a comprehensive view of your software ecosystem.
SBOM management
Handles SBOMs from open source, commercial tools, and manual uploads.
.
Matches your software against the National Vulnerability Database (NVD) and package managers using advanced normalization techniques. For example, Helm will normalize values such as “windows10”, “windows_10”, and “win 10” to the official value, such as Windows 10.
. Import or manually add license information. Helm can also add missing license information when you upload a new SBOM or you can add them on-demand per component.
Vulnerability management
instantly during major vulnerabilities like Log4j or WannaCry on Helm's comprehensive dashboard. Helm's dashboard enables you to quickly remedy your most impacted products.
Zero in on critical vulnerabilities.
Track progress on unremediated vulnerabilities.
Prioritize and remediate quickly via continuously monitoring and updating of vulnerability , and more.
Regulatory reporting
.
.
Export or .
You can upload .zst SBOM files generated by Yocto on Linux. If you still prefer to convert your .zst files to a zipped format, follow the steps below.
Inherit create-spdx class: Ensure that your Yocto configuration file inherits the create-spdx class by adding the following line:
Build the image: Proceed with building the image using the standard Yocto build process.
Locate the SBOM files: After the build process, you'll see three different outputs. All are provided here to guide you, but you must only use the third one (in bold). These items are copied directly from Yocto documentation.
SPDX output in JSON format as in IMAGE-MACHINE.spdx.json in tmp/deploy/images/MACHINE in your build directory.
This top-level file also has an IMAGE-MACHINE.spdx.index.json containing an index of SPDX files for individual recipes
The compressed archive IMAGE-MACHINE.spdx.tar.zst, which contains the index and files for the single recipes.
Please note this step is now optional, Helm natively supports the .zst file format.
Navigate to the directory that has the .zst file.
Run this command to unzip this file, which contains your individual SBOM files. Replace filename with your actual file name (in the bullets above from Yocto's docs, this is their IMAGE-MACHINE).
tar --zstd -xvf filename.zst
Create a directory with the name of what you want to name your zip file.
Navigate into that directory, then create the subdirectory, packages, in this directory.
Copy the individual SBOM files into this directory.
Run this command to zip the parent directory. In this example, we've used zst_sbom
Create .tar.gz
Create .zip
When creating a .zip for Mac, use: -x '**/__MACOSX' in the command. This does not work for creating a .tar.gz.
Once you've converted the file to either .tar.gz or .zip, you can to Helm.
Use the color-coded CVSS severity levels to focus on the most important vulnerabilities.
Critical (dark red)
9-10
This may allow attackers to access sensitive data and run code on your software.
High (red)
7-8
This may allow attackers to access sensitive data in your software.
You can use our powerful bulk vulnerability remediation to remediate large groups of vulnerabilities within a product, across products, or target a particular component's vulnerabilities with the click of a button, enabling you to speed triage and ensure remediation consistency of particular vulnerabilities across your product portfolio.
To make the most of your time, you'll likely want to start with the most critical vulnerabilities first, so that you can assess their severity given your particular device, its environment and its use. The CVSS v3 column in shown by default in the Vulnerabilities table. You can click the Columns link above the table header row to customize your data display, including adding the CVSS v2 column.
Initially, all of your vulnerabilities will have a Status of blank. For CycloneDX status, you'll ultimately want to remediate each of these to either Exploitable or Not affected. For VEX status, you’ll ultimately want to remediate each of these to either Affected or Not affected. Some MDMs use CycloneDX for assigning internal statuses, while using the CycloneDX VEX profile to assign external statuses that will be communicated to customers and other external stakeholders.
In the toolbar of the Vulnerabilities table, you'll see a Remediate N vulns link. If you have vulnerabilities selected in the table, this N indicates how many you have selected.
Click Remediate N vulns to display the Remediate panel.
If you're still investigating a vulnerability, choose the interim status for CycloneDX of In triage. If you have any information that will help triage these vulnerabilities, you will be able to add that to the Evidence field once you have chosen a status.
If you're not familiar with a particular vulnerability, click Actions > View details to get all vulnerability information. Close this panel when you're ready to remediate this vulnerability.
In the Vulnerabilities table, click Actions > ... > Remediate vulnerability for the vulnerability that you'd like to remediate. This will display the Remediate panel.
If you're still investigating a vulnerability, choose the interim status for CycloneDX of In triage. If you have any information about the vulnerability that will help triage it, you will be able to add that to the Evidence field once you have chosen a status.
If you're ready to remediate the vulnerability to a final status, choose the appropriate status. For CycloneDX, depending on the status, you may also need to select a remediation and justification for that remediation.
If you'd also like to add a VEX status, click the Add CycloneDX VEX status link. Note that this is the CycloneDX profile of VEX, not OpenVEX, so the statuses are a subset. If you're still investigating a vulnerability, choose the interim status for CycloneDX VEX of Unknown.
If you select any status besides an interim status for either CycloneDX or CycloneDX VEX, you'll need to provide information to explain this status change in the Evidence field. This will provide you with an audit trail for this vulnerability.
Click Remediate N vulnerabilities. In the Vulnerabilities table, you'll see the respective status(es) display in the CycloneDX status and VEX status columns, respectively.
If you're ready to remediate the vulnerability to a final status, choose the appropriate status. For CycloneDX, depending on the status, you may also need to select a remediation and justification for that remediation.
If you'd also like to add a VEX status, click the Add CycloneDX VEX status link. Note that this is the CycloneDX profile of VEX, not OpenVEX, so the statuses are a subset. If you're still investigating a vulnerability, choose the interim status for CycloneDX VEX of Unknown.
If you select any status besides an interim status for either CycloneDX or CycloneDX VEX, you'll need to provide information to explain this status change in the Evidence field. This will provide you with an audit trail for this vulnerability.
Click Apply remediation. In the Vulnerabilities table, you'll see the respective status(es) display in the CycloneDX status and VEX status columns, respectively.
Medium (orange)
4-6
Under some conditions, this may allow attackers to access sensitive data in your software.
Low (green)
1-3
Your software could expose some data that allows vulnerability mapping. This can be used to chain vulnerabilities to attack your software.
None (gray)
0
There is no known attack risk for this software at this time.
🚧 This feature is being updated in the UI and is not currently available.
INHERIT += "create-spdx"COPYFILE_DISABLE=1 tar -zcvf zst_sbom.tar.gz zst_sbom -x zip -r zst_sbom.zip zst_sbom -x '**/.*'Auto-enriches inaccurate or missing CPEs and PURLs.
Automated lifecycle rules: Create rules in the Rules manager to automatically apply Level of Support and End-of-Support/End-of-Life (EOS/EOL) information to components based on supplier name, component name, and version. Rules ensure consistency across your product portfolio and take precedence over user-provided lifecycle data.
If we can't identify a match in the NVD, you can create aliases to match components to software in the NVD. These will be auto-matched for all future SBOMs.
Get AI-powered vulnerability guidance: Select one or more vulnerabilities and click the Get AI guidance action to receive comprehensive mitigation strategies, upgrade recommendations, and actionable remediation steps with supporting sources.
Automated AI detection of impacted technology stacks: Automatically identifies and tags which technology stacks (Windows, Redhat, SQL, Git, GRPC, WordPress, and others) are affected by each vulnerability, with detailed AI recommendations for each stack.
Supports CVSS 2, CVSS 3.x, and EPSS severity and exploitability prediction scores. Learn more on CVSS.
Rescore vulnerabilities in bulk or individually to align with your product's environment and use.
Get daily, weekly, or monthly vulnerability email digests to stay on top of the latest threats.
Automated lifecycle compliance: Lifecycle rules automatically include required Level of Support and End-of-Support/End-of-Life (EOS/EOL) information in FDA reports, ensuring accuracy and streamlined compliance.
Manage SBOMs
Leverage AI guidance
Prioritize vulns
Rescore vulns
Patch Windows vulns
Remediate vulns
Check out the latest updates!
Cybersecurity best practices
API
Administration
Manage users
Manage products
The Get Started page in Helm serves as the primary onboarding hub for new and existing users. Whether you're just starting out or looking to enhance your cybersecurity efforts, this page guides you through the essential steps to begin managing your cybersecurity risks effectively.Whether you're just starting out or looking to enhance your cybersecurity efforts, we have the tools and expertise to help you succeed.
Upload CycloneDX, SPDX, or Yocto SBOM to start managing your cybersecurity risks and proactively responding to threats.
How to get started
Navigate to the products page.
Click Upload SBOM.
Select your SBOM file (CycloneDX, SPDX, or Yocto format).
Follow the upload wizard to complete the process.
We are currently working on this tool and it should be available in a future release.
Create FDA-compliant SBOMs with our downloadable SBOM generator tool. Supports Windows 11 and Ubuntu 20.x.
Take our FDA readiness survey to ensure SBOM and vulnerability management compliance and avoid delays.
Why this matters
Identify compliance gaps before submission.
Get tailored recommendations for improvement.
Avoid regulatory delays and rejections.
Consult with our former FDA reviewers and cybersecurity analysts for specialized guidance on regulatory compliance.
What you get
Access to former FDA policy experts.
Customized guidance for your device type.
Support throughout the approval process.
Helm provides many ways to ensure you have a comprehensive and accurate view of your overall risk that is tailored to your product's particular security posture, enabling you to spend your limited time on the vulnerabilities that matter most.
Leverage our powerful to automatically create product versions, upload SBOMs, retrieve vulnerabilities and unmatched components, as well as generate FDA-ready reports.
Key capabilities
Automated product and version management
Programmatic SBOM uploads
Vulnerability data retrieval
Report generation
Use our to automatically create product versions, upload SBOMs, retrieve vulnerabilities and unmatched components, as well as generate FDA-ready reports. Requires API access.
Setup requirements
GitHub repository access
Helm API credentials
SBOM files in your repository
Use our to auto-create product versions, upload SBOMs, retrieve vulnerabilities and unmatched components, as well as generate FDA-ready reports.
Setup requirements
Azure DevOps project access
Helm API credentials
SBOM files in your pipeline
We are currently working on this integration and it should be available in a future release.
to automate SBOM uploads from S3 buckets and incorporate vulnerability data into your existing AWS workflows.
Planned features
S3 bucket integration
Automated data export
AWS service compatibility
Trigger-based exports
We are currently working on this integration and it should be available in a future release.
to auto create, track, and update tickets for critical vulnerabilities, streamlining your remediation workflow.
Planned features
Automatic ticket creation
Vulnerability tracking
Access comprehensive guidance to maximize your vulnerability management capabilities and ensure regulatory compliance.
Follow step-by-step instructions to upload your first SBOM, analyze vulnerabilities, and implement remediation strategies.
What's covered
Account setup and security configuration
and options.
Component matching and status resolution
Vulnerability and .
to auto-match components to known software, or select from match recommendations for a comprehensive risk view.
by rescoring based on your device's context. Leverage threat intel from CISA KEV and exploit databases.
for short-term and upgrade recommendations to resolve vulnerabilities quickly.
Generate our proprietary , , and to ensure successful regulatory submissions.
Here are the recommended next steps:
to begin analyzing your vulnerabilities.
to understand your compliance status.
that fit your development workflow.
for detailed implementation steps.
Our team of former FDA policy experts and cybersecurity analysts provide comprehensive services throughout the total product lifecycle—from development to post-market monitoring. Combined with Guardian for device provisioning and Helm for vulnerability management, we offer complete support to help you create secure-by-design products and enhance cybersecurity at any lifecycle stage.
Assess your cybersecurity maturity: Evaluate your current security posture, identify gaps, and receive a tailored improvement roadmap from our FDA experts to strengthen your medical device security.
: Secure your connected devices with hardware-backed cryptography. Guardian provides device provisioning and authenticated communication channels to protect IoT devices and ensure data integrity throughout their entire lifecycle.
: Our comprehensive services have helped clients reduce FDA approval time from 180 to 45-60 days with a 100% approval rate across over 200 projects and more than 60 clients.
Our is available to guide you through any aspect of getting started!
You can use many different open-source tools to generate your SBOM in CycloneDX format. We support CycloneDX 1.4 and JSON and XML formats.
Note: We have not used all of these, so have appended an * to the ones we've used or have seen our clients use successfully.
Generate an SBOM for Java Core projects with the .
Generate an SBOM for Java Maven projects with the .
Generate an SBOM for Java Gradle projects with th or Gradle's own .
Generate an SBOM for JavaScript projects with the .
Generate an SBOM for Node.js NPM projects with the .
Generate an SBOM for Node.js NPM projects with the .
Generate an SBOM for Node.js Yarn projects with the .
Generate SBOM for CocoaPods projects with the .
Generate SBOM for .NET NuGet projects with the .
Generate SBOM for Python projects with the .
Generate SBOM for Python Pip projects with the .
Generate SBOM for Python Poetry projects with the .
Generate SBOM for PHP Composer projects with the .
Generate SBOM for Golang projects with gomod using the .
Generate SBOM for Elixir Mix projects using the
Generate SBOM for Erlang Rebar3 projects with the .
Microsoft's (microsoft.sbom.tool) apparently can detect NPM, NuGet, PyPI, CocoaPods, Maven, Golang, Rust Crates, RubyGems, Linux packages within containers, Gradle, Ivy, GitHub public repos, and more. It uses Component Detection to generate your SBOM.
Generate SBOM using Syft's .
Download the tool to your local environment, then give execute permission to the downloaded executable file:
chmod +x ./sbom-tool
Download, then extract the Linux kernel source code from The Linux Kernel Archives. For example, this uses version 5.15.88:
tar xvfJ linux-5.15.88.tar.xz
Generate SBOM for Ruby projects with the .
*
Helm provides many ways to ensure you have a comprehensive and accurate view of your overall risk that is tailored to your product's particular security posture, enabling you to spend your limited time on the vulnerabilities that matter most.
Comprehensive bulk rescoring capabilities: Rescore vulnerabilities at multiple levels according to your product's security posture, ensuring you're focusing on the most exploitable vulnerabilities:
Rescore selected vulnerabilities across your entire product portfolio (multiple products and versions)
Rescore all vulnerabilities within a single product version
Rescore vulnerabilities across selected components within a product version
Toggle on auto-update to automatically rescore vulnerabilities that have exploitability and fixability changes across any of these rescoring levels
Bulk vulnerability remediation: across one or more products or components.
Bulk Windows patching: across a product version or multiple products by aligning digital KB patch levels with their physical device counterparts, or by leveraging our Windows KB patch recommendations.
Bulk component lifecycle updates: Create automated lifecycle rules to ensure consistent Level of support and EOS/EOL information across products.
Bulk component editing: Edit level of support, EOS/EOL, and license information across multiple components simultaneously for efficient SBOM maintenance.
Automated lifecycle rules: to automatically update component Level of support and EOS/EOL information across all products, ensuring consistency and regulatory compliance.
Automatic vulnerability updates: All vulnerabilities are automatically updated with severity and exploitability information.
On-demand license enrichment: to automatically (only for components that do not already have associated licensing information), ensuring you're not missing valuable license risk that could even impact your IP.
Component alias automation: For components we're unable to match, you can to automatically match these to known software for future SBOMs.
API automation: to automate many tasks, such as creating product versions, uploading SBOMs, returning all vulnerabilities and generating reports, as well as returning only unmatched components or only CISA KEV vulnerabilities.
CI/CD integration:
to ensure you have everything you need for FDA submission.
Export FDA-ready , , and reports to meet compliance and regulatory requirements.
You can easily integrate Helm into your CI/CD process to streamline and automate the process of creating products and product versions and uploading SBOMs to Helm. You can either use our GitHub action independently or integrate it into your existing GitHub action workflow, enabling you to maintain comprehensive and up-to-date documentation of your product's components, dependencies, and vulnerabilities with minimal effort.
Once configured, Helm will automatically add products and add or update SBOMs for the appropriate product versions based on your event trigger when new or updated SBOMs are added to your connected GitHub repository.
Efficiency: Automates the labor-intensive process of maintaining SBOMs, freeing up your team to focus on development.
Accuracy and consistency: Ensures that every change in your codebase is reflected in your SBOMs.
Seamless integration: Fits naturally into your existing GitHub workflows, enhancing your DevOps practices without disrupting them.
Compliance and transparency: Facilitates compliance with regulatory requirements and enhances transparency with stakeholders by providing detailed and up-to-date SBOMs.
Our simplifies the management of SBOMs by automating the creation and uploading of product versions and their corresponding SBOM files from your GitHub repository.
To get started, you'll need Helm API access and the API credentials, as well as our Helm API URL (api-base-url).
In your GitHub repository, create a /workflows directory: .github/workflows
Create a new workflow .yml file under .github/workflows/ if you don’t already have one. If you already have one, just incorporate our step under jobs: > steps.
Using Visual Studio Code editor?
You can install their GitHub actions plug-in, which will enable you to hover over the parameters to get the information in the table below or in the Readme file.
In the uses: parameter, this is set to /medcrypt/action-helm-sbom-upload@your_version_branch
In the with: parameter, specify the following information:
Wrap our action up in your own workflow file, then write a reusable workflow using on: workflow_call to call your workflow.
Just copy and paste the step into that repo's yml file. If desired, you can create your own reusable action to store client-id and client-secret, anything that will be the same across your organization.
If there is an error, you can check the action to see where errors occurred.
You can from the UI or . Removing the product will archive it, so that you can readd it, but if you delete the version, you will no longer be able to access that version's SBOM, and will need to readd it.
You can stop using this or modify your action settings at any time, including changing or disconnecting repositories, changing event triggers, and more.
There are two ways to export your SBOM:
Click the Reports item in the sidebar, then click the corresponding export button on the report card.
Click the Manage SBOM drop-down button, then click Export SBOM.
When downloading (exporting) your SBOM to share with others or for auditing purposes, you can either export your original SBOM or your enhanced SBOM (with matches our system made automatically or that your team matched). You can also choose to include vulnerabilities and any associated CPE or PURL information in your export. SBOMs are currently exported in CycloneDX 1.4 format. If you are interested in exporting in another format, .
Export as file name: This is the filename that will be generated with your exported data.
Export details: You can choose to export your original SBOM or your enriched SBOM. Your enriched SBOM can include vulnerabilities, enriched CPE and PURL information, and more.
Export as file type: For your original SBOM, you can export in CycloneDX JSON, SPDX JSON or XML, and CSV. For your enriched SBOM, you can export in CycloneDX or SPDX JSON.
If your SBOM contained any component hashes when uploaded, that information was retained and will be exported intact to any .
You can export lifecycle data, including level of support and EOS/EOL infomration, as well as license data for your components to your or . You can also export lifecycle data to your CycloneDX SBOM.
You can import from and export lifecycle data, including level of support and EOS/EOL information, to your CycloneDX SBOM. Refer to for more info.
You can import from and export Windows KB patch data to your CycloneDX SBOM. Refer to for more info.
You can export lifecycle and license data for your components as an or export the .
You can export Level of support and/or EOS/EOL to a CycloneDX SBOM provided that you use the following properties. This information will be populated into the respective columns in the Products table, as well as in the component details.
Level of support (date): Import will support cdx:lifecycle:milestone:endOfSupport property or eos_date (Medcrypt-specific property). Export will be the CycloneDX native property.
EOS/EOL (date): Import will support cdx:lifecycle:milestone:endOfLife property or eol_date (Medcrypt-specific property). Export will be the CycloneDX native property.
Refer to the official in GitHub for definitions.
You can connect Helm to AWS to automatically send vulnerabilities from selected products based on the trigger rules you define. This integration enables you to export vulnerability data to your AWS S3 buckets for further analysis, compliance reporting, or integration with other AWS security services.
You can connect Helm to Jira to automatically send vulnerabilities from selected products. These will be stored in the Jira security board. You can then decide which to convert into Jira tickets, stories, etc.
The Jira integration allows security teams to bridge the gap between vulnerability management in Helm and project management in Jira. This integration automatically synchronizes vulnerability data from your Helm-monitored products into your Jira instance, where they appear as security information that can be linked to development work.
Lifecycle rules ensure consistency across your product portfolio by automatically applying Level of Support and End-of-Life (EOL)/End-of-Support (EOS) information to components in all current and future SBOMs. The Helm can create lifecycle rules in Helm's Rules manager to streamline compliance with FDA cybersecurity requirements.
Each rule defines conditions based on supplier name, component name, and component version
The match status of each of your components is indicated in the Match status column of the components table. You can click directly on this status badge itself to begin the resolution process, or you can select an action from the Actions column. We use a variety of metadata and to identify a match, including the NVD, CPE, alias, name, and supported package managers (Cargo, NPM, NuGet, PyPI).
Note: AI recommendations are meant to supplement, not replace, security expertise. Always validate suggestions against your specific environment and security policies.
Helm provides AI-powered vulnerability guidance to help you fix or mitigate security vulnerabilities faster. Get actionable mitigation strategies, upgrade recommendations, and technology stack insights backed by source documentation.
In the context of vulnerability assessment, Helm provides a practical framework for understanding and prioritizing vulnerabilities based on severity, exploitability, and potential threats. This article outlines how Helm utilizes CVSS v2 and v3 scores, along with EPSS scores and threat sources, including indicating if vulnerabilities are on the CISA KEV list, whether they are in the Exploit Database (exploit-db.com) or have a Metasploit toolkit available to make attacks easier, and whether they meet the criteria of the top 25 CWEs (Common Weakness Enumerations).
You can across an entire product version based on your device's environment and usage, or . Customize vulnerability scores based on your device's unique environment and usage, recalibrating severity, exploitability, and threat information for a tailored assessment that minimizes false positives while pinpointing your more exploitable and critical vulnerabilities, thereby strengthening your cybersecurity defenses.
Before getting started, ensure you have:
Jira Cloud instance with admin permissions
Helm API credentials or bearer token
Organization identifier from Helm
In your Jira instance, navigate to Apps > Find new apps.
Search for "Helm Security" and install the app. The app will request permissions to access your Jira security information.
After installation, go to Apps > Manage apps > Helm Security.
Click Configure to access the setup page.
You'll need to provide:
Your Helm API credentials or bearer token
Organization identifier from Helm
In the configuration interface, select which Helm products should sync with which Jira projects
Each Helm product becomes a "container" that can be associated with one or more Jira projects
Save your configuration to begin synchronization
Once configured, vulnerabilities will appear in the security section of your Jira projects:
Navigate to any associated Jira project.
Look for the Security tab or section.
Vulnerabilities from the linked Helm products will be listed with:
CVE identifier
Severity level
Affected component
Description
Remediation guidance
From the Jira security board, select any vulnerability.
Click Create Issue or Link to Issue.
Choose the issue type (Story, Task, Bug, etc.).
The vulnerability details will be automatically populated.
Assign to team members and set priority as needed.
Vulnerabilities are synchronized on a regular schedule.
New vulnerabilities automatically appear in Jira.
Resolved vulnerabilities are updated to reflect their status.
Each vulnerability includes an update sequence number for tracking changes.
Vulnerabilities are automatically sent from Helm to Jira.
Updates occur regularly to keep information current.
No manual intervention required once configured.
Each vulnerability is identified by its CVE ID.
Track remediation progress directly in Jira.
Link vulnerabilities to development work items.
Vulnerabilities appear alongside other security tools.
Consistent interface with existing Jira security features.
Standard Jira workflows apply to vulnerability management.
Once configured, you can:
Monitor synchronization: View sync status and history in the Helm Security app settings
Modify associations: Add or remove product-to-project associations
Workspaces correspond to your organizations in Helm
Containers correspond to your organization's products or product versions
During setup, you associate specific Helm products with Jira projects
Associate related products with the same Jira project for better oversight.
Use consistent naming conventions for created issues.
Tag vulnerability-related issues for easy filtering.
Create templates for common vulnerability types.
Set up automation rules for high-severity vulnerabilities.
Establish clear assignment rules for security issues.
Vulnerabilities not appearing: Check API credentials and product associations.
Outdated information: Verify the synchronization schedule is active.
Permission errors: Ensure the Helm app has proper Jira permissions.
If you encounter issues with the Jira integration:
Check your Helm API credentials are valid.
Verify product associations are correctly configured.
Contact support with your Jira instance details and error messages.
Only vulnerability metadata is shared with Jira.
No sensitive application code or internal details are transmitted.
Data transmission uses secure JWT tokens.
Jira project permissions control who can view vulnerabilities.
Standard Jira security models apply to vulnerability data.
Configure appropriate user groups for security information access.
Remediation actions must be performed in Helm.
Two-way synchronization is not currently supported, but is under active investigation.
Leveraging AI-powered guidance and tech stack detection to identify and resolve vulnerabilities quickly
Global search capabilities to quickly assess whether a component or vulnerability is in your portfolio
Consider expert consultation for specialized guidance.
Expert guidance throughout your device lifecycle: Get expert pre-market guidance on FDA cybersecurity readiness and threat modeling, as well as post-market support for incident response, vulnerability management, and regulatory compliance. Request a consultation.
./sbom-tool generate -b ./linux-5.15.88 -bc ./linux-5.15.88 -pn kernel -pv 5.15.88 -ps linux.org -nsb https://kernel.org
Locate the generated SPDX file in ./linux-5.15.88/_manifest/spdx_2.2/ folder. It is named manifest.spdx.json. You will now need to convert the SPDX file to CycloneDX.
Automatic CPE/PURL enrichment: If we identify inaccurate CPEs or PURLs in your SBOM, Helm will attempt to provide an enriched CPE or PURL that matches to the correct software. You can override this default if desired, though this is not recommended.
Auto-rescore vulnerabilities: Auto-rescore all vulnerabilities that have exploitability or fixability updates.
Ubuntu patching automation: Any Ubuntu vulnerabilities that have already been fixed in your current version are automatically shown as patched.
Integrate our Microsoft Azure DevOps extension into your CI/CD pipeline to automate product version creation and SBOM uploads.
Create a step to upload your SBOM in the jobs section.
In the step, you can refer to the parameters in the table below or to the Readme for each of the parameters you'll need to add.
Provide the workspace-name that the product is assigned to or will be assigned to (if creating a new product). This is optional. If not provided, default workspace will be used.
Provide the product-name and product-version-name.
If the product doesn't exist and you want us to create it for you, set create-product-if-not-found to true.
If the product version doesn't exist and you want us to create it for you, set create-version-if-not-found to true.
Pass in your client-id and client-secret. These are your Helm API credentials. client-id is your email address (for the user that generated the API key) and client-secret is that user's API key.
Provide your sbom-file-path.
In our action, we currently set on to workflow_dispatch, which enables you to run it manually from the GitHub UI, but you can set it to whatever trigger you want, such as push, pull_request, or to run on a schedule.
create-product-if-not-found
'false'
This indicates if a product should be created if the product does not exist in Helm. This is set to false by default. Use this with caution.
create-version-if-not-found
'false'
This indicates if a product version should be created if the product or version does not exist in Helm. This is set to false by default. Use this with caution.
client-id
${{ secrets.CLIENT_ID }}
This is the email address of the user that has Helm API access.
client-secret
${{ secrets.CLIENT_SECRET }}
This is the API key of the Helm API.
sbom-file-path
./api_test_sbom.json
This is the path to your SBOM file. This should be the location of the file within your current GitHub workspace, such as after checking out source code, downloading an artifact, etc.
repository
'https://helm.environment.medcrypt.co/sub-path/'
This is the Root URL of the Helm API, and is provided to you by Medcrypt.
workspace-name
'Workspace name'
This is the workspace that the product is assigned to or will be assigned to (if creating a new product). This is optional. If not provided, default workspace will be used.
product-name
'your product name'
This is your product name. Quotes are optional.
product-version-name
'1.0'
This is your product version. It must be enclosed in quotes to prevent truncation of numeric values.
Include enriched CPEs and PURLs from matching: Your original SBOM export will include all CPE/PURL information, but you can check this box to export all enriched CPE/PURL data, including those identified by Helm or during the matching and analysis process or that you manually matched or added.
medcrypt:lifecycle:milestone:endOfLifeText or eol_text. Export will be `medcrypt:lifecycle:milestone:endOfLifeText. EOS/EOL (text): Import will support medcrypt:lifecycle:milestone:levelOfSupportText or eos_text. Export will be `medcrypt:lifecycle:milestone:levelOfSupportText.
Jira (coming soon)
AWS (coming soon)
Valid Helm account with appropriate permissions
API access enabled (contact support to request access)
The Helm API allows users to efficiently manage SBOMs, assess vulnerabilities, and generate detailed reports.
Upload single or multiple SBOMs
Retrieve all vulnerabilities or filter to focus on CISA KEV vulnerabilities
Generate FDA SBOM reports or CycloneDX VEX reports
Identify unmatched SBOM components
Request API access: Contact us to get access to the Helm API
Generate credentials: Create your API key from the Developers page in Helm.
You can easily integrate Helm into your CI/CD process to streamline and automate the process of creating product versions and uploading SBOMs to Helm. This GitHub action can be used independently or integrated into your existing workflows.
Supported formats:
CycloneDX JSON (SPDX support available upon request)
Efficiency: Automates the labor-intensive process of maintaining SBOMs.
Accuracy and consistency: Ensures every change is reflected in your SBOMs.
Seamless integration: Fits naturally into existing GitHub workflows.
Compliance: Facilitates regulatory requirements and stakeholder transparency.
Our Microsoft Azure DevOps extension enables seamless integration of Helm into your CI/CD workflows, automating the creation of product versions and uploading of SBOMs to Helm.
Efficiency: Automates SBOM maintenance, allowing focus on development.
Accuracy and consistency: Ensures every change is reflected in SBOMs.
Seamless integration: Fits naturally into existing Azure DevOps workflows.
Compliance and transparency: Facilitates regulatory adherence and stakeholder transparency.
We are currently working on this integration and it should be available in a future release.
Configure Amazon Web Services to automate SBOM uploads from S3 buckets and incorporate vulnerability data into your existing AWS workflows.
S3 bucket integration for automated SBOM processing
Export vulnerability data to S3 for analysis
Trigger-based operations based on specific criteria
Integration with other AWS security services
We are currently working on this integration and it should be available in a future release.
Connect Helm with Jira to auto create, track, and update tickets for critical vulnerabilities, streamlining your remediation workflow.
Automatic ticket creation for high-priority vulnerabilities
Link vulnerability data to development work items
Track remediation progress from discovery to resolution
Integration with existing project management workflows
API key management: Store API credentials securely using your platform's secret management
Access control: Limit API access to necessary personnel and systems
Audit logging: Monitor API usage for security and compliance purposes
Automation: Configure appropriate triggers for your development workflow
Error Handling: Implement proper error checking and logging in your integrations
Testing: Test integrations in development environments before production deployment
Monitoring: Set up alerts for integration failures or performance issues
Repository organization: Use reusable workflows for multiple products in the same repository
Version Management: Implement consistent product and version naming conventions
Contact our support team for assistance with setting up any of these integrations or to discuss your specific workflow requirements.
These rules take precedence over user-provided lifecycle data and can be reordered by dragging and dropping in the Lifecycle Rules list.
The applied information is included in your FDA SBOM report, ensuring accuracy and automation.
When creating and managing alias rules:
Organization-wide benefit: Lifecycle rules apply to components across all workspaces
Rule management: All Workspace admins can view the organization's lifecycle rules regardless of their current workspace
Streamline FDA compliance: Automatically include required lifecycle information in FDA reports
Ensure consistency: Apply the same lifecycle data across your entire product portfolio
Save time: Update lifecycle information once and have it apply everywhere
Improve accuracy: Eliminate manual data entry errors with automated rules
Maintain flexibility: Easily adjust rules as product lifecycle information changes
When lifecycle rules are applied, they affect:
Existing SBOMs: All previously uploaded SBOMs will have the lifecycle information applied
Future SBOMs: Any new uploads will automatically have the rules applied
FDA SBOM reports: The lifecycle information will be included in FDA compliance reports
User-provided data: Rules take precedence over any manually entered lifecycle information
Risk assessment: Components marked as EOL/EOS are flagged as higher risk due to lack of ongoing security support
Only the Account owner can create lifecycle rules in Helm's Rules manager to streamline compliance with FDA cybersecurity requirements.
Click the Rules manager in the sidebar.
Click the Lifecycle rules tab.
In this tab, click the Add lifecycle rule button.
To set rule conditions, select the corresponding field and comparator, then specify the expected matching value. You can add one condition for each metadata field.
Each condition uses AND logic, so everything must be true for the effects to apply.
If there is an existing lifecycle rule that exactly matches your criteria, you'll be prompted to discard this pending edit or change the criteria.
Below the conditions, you can set each action you want to automatically perform when all conditions match. Select the corresponding field, comparator, and expected matching value.
For Level of support and EOS/EOL (end-of-support and end-of-life) information, you can specify either is equal to date, then select a specific date, or set it as is equal to text, then provide the respective text value.
When finished adding rules, updating rules, and/or changing rule priority, click Save & apply lifecycle rules. Note that unsaved changes will only persist during your Helm session, so make sure to save and apply anything you don't want to be discarded.
After you confirm these changes, Helm will apply them to existing and future SBOMs.
Rules are named according to the criteria specified for them, for example: [Supplier name]/[Component name]/[Version]. You cannot currently edit rule names. If this is important to you, let us know.
Lifecycle rules are applied according to their position on the rules list.
Drag-and-drop them higher to increase their priority or lower to decrease their priority.
Click Save & apply changes. This will apply any changes you have made, including adding new rules, marking rules for deletion, and reprioritizing.
Click Edit on any lifecycle rule to modify it.
Make any modifications to conditions and/or actions to perform, then click Save.
To change rule priority, click the drag icon next to the rule name to drag it to a different position in the list. Rule priority is determined by the order of the rules in the list. If multiple rules impact a component, the one highest in the list takes precedence. If you are just changing rule priority, but not marking any rules for deletion, click Save & apply lifecycle rules.
To delete a rule, click the Mark for deletion action. After marking the rules you want deleted, as well as making any priority changes, click the global Review changes button at the bottom of the rule list.
When you're finished making changes, click Save & apply lifecycle rules.
After you confirm these changes, Helm will apply them to existing and future SBOMs.
Note that unsaved changes will only persist during your Helm session, so make sure to save and apply anything you don't want to be discarded.
Deleted rules will be unapplied from existing SBOMs, and will not be applied to future SBOMs. You cannot recover a deleted rule.
Click the Rules item in the sidebar.
Click the Lifecycle rules tab.
Click Mark for deletion on the lifecycle rules you want to delete. Above the rule list, you'll see the total rules marked for deletion. If you change your mind for a rule, click Unmark for deletion.
If you need to change priority of any rules as a result of these impending deletions, drag-and-drop the respective rules higher or lower in the list.
Click Save & apply changes button. This will display a confirmation panel showing the impact of your potential deletions across your portfolio.
If you are deleting the only rule you have, you will be prompted to confirm applying all unsaved changes. In that case, you'll now see a blank rule, so that you can add more rules in the future.
Confirm your changes. You'll see a success notification that the rule will no longer be applied to existing or future SBOMs.
Rule naming: You cannot currently edit rule names. They are automatically generated based on conditions.
Rule conflicts: When multiple rules could apply to the same component, the rule higher in the list takes precedence.
Session persistence: Always save your changes before navigating away, as unsaved changes will be lost.
Verification: After applying rules, check a sample of matching components to verify the rules are working as expected.
The Vulnerabilities list provides AI-powered guidance to help you fix or mitigate vulnerabilities more effectively. Select one or more vulnerabilities, then click the Get AI guidance action in the toolbar to display a comprehensive panel with short-term and long-term mitigation strategies, including specific upgrade recommendations for each selected vulnerability. Sources are provided when viewing mitigation and upgrade recommendations for individual vulnerabilities, enabling further research and validation.
Additionally, Helm automatically detects and displays which technology stacks (Windows, Redhat, SQL, Git, GRPC, WordPress, and many more) are impacted by each vulnerability. Click these technology stack tags to open the vulnerability details modal, which includes an AI recommendations section with detailed information about affected tech stacks, upgrade recommendations, and short-term mitigations, all backed by source documentation. This beta functionality requires manual activation: click the Columns link in the vulnerabilities table, then enable the Impacted tech stacks column to view this information.
You can easily stay on top of new and updated vulnerabilities:
Get email notifications of new vulnerabilities impacting your software supply chain.
Identify those with available exploits or malware kits.
Patch Windows vulnerabilities with suggested Windows KB updates
Stay updated with the latest insights from the National Vulnerability Database (NVD) and various other data sources, including cve.org and osv.dev.
To ensure you're focusing on the most exploitable vulnerabilities:
Rescore all vulnerabilities across a product version
Use AI guidance to get tailored mitigation strategies and upgrade recommendations
Once you've rescored your vulnerabilities, filter down on those that have a combination of high CVSS scores with high exploitability (EPSS) scores and that have exploits or threats.
You can filter on the following exploit and threat information for vulnerabilities that:
are on the CISA KEV list
are in the Exploit Database
have a Metasploit toolkit available
meet the criteria of the top 25 CWE list
have a particular EPSS threshold: Enter a number, such as 80, into the EPSS filter. This will return any vulnerabilities with an EPSS score of 80% or above.
Bulk remediate vulnerabilities within a product, across products, or target a particular component's vulnerabilities with the click of a button, enabling you to speed triage and ensure remediation consistency of particular vulnerabilities across your product portfolio.
If you’ve previously assessed a vulnerability, you can turn on the Date updated column to see whether there have been any updates.
If you've turned on vulnerability email notifications, Helm will automatically send you emails whenever there is a new vulnerability.
IMPORTANT: If you have a Matched status that does not have an NVD badge, this has not been matched in the NVD, which means that it either does not have vulnerabilities or has a different name in the NVD. Refer to Resolve matched statuses for more information. You must identify an exact match in the NVD in order to see vulnerabilities for that component.
View your account and access assigned workspaces within that account.
Access your profile, including enabling new vulnerability notifications
View and interact with breadcrumbs, where you can view or switch workspaces, select products and product versions, and understand at a glance where you are in Helm.
Click the sun/moon icon to change themes.
Search within your vulnerabilities or your SBOMs, as detailed below
Sign out
There are two components to the Account drop-down section in the main nav bar:
[Company name] drop-down: Check who your org owner is, as well as get their contact information.
[Workspace name] drop-down: View current workspace and switch to another.
All data you see in Helm is scoped to your current workspace:
Dashboard metrics reflect only your current workspace
Product and version lists show only items from your current workspace
Search results include only data from your accessible workspaces
Reports generate for products within your current workspace
User permissions apply within the workspace context
If you need to work with products from a different business unit, switch to that workspace using the breadcrumb drop-down.
Each Helm page has a breadcrumb trail so that you know exactly where you are. Your Dashboard is Home, so all other page breadcrumb trails start at your selected workspace.
[Workspace drop-down] / Current page
Use the workspaces drop-down if you need to switch workspaces
After the Home item in the breadcrumb trail, you'll see your current workspace. If you have access to multiple workspaces, this will be a drop-down that you can click to switch to a different workspace.
In the Vulnerabilities page, the default view is:
All vulnerabilities: [Workspace drop-down] / All products drop-down / All versions drop-down / Vulnerabilities
Select a product and version from the drop-downs to drill down to a particular version.
In the Products (SBOM) page, the default view is:
Components for seleted product: [Workspace drop-down] / Selected product drop-down / Selected version drop-down / Components
Select a product and version from the drop-downs to drill down to a particular version. You can also create new products and versions from their respective drop-downs.
Administration breadcrumbs
The Org owner and Workspace admins can access Administration, where they can manage users and workspaces.
Breadcrumb trail: The Workspace drop-down will automatically switch to All workspaces for Org owner and Workspace admins with an admin role in multiple workspaces. This cannot be while you are in Administration, but you will be returned to your default selected workspace when you go to another page.
This enables you to see all users and all workspaces, so that you can add existing users to workspaces.
You can filter in the Users tab or drill in on a particular workspace in the Workspaces tab.
View your company, currently selected workspace, and role within that workspace
View your current org owner
Access your profile, where you can enable email notifications for new vulnerabilities
Sign out
Share deep links to particular Helm pages with colleagues.
You can access any main page in the sidebar, including:
Products (SBOMs): View all components for the selected product and version.
Vulnerabilities: View all vulnerabilities across all products or a selected product version.
Global search discovery:
: Download our API SDK, then automate many SBOM and vulnerability management tasks.
Reports: Our suite of , including , , and our ensures you'll be ready for your FDA submission.
Administration: Manage , , and .
Help: Provides paths to get you started:
Documentation: Access this Helm help center at any time.
View our latest changelog with tons of great new features to automate your cybersecurity risk management.
Choose between our dark or light theme. To switch themes, click the sun/moon icon in the main navigation bar.
Depending on the page you are on or the view you have selected, you may see a table or a list of cards.
Product/version selection bar: You can upload your SBOM, specifying the product and version within your current workspace that you want to associate this SBOM with. You can then switch between SBOMs by selecting the appropriate product and version within your workspace.
Filter bar:
Filters drop-down:
or your within your current workspace to quickly drill down to exactly the information you need.
Workspace admins and org owners can also filter users in Administration.
Refresh/Auto-refresh: Depending on the page you are on, you may have the option to set the auto-refresh frequency or to manually refresh.
If Auto-refresh is on, you cannot manually refresh. To turn this off, click Auto-refresh, then disable it.
Global search: In the main nav bar, you can s (Vuln ID) or on (SBOM) in the global search box in the top navigation bar.
Depending on the page you are on, you will see contextual action links and buttons, some of which are drop-downs.
Take control of how you view and interact with data. You can adjust table column visibility, perform multi-sorts, and choose your preferred display density.
Content refresh setting: Take charge of your data updates by setting auto-refresh intervals or turning it off entirely. You can also refresh manually refresh.
Pagination: Navigate large datasets with ease using our new pagination feature, ensuring you don’t lose your place.
Hide or show columns: Click the Columns link to toggle on/off specific columns. If you want to hide a particular column that is already displayed, you can also hover over each column header to display a ... icon. Click this, then select Hide column.
Customizable columns: Tailor your tables to display exactly what you need. Use the Columns link to show or hide specific columns and hover over column headers to drag and drop them into your preferred order with the … icon.
Change column order: Hover over each column header to display a ... icon. Click this, then select Move right or Move left to order columns exactly how they work best for you.
Multi-column sorting: Click the Sort fields link at the top of each table to apply complex sorts across multiple columns.
Column sorting: Sort columns in alphabetic or reverse-alphabetic order. Hover over each column header to display a ... icon. Click this, then select Sort A-Z or Sort Z-A.
Flexible display density: Optimize your view by selecting a compact or expanded display mode and adjusting the number of rows per page to suit your preferences.
Advanced date picker: Gain precise control over date filtering with options for absolute/relative dates, custom ranges, and multi-month views.
If you don't see particular columns, that means that they are currently hidden by default. You can customize your view to show only the data you want, nothing you don't — enabling you to stay focused on what matters most. Click the Columns link in the top of the components or vulnerabilities table to see which columns are available, then toggle on/off columns to display only the ones you need. For example, if you need CVSS v2 scores, just toggle on this column.
Feed vulnerability data into AWS-based SIEM systems
Create custom analytics dashboards using AWS services
Maintain compliance audit trails in AWS
Integrate with existing AWS security workflows
Backup vulnerability data for long-term retention
Before getting started, ensure you have:
AWS Account ID (12-digit identifier)
IAM Role ARN with S3 permissions
S3 bucket name for storing vulnerability data
Provide your AWS account ID, Role ARN, and S3 bucket name, then click Continue.
Create or select the products and versions for which you'd like to send vulnerability data to AWS. You can always come back and configure this later.
Select the triggers for each version of each product. This will send vulnerability data to AWS based on those triggers, such as particular severity levels, exploit sources, new vulnerabilities, remediations, and more. You can always come back and configure this later.
Trigger types will likely include the following, but specific trigger options will be detailed when the integration is released.
Severity-based triggers: Export vulnerabilities above certain severity thresholds
Exploit-based triggers: Export when exploit code becomes available
New vulnerability triggers: Export newly discovered vulnerabilities
For each selected product, provide the S3 path to store vulnerability data in. You can always come back and configure this later. but you'll need to provide these before the integration can be enabled.
Review your configuration and complete any necessary steps.
Click Deploy integration to activate the integration with AWS. Helm will validate connectivity to your S3 bucket.
Once deployed, you can:
Monitor exports: View export history and success rates in the AWS integration dashboard
Modify configuration: Add or remove products, update triggers, change S3 paths
Pause/Resume: Temporarily disable exports without losing configuration
You can update your configuration at any time:
Add or remove products and versions
Modify trigger criteria
Change S3 paths or bucket destinations
Update AWS credentials or roles
Data privacy: Only vulnerability metadata is exported - no sensitive application code or internal details are transmitted.
Encryption: All data transmission uses AWS standard encryption in transit, with files stored using server-side encryption in S3.
Access control: Access is controlled through your AWS IAM policies and S3 bucket permissions.
Authentication: Secure authentication uses AWS IAM roles and policies.
This integration will incur standard AWS charges for:
S3 storage costs for vulnerability data
S3 PUT requests for file uploads
Data transfer costs (typically minimal)
One-way export: This integration only exports data from Helm to AWS - remediation actions must be performed in Helm
S3 only: Currently supports S3 export only - other AWS services are not directly supported
Trigger dependency: Data is only exported when configured triggers are met - historical data export is not automatic
No real-time sync: Exports occur on a scheduled basis, not in real-time
Automatic data export: Vulnerabilities are automatically sent from Helm to AWS S3 based on your configured triggers.
Flexible triggers: Configure exports based on severity levels, exploit sources, new vulnerabilities, remediations, and more.
Scheduled synchronization: Regular exports keep your AWS data current with minimal manual intervention.
Custom S3 paths: Organize exported data using your preferred S3 bucket structure.
Trigger-based export: Only export the vulnerability data you need based on your specific criteria.
Organization:
Use consistent S3 path naming conventions across products
Group related products in similar path structures
Implement S3 lifecycle policies for old vulnerability data
Trigger configuration:
Start with broader triggers and refine based on data volume
Configure appropriate trigger frequencies to avoid overwhelming S3
Monitor trigger effectiveness and adjust as needed
AWS management:
Regularly review AWS costs associated with S3 storage and requests
Use S3 transfer acceleration for large data volumes
Monitor S3 access logs for security purposes
Integration fails during setup:
Verify AWS account ID and role ARN are correct
Check IAM permissions include required S3 actions
Ensure S3 bucket exists and is accessible
No data being exported:
Review trigger configuration for your products
Check if products have vulnerabilities matching your triggers
Verify S3 paths are valid and don't conflict
Export failures:
Monitor S3 bucket permissions and policies
Check AWS service limits and quotas
Verify network connectivity to AWS services
Component scope: All match statuses and resolution work applies to components in your current workspace
Match sources: Matching draws from organization-wide sources (NVD, package managers, aliases)
Alias benefits: Aliases created by admins benefit all workspaces organization-wide
Workspace isolation: Component matching work in one workspace doesn't affect other workspaces' components
This status means the component has an exact match with software listed in the National Vulnerability Database (NVD). This means there was an exact match for your component in the NVD, and that it has associated vulnerabilities, so you can start prioritizing and remediating these risks.
This status shows that a component is matched to a package manager but is not found in the NVD, thus it will not show any vulnerabilities. Note that sometimes package managers might use different names or PURLs than the NVD, so you should check the NVD to make sure your component isn’t listed under a different name. Refer to Match or rematch components for more information.
If matched to a package manager Package URL (PURL), it will have a badge of the package manager, such as Cargo, PyPI, NPM, or NuGet.
The Matched status with an ALIAS badge indicates that a component was matched according to an alias rule. Refer to Match or rematch components for more information.
Matched to CPE: If you see a component that has a Matched status with an NVD badge and CPE badge, that means that there this component has at least one vulnerability that has been reported in the NVD. A CPE is only assigned to software when a vulnerability has been reported in the NVD. Refer to Match or rematch components for more information. CPE is considered the strongest match.
Matched to name: The Matched status with a NAME badge indicates that the component name/version/supplier combo exactly matches a known component name/version/supplier combo.
Matched by user: The Matched status with a USER badge indicates that this was manually matched by a user on this account. If the user created an alias rule while matching, it will be considered an Alias match.
This status indicates that Helm has found multiple potential matches using identifiers like CPE, PURL, alias, or name. You can click the badge or the primary action link to review and assess the suggested matches. Refer to Resolve match statuses for more information.
The Not found status will show which sources were searched. This indicates that the component does that match any known software in the NVD or supported package managers. Refer to Resolve match statuses for more information.
Administrators can create alias rules to match any components in your SBOM that have multiple matches or are unmatched to known software components in the NVD.
Scanning: This is an interim status that indicates that Helm is processing this match. If you have been waiting and haven't seen this update, try refreshing the page.
Fix version: The software version provided for this component does not match the expected version. This issue should be rare. If you see this, you will also see a warning icon next to the version. Refer to Resolve match statuses for more information on resolving this issue.
Contact us: Helm was unable to parse this version. We have logged this issue and will work to resolve it quickly. Refer to Resolve match statuses for more information on resolving this issue.
Error: Some other error occurred while trying to parse this component. for help in resolving this issue.
If the component has a correct CPE or PURL identifier but incorrect supplier information, our system will add an Enriched CPE or Enriched PURL field, to preserve your original data. If we're able to identify a CPE or PURL for your component that is missing in your SBOM, we'll automatically add that to these fields for you to ensure a unique match.
Helm checks CPE and PURL IDs to determine if a component is unique. If a duplicate is detected, it will automatically be removed to streamline your SBOM management.
IMPORTANT: If you have a Matched status that does not have an NVD badge, this has not been matched in the NVD, which means that it either does not have vulnerabilities or has a different name in the NVD. Refer to Resolve matched statuses for more information. You must identify an exact match in the NVD in order to see vulnerabilities for that component.
You can assess these KBs on your physical test devices, or you can apply them here to understand which vulnerabilities applying them will fix, before starting the physical testing. This will give you a clearer understanding of your overall current risks and an accurate digital record of your device’s current state, and will enable you to quickly answer the question of whether your business is at risk for a particular vulnerability, as well as to confidently communicate recommended patched for your customers to apply, providing you and your customers a clear understanding of your overall current risks.
To apply KBs:
In the Products (SBOM) page, click the Apply Windows KBs action link next to the Manage SBOMs drop-down button. This will display the Apply Windows KBs modal. This enables you to keep your Windows KB patching in Helm aligned with your internal Windows KB testing and recommendations to your customers.
Copy and paste the KBs into the KBs to apply list box. Make sure all values are separated with a comma. If you’re pasting from a spreadsheet, you can use the JOIN function in Excel or Google Sheets. This uses the Google Sheets example: JOIN(“,”, A2:A20), where cells A2-A20 contain the patch (KB) numbers you want to comma separate. Copy and paste that calculated string directly into the Patches (KB) field. Any patch (KB) number that is comma-separated will automatically be converted into a chip. Note that you do not need to include the “KB” in front of the Windows patch (KB) numbers, but if you do, our system will strip those out.
If there are already KBs applied, they display in the box to the right, KBs already applied. You can remove any erroneously applied KBs from here in order to keep your device version aligned with your ideal patch recommendations to your customers.
Click Apply changes. This will add the new KBs to this product version. If you removed any KBs, they will be removed. We do not do any validation on these KBs beyond numeric value validation, as there could be non-security related KBs that you have applied, or the KB could have been released after we’ve performed a daily sync with the Windows sources we use to extract updated KB information.
After applying KBs, you’ll see a success message letting you know which KBs were applied, as well as how many vulnerabilities they resolved.
Once you've patched Windows vulnerabilities, you'll still need to.
In the Vulnerabilities table, for Windows vulnerabilities, you'll see an update indicator next to the Vuln IDs that can be resolved by applying a Windows KB.
Once you’ve determined which KBs you need to apply to resolve a vulnerability, click the KB indicator next to the Vuln ID. This will display the Resolve panel.
In this panel, you'll see a list of suggested KBs. The top one is the one that is most recently released and contains the most rollups of the subsequent KBs. You can click each KB link to go to the Microsoft MSRC site to determine which KBs matches what you are applying to your physical test device to align your digital digital twin record accordingly.
Click Resolve with selected KB when you've chosen which KB you want to apply. You’ll see a success message letting you know which KB was applied, as well as how many and which vulnerabilities it resolved.
Next to the Vuln ID, the row will be grayed out to indicate that a KB has been applied. You can hover over this to see what KB was applied to resolve this vulnerability.
Once you've patched a Windows vulnerability, you'll still need to.
No matter how accurate and timely the patching recommendations you make to your clients are, some customers won’t patch up to the recommended level.
To manage multiple patch levels:
Export your current SBOM from Helm before you start applying KBs.
Upload your SBOM again, modifying its name slightly, such as SBOM_productname_v1.2 to SBOM_productname_v1.2.1.
In this new version, you can then apply the Windows KB patching that matches what you’re applying to your physical test devices. This will enable you to track your device’s vulnerability level at various patching levels, enabling you to provide the requisite proof to the FDA that you are proactively managing risk levels across all devices.
In the sidebar, click the Vulnerabilities item.
Select one or more vulnerabilities you want to review.
Click the Get AI guidance button in the toolbar.
Wait for the AI analysis to complete. If you haven't generated AI guidance for these vulnerabilities before, this may take a few minutes.
Review the comprehensive guidance panel that appears. The AI guidance panel provides:
Short-term mitigations: Immediate workarounds and temporary fixes
Long-term solutions: Permanent fixes and remediation strategies
Specific upgrade recommendations: Exact versions and components to upgrade
Source documentation: Links and references for validation and further research
This feature is currently in beta.
In your Vulnerabilities list, click the Columns link at the top of the table.
Enable the tech stack tags column.
Click Filters in the toolbar to display all available component filters.
In the Tech stack section, select the tech stacks you'd like to check in the Impacted tech stacks filter. You can also check for explicitly Not impacted tech stacks, but these are less common.
In the Affected tech stack column, you'll see orange warning badges with the name of the affected tech stack, or gray badges if the tech stack is explicitly listed as not affected in the sources we've referenced. If there are multiple affected tech stacks, click the X tech stacks badge to get aggregate information on how to mitigate these affected tech stacks.
Scroll down to the AI recommendations section of the modal that displays.
Review detailed information about:
Affected technology stacks
Stack-specific upgrade recommendations
Targeted short-term mitigations
The AI system evaluates:
Vulnerability details and severity
Affected components and versions
Available patches and updates
Technology stack context
Industry best practices
Immediate actions: Steps you can take right away to reduce risk
Upgrade paths: Specific version updates that address the vulnerability
Configuration changes: Security settings that may mitigate the issue
Alternative solutions: When direct fixes aren't available
Start with high-severity vulnerabilities for maximum impact
Validate recommendations using the provided source documentation
Consider your environment when implementing suggestions
Test changes in non-production environments first
Group similar vulnerabilities when requesting AI guidance
Prioritize based on exploitability and business impact
Track implementation progress in your issue management system
Document decisions for future reference
Beta feature: Technology stack detection is still being refined
Source validation: Always verify recommendations against official documentation
Environment-specific: Some recommendations may not apply to all environments
Update frequency: AI recommendations reflect information available at the time of generation
Check permissions: Ensure you have access to vulnerability details
Verify selection: Make sure you've selected at least one vulnerability
Refresh the page: Try reloading if the button doesn't appear
Enable the column: Make sure "tech stack tags" column is enabled
Clear cache: Try clearing your browser cache if tags don't appear
Check source documentation: Review the provided sources for context
Consider your environment: Recommendations may need adaptation for your specific setup
Contact support: Report issues to help improve AI accuracy
If you encounter issues with AI vulnerability guidance:
Check that you have appropriate permissions to view vulnerabilities.
Contact support with specific examples of unexpected behavior.
The AI guidance system continuously learns and improves based on user feedback and new vulnerability intelligence.
Component hash information: If your SBOM contained any component hashes when uploaded, that information was retained and will be exported intact to any SBOM report.
Product selection: The dropdown shows only products from your current workspace
Cross-workspace reporting: To include products from multiple business units, you'll need to generate separate reports from each workspace
Data scope: All report data (vulnerabilities, components, SBOMs) reflects only your current workspace
Consolidated reports: Multiple product versions can be selected within the same workspace for consolidated reporting
Permissions: Your ability to export specific report types depends on your role permissions within the workspace
To start running reports, click the Reports item in the sidebar.
Make sure that you have a product and at least one version selected, which will enable you to access the reports, providing that you have the appropriate permissions for them.
Click the Export button. Depending on the report, you may be prompted for additional configuration information.
Disabled reports:
If a report is disabled, make sure that you have a product and at least one version selected, which will enable you to access the reports, providing that you have the appropriate permissions for them.
If you still see these report "cards" and buttons grayed out (disabled), that means that you do not have permissions to export that report. Hover over the disabled button to see what you have. Contact your administrator if necessary.
Medcrypt FDA SBOM: This is the only SBOM that ensures you meet FDA requirements, specially crafted by our team of FDA experts to help ensure a successful FDA submission. You will need to have both SBOM and vulnerability access for this product version to export this report.
CycloneDX SBOM: Exports an enriched version of your SBOM in CycloneDX JSON format, including any CPE/PURL matching data that was identified through automatic or manual matching, or that you specified manually, as well as vulnerabilities and license data. You will need to have SBOM access for this product version to export this report, and also vulnerability access to export it with vulnerabilities. Note that although you can import in CycloneDX 1.3, 1.4, or 1.5, Helm currently exports in only CycloneDX 1.4 — let us know if we need to prioritize other support.
SPDX SBOM: Exports an enriched version of your SBOM in SPDX format, including any CPE/PURL matching data that was identified through automatic or manual matching, or that you specified manually, as well as vulnerabilities and license data. You will need to have SBOM access for this product version to export this report, and also vulnerability access to export it with vulnerabilities.
SBOM CSV: Exports an enriched version of your SBOM, including any CPE/PURL matching data (that was identified through automatic or manual matching, or that you specified manually), as well as license and lifecycle data. You will need to have SBOM access for this product version to export this report.
: Export your Vulnerability Disclosure Report (VDR), containing all SBOM and vulnerability data, including analysis and remediation plans for all of your product's vulnerabilities. Offering comprehensive insights into identified vulnerabilities, these reports equip you with proactive mitigation strategies, bolstering your defense against emerging threats. You will need to have both SBOM and vulnerability access for this product version to export this report.
: Export your Vulnerability Exploitability eXchange (VEX) report to easily and confidently report on exploitability and potential impact for all vulnerabilities that have a VEX status. You will need to have both SBOM and vulnerability access for this product version to export this report.
Vulnerabilities CSV: Export all of your vulnerabilities in CSV format. You will need to have vulnerability access for this product version to export this report.
Each report you run represents a snapshot in time. Users with the appropriate permissions can retrieve a previously-run report at any time from the Report history tab. Click the Download button to download a particular report.
If you need to generate reports for products in different business units:
Switch to the target workspace using the breadcrumb dropdown or account menu
Navigate to Reports and select the appropriate products
Generate and download the report
Repeat for additional workspaces as needed
You can view details about a component, including its licenses, how it was matched, and any review information. In the Software Bill of Materials (Products) page, select Actions ... > Manage component to modify component details.
The Manage component panel includes information on the product the component is in, the component itself and how it was matched, as well as its lifecycle and license information, and any review details. components table, select Actions ... > Manage component to modify component details.
Product name: This is your product name.
Product version: This is your product version.
Component name: This is the component (dependency) name (e.g., firmware, software, framework, library, file, operating system, etc.) that is installed on the physical representations of your device (e.g., Windows, OpenSSL). This is the component name from your SBOM.
Version: This is the version for this component name (e.g., 10.1 for Windows) from your SBOM.
Supplier: This is the organization that supplied the component. The supplier may often be the manufacturer, but may also be a distributor or repackager (e.g., Microsoft for Windows). This is the component supplier from your SBOM.
Helm will automatically update and enrich your component's CPE or PURL if we are able to detect or derive a more precise match. You can if you require exact matches to the CPEs or PURLs you provide.
Enriched CPE: If Helm's AI copilot locates a match or a more precise match for your component's CPE, it will automatically populate that information into the Enriched CPE field for that component. If you already had a CPE, that is still retained in the Original CPE field.
Incomplete CPE: Helm will interpret incomplete CPEs (with at least 5 of the possible 13 segments of a CPE), Helm will now fill in missing CPE segments with a wildcard (*).
Enriched PURL: If Helm's AI copilot locates a match or a more precise match for your component's PURL, it will automatically populate that information into the Enriched PURL field for that component. If you already had a PURL, that is still retained in the Original PURL field.
This information will be included see this information in the components table in now export this enriched info for any FDA reports that include SBOM components, including your enriched SBOM, FDA SBOM, or VDR report.
This is how Helm matched or attempted to match your component.
Match status: This shows the current , as well as what were matched on.
Vuln source: This is the source where we located this component. This is currently always NVD. If it was not in the NVD, it will show a badge.
Matched by:
When building a new device, you can ensure that your component is actively maintained or prioritize upgrading to a more stable version. When updating devices in the field, you can prioritize upgrades for components that are nearing end-of-support or end-of-life. This will help you ensure that the stability and security of your device throughout its lifecycle.
This information will also be populated into your or .
Level of support: Specify whether the component is actively maintained or not. You can specify a date or text value.
EOS/EOL: Provide an EOS or EOL date or other text value.
to automatically update lifecycle information for particular component criteria across products in the Rules manager.
The License details section displays comprehensive license information for each component. Helm supports ingestion of licensing information from CycloneDX and SPDX SBOMs and enriches this information via partnership integration with Tidelift. Refer to for more information.
License information fields
License type: This field is populated from the license information in your SBOM and can be one of the following:
License expression: For components combining multiple SPDX licenses with AND or OR, or using a SPDX license exception
Individual licenses: If your SBOM component contains multiple SPDX licenses that are not combined with AND or OR (or +) or if your component has custom licenses
No license (NONE in SPDX)
For components with "No license" or "Unknown" status, Helm automatically attempts to identify and add license information for open-source components that have unique PURLs, using data from Tidelift partnership integration.
Helm will detect and automatically enrich missing licenses for any new SBOM components that do not have any license associated with them. You can also have Helm automatically add license information for your existing components.
For any component that you want to enrich with license information, click Actions > Reload component.
You'll be prompted to confirm this reload, as it will discard any metadata (e.g., review information, match status, associated vulnerabilities, etc.). This will then re-identify associated vulnerabilities, so you may see some discrepancy in your number of vulnerabilities for that component. This reduces your manual effort of tracking down licensing information, ensuring you have the latest license information available from our data sources.
This shows the last review added for this component. You can also add your own review or view all review information.
Review status: Shows whether the component has been reviewed or needs to be reviewed. You can click this badge to set a new status.
Last reviewed on: Shows the last time a user reviewed this component.
Last reviewed by: Shows who last reviewed this component.
Last review: This is the last review note made on this component to inform the team or progress, final status, or critical risk.
This topic covers managing component details, but all other component actions are available from the Actions column of the components table.
On the component you want to edit, click Actions ... > Manage component.
Click Edit on the section you would like to edit. Note that you cannot edit the Match details section.
If you edit fields in the Component details section, then save your changes, you will be prompted to reload this component. Note that this will assess the component anew, which will lose any previous metadata, including matching, EOS/EOL, licensing, or review information that you have manually added.
Click Actions > Remove (Delete) component. You will be prompted to confirm, as you cannot recover deleted components. This will only delete this component from this product version.
You can rescore vulnerabilities at multiple levels according to your product's security posture, ensuring you're focusing on the most exploitable vulnerabilities:
Bulk rescore selected vulnerabilities across your entire product portfolio (multiple products and versions)
Bulk rescore all vulnerabilities within a single product version
Bulk rescore vulnerabilities across selected components within a product version
Toggle on auto-update to automatically rescore vulnerabilities that have exploitability and fixability changes across any of these rescoring levels
Rescoring vulnerabilities allows you to align CVSS 3.x scores with the specific needs of your product's environment and usage, ensuring your vulnerability management process is both efficient and effective, and that you stay focused on resolving the vulnerabilities that matter most to your company, patient safety and your bottom line.
Unlike upgrading to a new version of applying a patch, rescoring does not require you to .
Key reasons to rescore:
Focus on most exploitable issues: Identify and address the most exploitable and impactful vulnerabilities based on its fixability, report confidence, and the impact it will have on your overall infrastructure.
Save time and minimize effort:
Automate exploitability and fixability updates, reducing manual tracking and human error. If there is any change to the metrics of Exploit Code Maturity, Remediation Level, and/or Report Confidence, your vulnerabilities will be automatically rescored based on this updated data.
You can now select multiple vulnerabilities across different products and versions, then bulk rescore them with consistent Temporal and Environmental scoring parameters.
From the Vulnerabilities view, select the vulnerabilities you want to rescore across your product portfolio. You can select vulnerabilities from different products and versions.
Click Rescore X vulns (where X represents the number of selected vulnerabilities).
In the Rescore panel, specify a profile name and description for this bulk rescoring operation.
Click the Temporal score
You can rescore all CVSS 3.x vulnerabilities across a product version.
In the product/version selection bar, click the Rescore drop-down link > Rescore all vulnerabilities. This will display the Rescore panel.
Specify a profile name and description.
Click the Temporal score section to expand it.
Select any Temporal metric values you'd like to apply across the product version.
You can select multiple components within a product version and rescore all vulnerabilities associated with those components.
From a specific product version's Vulnerabilities view, select the components whose vulnerabilities you want to rescore.
Click Rescore all vulnerabilities for the selected components.
In the rescore panel, specify a profile name and description for this component-based rescoring operation.
Click the Temporal score section to expand it, then select the appropriate metric values you'd like to apply to all vulnerabilities in the selected components.
You can individually rescore any vulnerability. If you've already , this individual rescore will override the custom rescore for that vulnerability. The last change made to a vulnerability — whether by a custom rescore global change or by an individual vulnerability rescore — will take precedence.
In the product/version selection bar of Vulnerabilities, you'll see a Rescore action link.
Expand the Temporal score section, then modify the appropriate metric values.
Expand the Environmental score section, then modify the appropriate metric values. You'll see the rescored value display in both the Temporal and Environmental sections, as well as in the summary information below these sections.
Speed up your vulnerability remediation process by importing existing remediation statuses from another product version. The import remediations feature allows you to carry forward CycloneDX and VEX remediation statuses from a source product version to your target product version, helping you avoid duplicate remediation work. Importing remediations helps maintain consistency across product versions while reducing the time needed to assess and remediate vulnerabilities.
You can import remediations in two ways:
Import for specific vulnerabilities: Select vulnerabilities first, then import remediations only for those selected items from the source version you select.
Import all available remediations: Import remediations for all previously remediated vulnerabilities from the source version you select.
Both approaches allow you to select which vulnerability remediations to carry forward and provide real-time feedback during the import process.
Use this approach when you want to import remediations for specific vulnerabilities you've already identified.
On the Vulnerabilities page, select the vulnerabilities for which you want to import remediations by checking the boxes next to each vulnerability.
Click Import remediations.
In the Import remediations modal, select the source product version from which you want to import remediation statuses.
Review the vulnerabilities table, which displays shared vulnerabilities between your selected items and the source version:
Use this approach to import remediations for all previously remediated vulnerabilities from another version.
On the Vulnerabilities page, click Import remediations without selecting any specific vulnerabilities.
In the Import remediations modal, select the source product version from which you want to import remediation statuses.
Review the vulnerabilities table, which shows all vulnerabilities that have been remediated to any status in the source version:
After clicking Apply x remediations, the import process begins:
A processing modal displays with a progress bar showing the import status
You can close the processing modal at any time - the import will continue in the background.
When you close the modal, you'll see a processing indicator in the filters toolbar
A toast notification confirms that remediations are being applied
While remediations are processing, avoid closing or refreshing your browser page. The system will notify you when the process is complete.
After the import completes, you can see the imported remediations reflected in:
CycloneDX status column: Shows updated CycloneDX remediation statuses
VEX status column: Shows updated VEX remediation statuses
The imported statuses will now appear for the selected vulnerabilities in your current product version.
Choose the source version with the most shared vulnerability remediations: Select a source version that shares the most vulnerabilities with your target version for maximum efficiency.
Review before applying: Always review the vulnerabilities and statuses before confirming the import.
Monitor progress: Keep track of the processing indicator to know when the import is complete.
Verify results
This feature is in beta. Let us know your feedback and what we can do to enhance this experience!
You can upload CSV and Excel files directly to Helm and have them automatically converted to a CycloneDX SBOM. This eliminates the need for manual conversion tools or scripts.
Click the Upload SBOM button.
In the modal that displays, specify a product name and version.
In the SBOM type drop-down, select Document.
Select or drag and drop a file in the SBOM file field.
Click Generate CycloneDX SBOM.
Preview your data before uploading. Review the component information to ensure everything looks correct and catch any formatting issues.
Click Upload to convert and import your SBOM.
Once imported, your SBOM will be ready for vulnerability analysis and remediation, and can be exported in , plus our . You can also export .
To keep track of various versions of your SBOM and to ensure that your SBOM is accurate for each product release to meet FDA requirements and protect your customers and their patients, you should create a new version of your SBOM whenever your team:
Updates the device or application
Adds or removes a component or changes a component version
Adds one or more Windows KBs to a device version
Adds a Windows KB to a vulnerability
Upgrades the version of a component
This will help ensure your readiness for your pre-market FDA submission, while ensuring that customers post-market understand whether they are affected by vulnerabilities associated with a particular version of your product. Refer to for more information.
By having an SBOM that represents the current state of your product, you now have a catalog of all of your “ingredient lists”, creating visibility and transparency across your software security supply chain and ensuring that your software is updated and patched on a regular basis. You can then quickly identify any potential exploitable vulnerabilities you need to assess and mitigate.
SBOMs are a critical component for operationalizing software supply chain security; they are key building blocks in your software supply chain cybersecurity programs. SBOMs act like a list of ingredients for the software that makes up applications. You may call these individual software “components” or “dependencies”. Helm enables you to provide transparency to your own company, your auditors, and even your customers, depending on your company policies, on your software supply chain, ensuring that stakeholders are aware of otherwise invisible dependencies on proprietary, open source and licensed, Commercial Off-the-Shelf (COTS) libraries.
Our SBOM vulnerability management product integrates data from multiple sources to ensure you have the most comprehensive and up-to-date information, including frequency of updates. By integrating these sources, our SBOM vulnerability management product ensures you are well-equipped to manage and mitigate risks effectively.
Time-based triggers: Export vulnerabilities discovered within specific timeframes
Vuln ID: The vulnerability identifier
CVSS v3: The CVSS v3 base score (CVSS v2 is hidden by default but can be displayed)
Rescore: Your custom rescore for this vulnerability
Exploitability: Exploitability assessment information
EPSS: Exploit Prediction Scoring System likelihood
CycloneDX status: Current CycloneDX remediation status
VEX status: Current VEX remediation status
Actions: Contains a Details button to open the vulnerability details modal
Select the remediations you want to import by checking the boxes next to each vulnerability. You can only select whole remediation statuses (not individual status types like CycloneDX only).
Click Confirm import of x remediations.
In the confirmation modal, click Apply x remediations to proceed. This will display a processing modal, as detailed in Processing and completion.
CVSS v3: The CVSS v3 base score (CVSS v2 is hidden by default but can be shown)
Rescore: Your custom rescore for this vulnerability
Exploitability: Exploitability assessment information
EPSS: Exploit Prediction Scoring System likelihood
CycloneDX status: Current CycloneDX remediation status
VEX status: Current VEX remediation status
Actions: Contains a Details button to open the vulnerability details modal
Select the remediations you want to import by checking the boxes next to each vulnerability.
Click Confirm import of x remediations.
In the confirmation modal, review your selection and click Apply x remediations to proceed. This will display a processing modal, as detailed in Processing and completion.
A toast notification informs you when all remediations have been applied
Open-source libraries.
Plug-ins, extensions, and add-ons
Custom source code created in-house
Information about versions, licensing status, and patch status of components
SaaS: Third-party services and API information required to run the SaaS application.
SBOMs are critical to realizing a better and more secure future for your company, your customers, and their patients. It is the latest step in the path to ensure that through making your software dependencies visible, you can then manage vulnerabilities of this software, ensuring that you are focusing on the highest-risk and most critical vulnerabilities first. Per the FDA, it’s no longer sufficient to rely on “security through obscurity”, as medical device manufacturers, you need to take responsibility and realize your pre-market and post-market liability for insecure software being used in your devices and systems, which are then passed down to customers and patients.
Over the past few years, there have been a number of high-profile software supply chain attacks. Today’s connected devices rely on many software libraries, including home-grown, third-party, and open source projects. As a result of the pandemic, there have been a number of business-critical supply chain shortages, which have forced device and product manufacturers to expand outside their network of trusted suppliers, adding another layer of risk to the software supply chain. Here are a few of the more recent and most impactful attacks, although there are many more:
In 2020, the SolarWinds attack on the software supply chain has a deep and lasting impact on the US governmental infrastructure and many companies across the US, Europe, Asia, and the Middle East, as IT networks were hacked by intruders over a months-long operation against SolarWinds, which supplied the hacked companies with a network monitoring and management platform. It cast a sobering spotlight on the extent to which medical device manufacturers know about the software that is used in their devices.
In 2021, a critical remote-code execution vulnerability was discovered in the ubiquitous Apache Log4j open-source Java logging library. Its widespread usage combined with its ease of exploitation for even inexperienced hackers makes it especially dangerous, putting any Java applications with a user interface at risk of a Log4Shell attack. It made the risk inherent in using open source components in devices painfully clear. Systems and services that use the Log4j library include Twitter, Tesla, Apple, Minecraft, and many others.
In 2017, the WannaCry (also known as WannaCrypt) ransomware attack targeted computers running the Microsoft Windows operating system by using the EternalBlue exploit to encrypt data and the DoublePulsar tool to install and execute copied of itself, then demanding cryptocurrency payments to unencrypt the data. While Microsoft had released patches to close the exploit, many organizations had not applied these patches or were using older Windows operating systems that were past their end-of-life. According to Europol, WannaCry infected over 200K computers across 150 countries, impacting the National Health Service and a myriad of other companies.
Is my company impacted by Log4j or WannaCry?
For Log4j, you can search for “log4j” in our global search to return all components that are potentially impacted, or you can search on the vulnerability ID CVE-2021-44228. If you think you are impacted, refer to CISA's Log4j Vulnerability Guidance for more information.
For WannaCry, you can search for older Windows operating systems (e.g., Windows XP and upwards) to make sure that they have been patched. You can also search for associated vulnerability IDs: CVE-2017-0143, CVE-2017-0144, CVE-2017-0145, CVE-2017-0146, CVE-2017-0147, and CVE-2017-0148. If you think that you could be impacted, refer to CISA's WannaCry fact sheet for more information.
According to Gartner, by 2026, at least 60% of companies with mission-critical software solutions will mandate SBOM disclosures in their license and support agreements.
By having an SBOM that represents the current state of your product, you now have a catalog of all of your “ingredient lists”, creating visibility and transparency across your software security supply chain and ensuring that your software is updated and patched on a regular basis. You can then quickly identify any potential exploitable vulnerabilities you need to assess and mitigate.
SBOMs are critical to realizing a better and more secure future for your company, your customers, and their patients. It is the latest step in the path to ensure that through making your software dependencies visible, you can then manage vulnerabilities of this software, ensuring that you are focusing on the highest-risk and most critical vulnerabilities first. Per the FDA, it’s no longer sufficient to rely on “security through obscurity”, as medical device manufacturers, you need to take responsibility and realize your pre-market and post-market liability for insecure software being used in your devices and systems, which are then passed down to customers and patients.
The US government published Executive Order 14028 for Improving the Nation’s Cybersecurity in 2021, after which federal agencies were subsequently required to adopt NIST guidelines, including using SBOMs to conform with NIST secure software development practices.
Hospitals, the consumer of medical devices, are increasingly requesting a detailed SBOM as part of their Business Associate Agreements (ex. Mayo Clinic), with expectations including the device or application name, the vendor and product name based on the NIST CPE dictionary and the version, as well as who is responsible for providing and applying any software updates, how often the software will be updated, how often security patches are applied (particularly when there is a known vulnerability), whether the software is critical for the device to function, how the MDM will notify the Mayo Clinic in case of updates, and expected end-of-life date for the device or application. Due to their need to reduce operating expenses while maintaining the highest quality of healthcare, health systems like the Mayo Clinic will continue to reject supplier price increases, pass-thru taxes (e.g., the Medical Device Tax), or other loss of value. They have asked that MDMs continue to streamline processes and increase efficiencies.
You can use SBOMS to proactively understand and prevent or reduce risks, as well as to respond to incidents when they do occur.
By having an SBOM that represents the current state of your product, you can create a catalog of all of your “ingredient lists” to create visibility and transparency across your software security supply chain, as well as identifying any potential exploitable vulnerabilities you need to assess and mitigate.
If you’re doing business with the Mayo Clinic, they often request a detailed SBOM as part of their Business Associate Agreements, including the device or application name, the vendor and product name based on the NIST CPE dictionary and the version, as well as who is responsible for providing and applying any software updates, how often the software will be updated, how often security patches are applied (particularly when there is a known vulnerability), whether the software is critical for the device to function, how the MDM will notify the Mayo Clinic in case of updates, and expected end-of-life date for the device or application. Due to their need to reduce operating expenses while maintaining the highest quality of healthcare, the Mayo Clinic will continue to reject for supplier price increases, pass-thru taxes (e.g., the Medical Device Tax), or other loss of value. They have asked that MDMs continue to streamline processes and increase efficiencies.
Per the FDA guidance in Content of Premarket Submissions for Management of Cybersecurity in Medical Devices, manufacturers should be addressing cybersecurity during the design and development of their medical device, which often results in more robust and efficient mitigation of patient and operator risks. Medical device manufacturers also need to establish design inputs for their device related to cybersecurity, as well as establishing a cybersecurity vulnerability and management approach as part of the software validation and risk analysis required by 21 CFR 820.30(g). This approach should address the following:
Identification of assets, threats, and vulnerabilities
Assessment of the impact of threats and vulnerabilities on device functionality and operators/patients
Assessment of the likelihood of a threat and of a vulnerability being exploited
Determination of risk levels and suitable mitigation strategies
Assessment of residual risk and risk acceptance criteria.
Medical devices that can connect (wirelessly or hard-wired) to another device, to the internet, to another network, or to portable media (e.g., USB or CD) are more vulnerable to cybersecurity threats than devices that are not connected. The extent to which security controls are needed depends on the device’s intended use, the presence and intent of its electronic data interfaces, its intended environment of use, the type of cybersecurity vulnerabilities present, the likelihood the vulnerability will be exploited, and the probable risk of patient harm due to a cybersecurity breach. To determine whether your device is considered a cyber device, refer to the What does the FDA classify as a cyber device? section.
Per the FDA guidance in Postmarket Management of Cybersecurity in Medical Devices, due to constantly changing nature of cybersecurity risks to medical devices, manufacturers cannot completely mitigate risks through pre-market controls alone. Thus, it is critical that manufacturers implement comprehensive cybersecurity management programs and documentation consistent with the Quality System Regulation (21 CFR part 820), including complaint handling, quality audit, corrective and preventive action, software validation and risk analysis, and servicing.
Cybersecurity risk management programs should address vulnerabilities that will potentially allow the unauthorized access, modification, misuse or denial of use, or the unauthorized use of information stored, accessed, or transferred from a medical device which may result in patient harm. This program should include:
Monitoring cybersecurity information sources for identifying and detecting cybersecurity vulnerabilities and risks.
Maintaining robust software lifecycle processes, including mechanisms for:
monitoring third-party software components for new vulnerabilities throughout the device’s lifecycle
design verification and validation for software updates and patches that are used to remediate vulnerabilities, including for off-the-shelf software
Understanding, assessing, and detecting the presence and impact of a vulnerability
Establishing and communicating processes for vulnerability intake and handling.
Using threat modeling to clearly define how to maintain safety and essential performance of a device by developing mitigations that protect, respond, and recover from cybersecurity risk
Adopting a coordinated vulnerability disclosure policy and practice
Deploying mitigations that address cybersecurity risk early and prior to exploitation.
Per the FDA guidance in Postmarket Management of Cybersecurity in Medical Devices, it is strongly recommended that medical device manufacturers participate in an ISAO that shares vulnerabilities and threats that impact medical devices. Sharing and disseminating cybersecurity information and intelligence pertaining to vulnerabilities and threats across multiple sectors is integral to a successful post-market cybersecurity surveillance program.
In case you weren’t aware, Medcrypt owns an ISAO, MedISAO - we’d love to have you join us in sharing information!
As part of your cybersecurity program, FDA post-market guidance states that manufacturers should define the safety and essential performance of their device, the potential for and severity of patient harm should the device be compromised, as well as the risk acceptance criteria, all of which will enable you to quickly triage vulnerabilities for remediation and mitigation. Threat modeling is critical to helping to you understand and assess the exploitability of a vulnerability, as well as ensuring that your vulnerability remediation can reasonably control the risk of patient harm. Acceptable mitigations will vary depending on the severity of the potential patient harm.
Having a complete SBOM is critical during a data breach, enabling you to quickly detect and analyze the impacted software and to understand the impact of the data breach and which other components might be affected so that you can act quickly to limit the impact to your company, your customers, and their patients. It also helps you identify what critical areas you need to address and what to prioritize first in your cybersecurity plan.
SBOMs are very useful during the detection and analysis phase, providing visibility into what is in the software for context and details that inform the analysis. This drastically reduces wasted time spent gathering information from binary files, which is especially critical during a data breach.
By shifting the process of providing transparency to your entire software supply chain to the left, you can get requisite information from your vendors and third parties to determine their impact in your device’s particular environment. This also enables you to proactively identify necessary patching and communicate that to your customers before exploits occur.
If your SBOM is complete and accurate, your incident response team can more easily understand how an application or API works, enabling them to put an attack in context. It can also help them track down repositories and which people are involved in the project, shortening response time. If your SBOM contains information about services, such as backend connections to databases, queues, APIs, and directories, they can use this to calculate the impact of a breach while it is occurring. They can also seek out impacted or affected components or dependencies in areas that they haven’t begun investigating yet, enabling them to more quickly ensure that they’ve eradicated a particular attack.
After dealing with an exploit, you can use your SBOM in your post-mortem analysis to identify critical areas to address and what needs to be prioritized for the near and longer-term future.
Streamline your processes with scalable and repeatable custom rescores.
Maximize ROI:
Rescoring reduces repetitive manual assessment by weeks or even months, freeing engineers to focus on clinical innovation and reducing attrition.
Enables strategic risk mitigation, avoiding delays and improving product timelines.
Regulatory alignment: Meet FDA cybersecurity requirements by demonstrating proactive risk management tailored to your product's environment and usage. Ensure that you understand the impact of the recent regulatory changes included in the Patch Act, as well as the likelihood that the FDA will flag your submissions for connected devices due to cybersecurity deficits.
Increased accuracy: Tailored scoring ensures more precise prioritization and decision-making, avoiding the one-size-fits-all limitations of base CVSS scores, and the ever-evolving understanding of the flaws in the CVSS scoring system.
Click the Environmental score section to expand it, then select any Environmental metric value changes you'd like to apply to all selected vulnerabilities.
Click the Preview vulnerabilities tab to view a sample of vulnerabilities to assess how the rescoring will impact them.
Optional: Toggle the Auto-update all vulnerabilities switch. If enabled, all selected vulnerabilities will be automatically rescored whenever there are Temporal updates.
Click Save & apply to apply the rescoring to all selected vulnerabilities. You'll see a success message and updated scores in the Rescore column for each affected vulnerability.
Click the Environmental score section to expand it.
Select any Environmental metric value changes you'd like to apply across the product version.
Click the Preview vulnerabilities tab to view a sample of five vulnerabilities to assess how the rescoring will impact them.
Optional: In the Temporal section, toggle the Auto-update this vulnerability with exploitability changes switch. If you enable auto-update, the Temporal score metrics will become read-only, as they will be automatically updated based on exploitability changes. You can still individually rescore any vulnerability associated with this product, if desired. The last change made to a vulnerability — whether by a custom rescore global change or by an individual vulnerability rescore — will take precedence.
On the Save & apply button, you'll see the number of vulnerabilities associated with this product version (Save & apply to x vulnerabilities). Click Save & apply x vulnerabilities. You'll see a success message and will also see a new Rescore column with the rescored CVSS value for each vulnerability.
Click the Environmental score section to expand it, then select any Environmental metric value changes you'd like to apply to all vulnerabilities in the selected components.
Click the Preview vulnerabilities tab to view a sample of vulnerabilities to assess how the rescoring will impact them.
Optional: Toggle the Auto-update all vulnerabilities switch. If enabled, all vulnerabilities in the selected components will be automatically rescored whenever there are Temporal updates.
Click Save & apply to apply the rescoring to all vulnerabilities in the selected components. You'll see a success message and updated scores in the Rescore column for each affected vulnerability.
Upload single or multiple SBOMs.
Retrieve all vulnerabilities or filter to focus on CISA KEV vulnerabilities.
Generate FDA SBOM reports or CycloneDX VEX reports.
Identify unmatched SBOM components in your data.
Contact us to start using the Helm API. The Helm API is currently available as a Python SDK. It is in protobuf, with the API SDK providing Python bindings as well as helper bash scripts with which to call the SDK. The current API SDK version is 2.113.10.
If you need our C# SDK, it is currently in alpha mode. Contact us if you would like access to this.
Once you have received an email granting you access to the Helm API, click the Developers item in the sidebar.
Download the file below.
Before using the file, you should check that the MD5 checksum is 0bbe653125896c92db2d7b95602f66ef. If you're not sure how to do this, this source can be helpful.
Because our API documentation is hosted on Gitbook, you will see an interim page that Gitbook is verifying the safety of this file -- this page unfortunately does not go away, but your file will complete downloading successfully.
Once you have been granted access to the Helm API, you'll need to download our API SDK, then generate your API key to make calls to the API.
The Helm API provides the following methods:
listorganizations: Retrieves the organizations that the user has access to.
listworkspacesforuser: This lists the workspaces in the organization that the user has access to.
listorganizationproducts: Retrieves the products a given organization has.
listorganizationproductversions: Retrieves the product versions of a particular product for that organization.
createorganizationproduct: Creates a new product under that organization with the provided product name. The user will have access to this product.
createorganizationproductversions: Creates a new product version under a selected product with the provided version name.
submitsbom:
Uploads an SBOM provided in the --sbom_files parameter.
Allows the user to upload an SBOM under an existing product and product version.
Users can create a new product, product version, and upload an SBOM under this new version.
listunmatchedsbomentries: This lists all of your unmatched SBOM entries for a given SBOM product and version.
listvulnerabilities: This lists all vulnerabilities for a given SBOM product and version. You can also filter this down via --exploit_source to CISA KEV vulnerabilities only, as detailed below.
requestreport: This issues a request to generate a product version report. The report generation process is asynchronous, so this may take a moment.
getreportrequeststate: This checks on the status of a requested report.
getreportfile: Once a report request is completed (report_request_state=4), the report file will be available for download.
Submit issue: Contact us if you run into any issues, so we can get you unstuck quickly!
About: If you're using Helm in your QMS and/or V&V process, this will ensure that you have the correct core and UI versions (see our changelog version note to understand core and UI versions).
Matched dependency version: During matching, Helm may enrich your component version to increase match accuracy. This field will only display if the version was enriched.
Matched dependency supplier: During matching, Helm may enrich your supplier name to increase match accuracy. This field will only display if the supplier was enriched.
Original CPE: This is the original PURL assigned to this component in your SBOM file. Example format: (e.g., cpe:2.3:part:vendor:product:version:update:edition:language:sw_edition:target_sw:target_hw:other)
Enriched CPE: This is the PURL that was added or enriched from the respective package manager during the component matching process. This will only display if populated. You cannot edit this.
Original PURL: This is the original CPE assigned to this component in your SBOM file. Example format: (e.g., scheme:type/namespace/name@version?qualifiers#subpath)
Enriched PURL: This is the CPE that was added or enriched by our AI copilot during the component matching process. This will only display if populated. You cannot edit this.
Alias: Helm automatically matched this component based on an alias your team has created.
System alias: Helm automatically matched this component based on a global alias we have created.
User name: This user manually matched this component to a suggested match or created a new alias to link it to known software.
Unknown (NOASSERTION in SPDX): If you are not sure whether your SBOM has an associated license
Continual monitoring
Every 2 hours
Each vulnerability in Helm shows what data source or sources it was pulled from. Links are provided to the original CVE, as well as to exploitability and threat information.
The National Vulnerability Database (NVD) is the world’s most comprehensive repository of publicly available vulnerability management data. Maintained by the National Institute of Standards and Technology (NIST), the NVD is built on the foundational work of MITRE and other leading cybersecurity entities. The database catalogs vulnerabilities identified as Common Vulnerabilities and Exposures (CVE), offering detailed information on over 100k documented CVEs, reaching back to the 1990s. The NVD not only provides vital intelligence on software flaws and misconfigurations but also includes crucial metadata such as severity scores, impact and exploitability metrics, and remediation steps, making it an indispensable resource for cybersecurity professionals.
You can easily see which vulnerabilities come from the NVD via the NVD badge indicator in the Source column.
In response to the NVD backlog, MedISAO, in collaboration with Medcrypt, has experimented with an AI copilot that leverages Large Language Models (LLMs) to process vulnerabilities, showing promising results. This strategy aims to bridge the gap until NVD and CISA resolve their backlogs.
This system constructs CPE product and version match data to ensure rapid and continuous and continuous vulnerability enrichment.
This AI copilot pulls information from vulnerability databases like NVD, MITRE, and other external sources to stay up-to-date and continuously update vulnerability information.
AI copilot data sources and updates
This AI copilot pulls information from vulnerability databases like NVD, CISA, CVE.org, MITRE, and other external sources to stay up-to-date and continuously update vulnerability information.
CVE.org integration
We are currently adding CVE.org as a data source, and this support should be available in an upcoming release. CVE.org provides a list of publicly disclosed cybersecurity vulnerabilities, each assigned a unique CVE ID. With over 230,000 CVEs identified, defined, and catalogued, CVE.org partners with community members worldwide to grow CVE content. CVE.org has now been tasked with enriching CVEs in the NVD with CPE information to handle the backlog.
Support and integration
Supported by Helm, Medcrypt’s vulnerability management tool, this AI-driven approach uses historical data and a custom grammar parser to minimize inaccuracies and increase reliability. This AI copilot’s output mirrors the NVD data feed, allowing tools compatible with the NVD feed to seamlessly utilize enriched data.
How often is the NVD data feed updated?
This feed is updated daily and is available to MedISAO members and partners. It has thus far analyzed thousands more vulnerabilities than the NVD or CISA and integrated into Medcrypt's Helm product, enabling more enhanced vulnerability identification.
Exploit Database (ExploitDB) is an archive of public exploits and corresponding vulnerable software, providing insights into how vulnerabilities can be exploited. ExploitDB provides information on active exploits as well as Metasploits, which are hacker toolkits that less technical users can leverage to exploit a vulnerability. Each vulnerability in Helm provides information on its exploitability and threats, and which source that information was retrieved from.
Any active exploit retrieved from this database will show either an ExploitDB badge or Metasploit badge, depending on whether it is just an active exploit or whether there is a Metasploit toolkit. Additionally, you can view the impact of each vulnerability, which shows all known exploits and threats and provides links to the original source details.
The Exploit Prediction Scoring System (EPSS) is a data-driven effort for estimating the likelihood (probability) that a software vulnerability will be exploited in the wild. They aim to assist companies to better prioritize vulnerability remediation efforts. While other industry standards have been useful for capturing innate characteristics of a vulnerability and provide measures of severity, they are limited in their ability to assess threat. EPSS fills that gap because it uses current threat information from CVE and real-world exploit data. The EPSS model produces a probability score between 0 and 1 (0 and 100%). The higher the score, the greater the probability that a vulnerability will be exploited.
Helm provides EPSS scores for any vulnerabilities that have a CVSS v3 score, as only CVSS v3 vulnerabilities have been assessed using the EPSS methodology.
Top 25 CWE is a list of the most common, widespread, and impactful software weaknesses, which can be exploited by adversaries to steal data, take over a system, or prevent applications from working. and critical software weaknesses.
To create the 2023 CWE Top 25 list, the CWE Team leveraged Common Vulnerabilities and Exposures (CVE®) data found within the National Institute of Standards and Technology (NIST) U.S. National Vulnerability Database (NVD) and the Common Vulnerability Scoring System (CVSS) scores associated with each CVE Record, including a focus on CVE Records from the Cybersecurity and Infrastructure Security Agency (CISA) Known Exploited Vulnerabilities (KEV) Catalog. A formula was applied to the data to score each weakness based on prevalence and severity. The Top 25 CWE list is maintained by the MITRE corporation.
Any vulnerability that is considered a top 25 CWE threat will show a Top CWE badge in Helm. You can also view more impact information in the vulnerability details, as well as review original sources.
The CISA KEV catalog includes vulnerabilities known to be actively exploited in the wild.
For the benefit of the cybersecurity community and network defenders—and to help every organization better manage vulnerabilities and keep pace with threat activity—CISA maintains the authoritative source of vulnerabilities that have been exploited in the wild. Organizations should use the KEV catalog as an input to their vulnerability management prioritization framework.
Any vulnerability that is in the CISA KEV list will show a CISA KEV badge in Helm. You can also view more impact information in the vulnerability details, as well as review original sources.
The Microsoft KB update catalog includes patches and updates for Microsoft products, essential for tracking and managing vulnerabilities in Microsoft software. Microsoft provides a list of important, recommended, and optional updates that can be distributed over a corporate network. You can use it as a one-stop location for finding Microsoft software updates, drivers, and hotfixes.
Important updates provide significant benefits, such as improved security and reliability. Optional updates might include, for example, new or updated driver software for devices that you have added to your computer.
Any vulnerability that has a recommended patch update will show an available patch indicator. You will soon be able to view patch recommendations in the vulnerability details as well.
Components often belong to one or more ecosystems. These ecosystems typically have one or more sources of truth that provide additional data about the components. For example, Maven Central and the NPM repository provide information about Java and Node components respectively.
Vulnerabilities can be identified through the use of three fields: CPE, PURL, and SWID. Helm supports PURL and CPE.
Helm supports Package URL (PURL) that provides a flexible way to represent metadata about components and their place in various ecosystems. PURL is supported by the CycloneDX SBOM specification.
Helm uses PURL in several ways:
Match components to identify vulnerabilities
Reduce false positives and false negatives
Identify outdated components across ecosystems
Helm natively supports the following package managers natively, and is the in the process of expanding this support:
C#
NuGet
JavaScript
NPM
Python
PyPI
Rust
Cargo
For any vulnerability that was matched using a package manager, it will show the corresponding package manager name in its badge. If a component is matched with a package manager badge, but does not have an NVD badge, this means that Helm has identified your software in the package manager, but that no vulnerabilities have been reported in the NVD.
PURL is recommended for use in identifying a container, library or framework (package), or operating system package.
Package URL (PURL) standardizes how software package metadata is represented so that packages can universally be located regardless of what vendor, project, or ecosystem the packages belongs to. A PURL is an attempt to standardize existing approaches to reliably identify and locate software packages. It is a URL string used to identify and locate a software package in a mostly universal and uniform way across programming languages, package managers, packaging conventions, tools, APIs and databases.
As mentioned above, we currently support the following PURL package managers: Cargo, NPM, NuGet, and PyPI.
A PURL is composed of 7 components:
scheme:type/namespace/name@version?qualifiers#subpath
The definition for each component is:
scheme: this is the URL scheme with the constant value of "pkg". One of the primary reason for this single scheme is to facilitate the future official registration of the "pkg" scheme for package URLs. Required.
type: the package "type" or package "protocol" such as maven, npm, nuget, gem, pypi, etc. Required.
namespace: some name prefix such as a Maven groupid, a Docker image owner, a GitHub user or organization. Optional and type-specific.
name: the name of the package. Required.
version: the version of the package. Optional.
qualifiers: extra qualifying data for a package such as an OS, architecture, a distro, etc. Optional and type-specific.
subpath: extra subpath within a package, relative to the package root. Optional.
Examples:
pkg:pypi/[email protected]
pkg:nuget/[email protected]
pkg:npm/[email protected]
NIST defines CPE as a structured naming scheme for IT systems, software, and packages. It is based on the generic syntax for Uniform Resource Identifiers (URI) and includes a formal name format, a method for checking names against a system, and a description format for binding text and tests to a name. The CPE specification was designed for operating systems, applications, and hardware devices. It is maintained by the NVD.
For any vulnerability that was matched using a CPE match, it will show a CPE badge. If a component is matched with a CPE badge, that means that it has at least one vulnerability that has been reported in the NVD. A CPE is only assigned to software when a vulnerability has been reported in the NVD.
CPE follows this format: cpe:<cpe_version>:<part>:<vendor>:<product>:<version>:<update>:<edition>:<language>:<sw_edition>:<target_sw>:<target_hw>:<other>
cpe_version: This is the version of the CPE definition. As of this writing, the latest CPE definition version is 2.3.
part: This can be one of three values: a for Applications, h for Hardware, o for Operating systems. It is sometimes referred to as type.
vendor: This identifies the person or organization that manufactured or created this component.
product: This is the name of the system/package/component.
version: This is the version of the system/package/component.
update: This shows any update or service pack information, also known as minor versions.
edition: This describes the build of the system/package/component beyond version.
sw_edition (2.3 only): This indicates the language of the system/package/component, such as en-us for US English.
target_sw (2.3 only): This indicates the language of the system/package/component, such as en-us for US English.
target_hw (2.3 only): This indicates the language of the system/package/component, such as en-us for US English.
other (2.3 only): This indicates the language of the system/package/component, such as en-us for US English.
Application:
If the URI is cpe:/a:microsoft:office:2007:sp2:professional then the CPE string is:
cpe:2.3:a:microsoft:office:2007:sp2:-:*:professional:*:*:*
Operating system:
If the URI is
cpe:/o:microsoft:windows_7:-:sp1:x64 then the CPE string is:
cpe:2.3:o:microsoft:windows_7:-:sp1:-:*:*:*:x64:*
Hardware (not supported in an SBOM):
If the URI is cpe:/h:3com:3c13612 then the CPE string is:
cpe:2.3:h:3com:3c13612:-:*:*:*:*:*:*:*
What does a wildcard in a CPE string indicate? Anything that is a wildcard (*) means that no particular value was provided for that section, so it will encompass any applicable value in that section.
Data ingestion
Daily
View upload status: This displays the SBOMs that have been uploaded for your products and versions. You can view the file name, file ID, when it was uploaded and by whom, the number of entries processed, and the status.
If a file has uploaded successfully, you can see the number of components processed from the SBOM.
If a file has not uploaded successfully, you will see a red x icon next to the Failed to upload status. For these files, you will see an info icon to get more information on resolving the error.
Before you've added your first SBOM for a product version, you'll see an Add SBOM drop-down button on the Products (SBOM) page. If you've already added an SBOM, this will change to Manage SBOMs and will have additional options, including checking SBOM file upload status.
To access these options, click the Add SBOM or Manage SBOMs drop-down button:
View upload status: This displays the SBOMs that have been uploaded for your products and versions. You can view the file name, file ID, when it was uploaded and by whom, the number of entries processed, and the status. If a file has uploaded successfully, you can see the number of components processed from the SBOM. If a file has not uploaded successfully, you will see a red x icon next to the Failed to upload status. For these files, you will see an info icon to get more information on resolving the error.
When viewing and managing individual components:
Component workspace: Each component belongs to a specific workspace and product
Vulnerability data: Vulnerability information is available regardless of workspace once components are matched
Match sources: Component matching draws from organization-wide sources (NVD, aliases, package managers)
Review notes: Component reviews and notes are specific to the workspace and product context
Individual component management stays within workspace boundaries because:
Data isolation: Each business unit manages their own product components
Permission boundaries: Workspace admins control their own component resolution
Product context: Component reviews and notes are specific to how that business unit uses the component
Workflow efficiency: Admins focus on their workspace's components without distraction
After uploading your SBOM file or manually creating your SBOM, you can manage your SBOM for each product and version in your software supply chain. Once you've uploaded your SBOM, Helm will match your software against the National Vulnerability Database (NVD), supported Package URLs (PURL) package managers, and CPE strings.
To view your SBOM, ensure you've selected a product and version so that you can view and manage its components.
In the Products (SBOM) table, you can quickly see where you need to complete matching, as well as understand exploitability risk and end-of-support/end-of-life risk, enabling you to prioritize upgrades. You can easily see what needs to be reviewed and catch up on reviews your team has made, as well as understand and manage license risk.
Click to drill-down for more information: Most things in Helm tables are clickable, enabling you to quickly drill down for more information, such as component details, match suggestions, fixing a version, contact us, reviewing a component, and more.
Click the next step for each component: For each component, if there is a clear next step you need to take, that will be in the Actions column. If not, you'll just see the actions overflow ... button.
To view your SBOM, ensure you've selected a product and version so that you can see that version's components. Don't see some columns?
Original file name: This is your original SBOM file name. This enables you to merge SBOMs for a product version while retaining its origin, enabling faster prioritization and remediation for larger teams.
Component name: This is the component (dependency) name (e.g., firmware, software, framework, library, file, operating system, etc.) that is installed on the physical representations of your device (e.g., Windows, OpenSSL). This is the component name from your SBOM.
Version: This is the version for this component name (e.g., 10.1 for Windows) that was in your SBOM.
Supplier: This is the organization that supplied the component that was in your SBOM. The supplier may often be the manufacturer, but may also be a distributor or repackager (e.g., Microsoft for Windows).
Level of support: Indicates whether the component is supported. Can be date or text value.
EOS/EOL: Indicates whether the component has a known end-of-support or end-of-life date or other information. Like Level of support, this can also be a date or text value. If there is a date, this indicates that the component will no longer be supported or maintained after this time, thus it will potentially become more vulnerable and less reliable over time. You should either upgrade to a supported version or replace it with an alternate component to reduce risk.
Match status: Shows component's , along with the corresponding used to perform the match.
Review status: Indicates whether the component has been reviewed or needs to be reviewed.
Licenses: Displays the component's licenses.
For any components that have a next step you need to perform to complete matching and vulnerability identification, you'll see that primary action button in the Actions column, such as fixing a version or selecting a unique match. All other actions are in the ... button to the right of this action. If you don't see a particular option, that means that you have view access for SBOMs.
You can create rules to automate population of component lifecycle information or bulk edit lifecycle and license information across components.
Select multiple components in the components table, then click Update X dependencies (we are in the process of changing the term, dependencies, to components throughout our UI to handle the updated NTIA minimum requirements).
Set the lifecycle details and license details as desired, then click Save.
Click the Filters drop-down on the Components page to filter quickly to what you need.
Component details: Search by component name or component review status
Match details: Search by component match status
License details: Search by SPDX license ID or custom license name
Lifecycle details: Search for components with upcoming or expired end-of-support/end-of-life (EOS/EOL) dates, or search for components that will expire within a particular date range.
Follow these steps to ensure you've completed your component matching and identified all possible vulnerabilities across your SBOM.
Filter on match status
The match status of each of your components is indicated in the Match status column of the components table. You can click directly on this status badge itself to begin the resolution process, or you can select an action from the Actions column.
To ensure that you complete matching, filter on Select match first. Helm has provided strong match suggestions for these, so you should be able to match these relatively quickly. Click Select match on any of these statuses to start matching.
For users with Admin role, we highly recommend that you create an alias for each component you match. This will ensure that these are automatically matched for future SBOMs. If you're not sure whether to create an alias during the match, you (or your Admin) can always create one later.
If you want to complete matching, filter on Not found next. This indicates that Helm was unable to find an exact match in the NVD. Click the Not found badge to view the match suggestions Helm has identified. If you don't see the correct match, make sure you create an alias so that this will be automatically matched for future SBOMs.
Filter on match source
Helm uses many match sources to precisely identify your components and ensure that you have a comprehensive view of your vulnerabilities. Each Matched status or Select match status displays the sources where the match was found.
Filter on lifecycle details
Be confident that you're using actively maintained and supported components when building a new product or updating an existing one. Filter quickly on the support status of your components, as well as the timeframe for components that are nearing their end-of-support or end-of-life dates, enabling you to prioritize updates effectively, thereby ensuring the stability and security of your device throughout its lifecycle.
Filter on license details
Filter your components by license, including those with specific licenses, no license, custom license, or unknown license status. This filtering capability helps quickly identify and mitigate license-related risks, such as copyleft licenses or unknown license statuses that may impact IP.
Filter on which components have at least one license, those that don't currently have any license information, as well as those that are specifically set to No license or NONE or Unknown or NOASSERTION (the values in caps are SPDX values), ensuring you understand your legal risk for every component in your product.
Filter on GPL licenses and other restrictive licenses to quickly evaluate legal risk, enabling you to quickly prioritize updating or changing components that have licensing that could impact your IP and legal compliance.
After you’ve matched SBOM components to software components in the NVD, which could be one or more match sources, you’ll be able to see any reported vulnerabilities for those components.
IMPORTANT: If you have a Matched status that does not have an NVD badge, this has not been matched in the NVD, which means that it either does not have vulnerabilities or has a different name in the NVD. Refer to for more information. You must identify an exact match in the NVD in order to see vulnerabilities for that component.
In the Vulnerabilities table, if you don't have a product and version selected, you'll see all vulnerabilities for all products across all versions. Select a product and version to filter down to just those vulnerabilities.
You can to best meet your needs.
General info and patching
Vuln ID: This is the vulnerability ID. You can click on the vulnerability to open the vulnerability details, from which you can access this vulnerability in the NVD database. Currently, all of these are CVEs from the NVD, but we are working on adding more vulnerability types, including OSV.dev and private vulnerabilities, so if you need these or others!
KB badge: For Windows vulnerabilities, if there is an available KB to patch this, you'll see a KB badge. . The top KB will generally have the most rollup patches.
Shield icon:
Risk assessment
CVSS scores: If you have an older device, you may not have v3 scores. For newer devices, they may not have v2 scores. If you have both scores, it is recommended that you use the v3 score.
v3: This indicates the CVSS v3 score for this vulnerability. You can filter to show just v3 scores if available.
v2: This indicates the CVSS v2 score for this vulnerability. You can filter to show just v2 scores if available.
Remediation
CycloneDX status: Filter on CycloneDX remediation statuses, such as what's exploitable, in triage, or resolved.
VEX status: Filter on CycloneDX VEX statuses.
Available actions
Your next action on a vulnerability depends on the type of vulnerability and its current status.
Windows vulns: in bulk or individually.
Remediate: in bulk or individually.
Rescore: in bulk or individually. This ensures you stay focused on the most exploitable vulns according to your device's unique environment and usage.
Get AI guidance: Select one or more vulns to get upgrade and short-term mitigations, as well as sources referenced in these recommendations.
When remediating a vulnerability, you can specify either a CycloneDX or VEX status, or both.
This indicates whether your product is impacted by this vulnerability. Statuses include:
Not_affected: No dependency component is affected by the vulnerability. If you select this status, you need to include Justification.
False_positive: The vulnerability does not affect any dependency components and was falsely identified.
In_triage: You or someone on your team is investigating this vulnerability.
Exploitable: The vulnerability does affect one or more dependency components, and may be directly or indirectly exploitable.
This indicates whether your product is impacted by this vulnerability. This is the VEX profile of CycloneDX, so the statuses are a little less robust than those of OpenVEX. if you would like us to offer OpenVEX in the near future.
Statuses include:
Affected: This vulnerability impacts one or more dependency components in this product version's SBOM. If you haven’t reviewed these yet, click Actions > Remediate.
Unknown: Your team does not currently have an answer as to whether this vulnerability impacts this product. Click Remediate to assess it further.
Not_affected: This vulnerability does not have a known impact to any of your dependency components in this product version's SBOM.
Narrow down vulnerabilities by criteria such as severity, exploitability, and threat information.
Vulnerability details
Vuln ID: Search by vulnerability ID, such as a CVE ID.
Updated on: Select a date range to see all vulnerabilities updated in external sources during that timeframe. This does not include updates made by your team during security review and analysis.
Vulnerability vector info
Search by attack vector, attack complexity, and other CVSS metrics. Refer to for more information.
Severity details
Any CVSS score: If you're not interested in CVSS v2 scores, select the Any CVSS filter > CVSS 3 (if available). This will only return CVSS v2 scores if no CVSS v3 scores are available.
CVSS: Search for all CVSS scores greater than or equal to a particular number. For example, searching on 8 will give you 8-10.
Critical scores: 9 to 10
Exploitability details
Any exploit source: Search all or selected exploitability and threat sources, including CISA KEV, ExploitDB, Top CWE, Metasploit, and NVD.
Any source: Filter down on vulnerabilities that are in the NVD or that are derived by our AI copilot from many data sources.
Remediation details
Any patch status: earch for all Windows vulnerabilities that have a patch available, are patched, or are not patched with a Windows KB.
Any CycloneDX status: Filter by CycloneDX aremediation status. To see which vulnerabilities do not have a CycloneDX remediation status, select Not set.
Any VEX status: Filter by CycloneDX VEX remediation status. To see which vulnerabilities don't have a VEX remediation status, select Not set.
Tech stack details
Affected tech stack: Check whether your tech stacks are at risk. If so, they will display in the Impacted tech stacks column with a high severity orange badge. You can click any tech stack badge to get AI-driven upgrade and short-term mitigation recommendations, as well as dig into sources provided.
Not affected tech stack: If a tech stack is explicitly determined to be not affected, they will display in the Impacted tech stacks column with a gray badge.
The originally assigned CVSS v2 and v3 scores are retained in our database and continue to be displayed in the vulnerability information, even if they no longer appear in the latest NVD feed.
In cases where the NVD has assigned CVSS v2 or v3 severity scores to CVEs and later removed those scores, our system maintains the original scores for consistency. This approach provides several benefits:
Maintains consistent vulnerability severity ratings over time
Prevents vulnerability assessments from unexpectedly changing due to NVD data updates
Ensures historical vulnerability records remain intact with their original severity classifications
Provides more stable reporting for compliance and audit purposes
After uploading your SBOM (Software Bill of Materials) or manually adding a component, you may encounter different statuses that your software component, version, and supplier combination was not automatically matched to an existing unique entry in the NVD (National Vulnerability Database).
To view vulnerabilities for your components, you'll need to resolve any statuses other than Matched NVD. By following these steps to resolve these statuses, you can ensure accurate matching of your software components to
To view vulnerabilities for a particular component, each component must be matched to known software in the NVD. The alias rules manager enables you to set robust matching conditions for aliases, simplifying the known software search process and bringing forward more information to help you select the correct known software match.
Alias rules will not override components that were manually matched by users.
IMPORTANT: This topic was last updated July 2025. Although Medcrypt attempts to keep this up-to-date, you should always check the latest FDA guidances and consult with qualified regulatory professionals for your specific situation. This content provides general information about QMS cybersecurity considerations and is not intended as regulatory consulting advice for your specific device or situation.
When resolving component matches:
Current workspace focus: You're resolving matches for components in your current workspace
Organization-wide aliases: Any aliases you create will help similar components across all workspaces
Match suggestions: All match sources (NVD, package managers) are organization-wide resources
Vulnerability benefits: Successfully matched components gain vulnerability data regardless of workspace
A Select match status means that your software component, version, and supplier combination has multiple potential matches, making it unclear which one is the correct match.
A Matched status with a package manager badge (but no NVD badge) indicates that there either are no known vulnerabilities for that component, or that the component has a different name in the NVD.
A Not found status means that your software component, version, and supplier combination could not be automatically matched to an existing entry in the NVD. This could mean there are no vulnerabilities for this component, or it could mean the component is named differently in the NVD.
Click the Match status badge to open the Resolution options modal, then click the View suggestions button in the Select match box. This will display the Multiple matches modal, where you can evaluate the option based on the following details:
Supplier: The name of the supplier associated with the potential match.
Name: The name of the software component.
Sample versions: Versions that were extracted from the CVE vulnerability data.
Type of match: This shows sources used to determine a possible match, such as Alias, Name, CPE (Common Platform Enumeration), PURL (Package URL), or a particular package manager match.
If you need more information to make a decision, click the details icon. This will open the Match details modal, where you can view more versions of the component and see reported vulnerabilities over time. A trend of reported vulnerabilities that aligns with your component versions suggests a strong match.
Create an alias: Once you determine the correct match, you can create an alias that links this match to your component. This alias ensures that future uploads of an SBOM containing this software component, version, and supplier combination will automatically use this alias.
Add a review note: Click Actions > Add review note to keep your team informed about the status of the assessment, suggest further review, or highlight any critical risks associated with the software component.
To pick up a draggable item, press the space bar. While dragging, use the arrow keys to move the item. Press space again to drop the item in its new position, or press escape to cancel.
Supplier
This is the organization that supplied the component. The supplier may often be the manufacturer, but may also be a distributor or repackager (e.g., Microsoft for Windows).
Details icon
Click this icon to view more details about this possible match, including reported vulnerabilities over time, as well as known versions from the CVE. If these versions match those of your component and there are vulnerabilities that have been reported, this is likely the correct match.
Product name
This is what may be referred to as a component in other systems. It is the firmware, software, patches, or operating system that is installed on the physical representations of your device (e.g., Windows, OpenSSL).
Matched on
This shows the strength of the match. Refer to Match sources for more information.
Type
This shows the reliability of the match.
Exact match: This has an exact match in the NVD, which could include a PURL string (Cargo, NPM, Nuget, or Pypi package manager), CPE string, or name match.
Alias match: This component matches an existing alias.
Possible match: This component has a match in one or more sources. Check the Matched on column, then hover over those matching tokens for more information.
You can assess the likelihood that this is the correct match by viewing the trend of reported vulnerabilities over time and the known versions for this match suggestion. Multiple matches that have a trend of reported vulnerabilities and that match your component's versions (or at least version formats) are considered stronger matches.
To pick up a draggable item, press the space bar. While dragging, use the arrow keys to move the item. Press space again to drop the item in its new position, or press escape to cancel.
Reported vulnerabilities over time
Multiple matches that have a trend of reported vulnerabilities indicate that this is a frequently-used component. If you don’t see many reported vulnerabilities over time, it is likely that this is not the correct match. Check that the component’s versions (or at least version formats) are considered strong matches.
Known versions
These are the known versions for this suggested match that are coming from the CVE vulnerability ID. Check that your component’s versions (or at least version formats) match these.
After uploading your SBOM or manually adding a component, you might see a warning icon next to the component version, as well as a Fix version match status. This indicates that the version format doesn’t match the expected supplier version format.
Click the Fix version status badge for the component with the warning icon. Alternately, select Actions > Fix version for the component with the warning icon.
Check the version format to ensure it matches the known version number, make any necessary modifications, then save.
If the issue persists, contact us for assistance.
After uploading your SBOM or manually adding a component, you might see an error icon next to the component version, along with a Contact us match status. This indicates that we do not have a version parser for this specific version format.
If you see this icon, we're aware of the issue. However, if you need this resolved more quickly, please contact us for expedited assistance.
What happens when we add this version parser?: When we add support for a new version parser format, we will automatically reload any impacted SBOMs and their components to attempt to match them to known software in the NVD. You will be notified once the issue has been resolved.
How does this impact you?:
Exact match: Any known vulnerabilities from the NVD will be brought forward.
Vulnerability discrepancy: If you notice a discrepancy in the number of vulnerabilities, don’t be alarmed—this process is part of ensuring accurate tracking and reporting.
Multiple matches: Review these suggestions to determine the correct match.
No match: If an exact match cannot be found in the NVD, it may indicate that the component does not exist in the NVD (implying no known vulnerabilities) or that it is listed under a different name. In these cases, you should check the NVD or create an alias rule to link your component for all SBOMs.
After uploading your SBOM or manually adding a component, you might see a warning icon next to the component version, as well as a Fix version match status. This indicates that the version format or PURL value doesn’t match the expected values.
Click the Fix version match status badge or click Actions > ... > Fix version for the component with the warning icon. This will open the Manage component panel.
Version warnings are generally caused by an incorrect PURL or version format. Check the component's PURL and version to see whether this solves the problem. Make sure that the version format matches the known version number and PURL.
If the issue persists, contact support.
After uploading your SBOM or manually adding a component, you might see an error icon next to the component version, along with a Contact us match status. This indicates that a version parser for this specific version format is unavailable. If you see this icon, we're aware of the issue. However, if you need this resolved more quickly, please contact support.
What happens when we add this version parser?
Upon adding support for a new version parser format, we will automatically reload any impacted SBOMs and their components to attempt matching them to known software in the NVD. You will be notified once the issue is resolved.
How does this impact you?
Exact match found: Any known vulnerabilities from the NVD will be associated with the component. If there's a discrepancy in the number of vulnerabilities, don’t be alarmed—this process is part of ensuring accurate tracking and reporting.
Select match: You'll need to review these suggestions to determine the correct match.
No match found: This may indicate that the component doesn't exist in the NVD (implying no known vulnerabilities) or is listed under a different name. In these cases, you should check the NVD to find the correct match, then create an alias to link your software component correctly going forward.
Before resolving individual component matches, you may want to adjust how Helm handles CPE and PURL matching. By default, Helm automatically enhances CPEs and PURLs to improve matching accuracy, but you can override this behavior when you need require exact matches to the CPEs and PURLs you have provided. These settings are automatically turned on for any new product version.
When to use exact matching
You’ve manually curated specific CPE or PURL values for compliance requirements
Your SBOM contains precise CPE/PURL data that shouldn’t be modified
Configure matching behavior
In the components table, click the Settings drop-down.
Turn off Override auto-matching for SBOM CPEs to require exact CPE matches where you’ve provided values.
Turn off Override auto-matching for SBOM PURLs to require exact PURL matches where you’ve provided values.
Important: These settings only affect components where you’ve manually added or uploaded CPE/PURL data. Components without existing CPEs or PURLs will continue to be auto-enriched to ensure comprehensive vulnerability coverage.
Understanding the impact
Auto-enrichment enabled (default - switches off): Better match rates with broader matching scope
Exact matching enabled (switches on): More precise matching but potentially fewer matches found
Consider the trade-off between match accuracy and vulnerability coverage when making this choice
Before resolving individual component matches, you may want to adjust how Helm handles CPE and PURL matching. By default, Helm automatically enhances CPEs and PURLs to improve matching accuracy, but you can override this behavior when you need require exact matches to the CPEs and PURLs you have provided.
When to use exact matching
You've manually curated specific CPE or PURL values for compliance requirements
Your SBOM contains precise CPE/PURL data that shouldn't be modified
You need exact matches for regulatory or audit purposes
In the Components table, click the Settings drop-down
Toggle Override auto-matching for SBOM CPEs to require exact CPE matches where you've provided values.
Toggle Override auto-matching for SBOM PURLs to require exact PURL matches where you've provided values.
Important: These settings only affect components where you've manually added or uploaded CPE/PURL data. Components without existing CPEs or PURLs will continue to be auto-enriched to ensure comprehensive vulnerability coverage.
Auto-enrichment enabled (default - switches off): Better match rates with broader matching scope
Exact matching enabled (switches on): More precise matching but potentially fewer matches found
Consider the trade-off between match accuracy and vulnerability coverage when making this choice
After matching or assessing a potential match or doing some other research, you can add a note for your team to reduce parallel efforts.
Click Actions > ... > Add review. This will display the Review component panel.
If the component does not already have a Reviewed status, this will automatically update it to Reviewed.
Add a review note, then save. This will update the Review status for that component and will add a note icon. Ensure this column is visible in your view.
For medical device cybersecurity specifically, your QMS should typically integrate security as a core design control under 21 CFR Part 820, based on current FDA guidance.
Compliance with quality standards and regulations applicable to your company
Structured documentation for audits and inspections
Consistent processes across teams and locations
Clear accountability and responsibility chains
Improved quality via continual improvement and streamlining of quality processes
Increased customer satisfaction: Provide good quality products and services to keep customers happy and reduce churn
Improved efficiency: Eliminating waste and streamlining processes increases efficiency and productivity
Reduced costs associated with rework, waste, customer complaints, and employee attrition
Better communication and collaboration across your company and between team members
SPDF implementation: Your QMS provides the framework for integrating Secure Product Development Framework throughout your Total Product Lifecycle (TPLC)
Design controls: Enables systematic cybersecurity risk assessment and mitigation as required under FDA guidance
Traceability: Links security requirements to design inputs, verification, and validation activities
Vulnerability tracking: Systematic processes for identifying, assessing, and addressing cybersecurity vulnerabilities
Incident response: Documented procedures for cybersecurity incident detection, containment, and recovery
Change control: Ensures security implications are evaluated for all device modifications
Supplier management: Cybersecurity requirements and assessments for third-party components
FDA submission support: Organized cybersecurity documentation for premarket submissions
SBOM management: Systematic tracking of software components and vulnerabilities
Security testing records: Documentation of penetration testing, threat modeling, and security validation
Training records: Evidence of cybersecurity awareness and competency across teams
Your QMS should typically address FDA cybersecurity requirements including:
Section 524B compliance for cyber devices (where applicable)
Postmarket surveillance for cybersecurity vulnerabilities
CISA reporting preparedness for applicable critical infrastructure entities
Risk management integration combining ISO 14971 safety risk with cybersecurity risk considerations
Clinical risk assessment: Understanding how cybersecurity failures could impact patient care
Essential performance: Ensuring cybersecurity controls don't interfere with critical device functions
Usability considerations: Security controls that healthcare workers can realistically implement
Interoperability security: Managing cybersecurity across connected healthcare ecosystems
Legacy device management: Processes for maintaining security of older devices in the field
Update and patching: Systematic approach to security updates throughout device lifecycle
End-of-life planning: Secure decommissioning and data protection procedures
Supply chain security: Vendor cybersecurity assessments and ongoing monitoring
Your cybersecurity activities should integrate with existing QMS processes:
Design and development:
Cybersecurity requirements definition
Threat modeling and risk assessment
Security architecture and design
Security verification and validation
Manufacturing and distribution:
Secure manufacturing processes
Malware-free shipping procedures
Supply chain security controls
Configuration management
Post-market activities:
Vulnerability monitoring and assessment
Security update deployment
Incident response and reporting
Cybersecurity effectiveness monitoring
Essential cybersecurity documents within your QMS:
Cybersecurity plan and procedures
Threat model and risk assessment
SBOM and vulnerability tracking
Security test plans and results
Incident response procedures
Training and competency records
Assess your current cybersecurity maturity
Identify gaps between current state and FDA requirements
Prioritize improvements based on patient safety impact
Develop implementation roadmap with measurable milestones
ISO 13485: Medical device quality management foundation
ISO 14971: Risk management processes
AAMI TIR 57: Security risk management guidance
AAMI SW96: Security assurance for medical device software
Cross-functional teams: Include cybersecurity expertise in quality processes
Training programs: Cybersecurity awareness for all personnel
Competency management: Defined cybersecurity roles and responsibilities
Continuous improvement: Regular assessment and enhancement of cybersecurity processes
Bottom line: Based on current regulatory trends, a QMS without integrated cybersecurity management may be incomplete for medical device manufacturers. Consider making cybersecurity a systematic part of how you develop, manufacture, and maintain medical devices throughout their lifecycle. Consult with regulatory experts to determine the best approach for your specific situation.
QMS provides cybersecurity foundation - Generally serves as the required framework for systematic cybersecurity management in regulated environments
Integration is typically essential - Cybersecurity should generally be woven throughout your QMS rather than bolted onto existing processes
Regulatory advantage - A well-structured QMS can significantly simplify FDA cybersecurity submissions and ongoing compliance
Patient safety imperative - Your QMS should help ensure cybersecurity enhances rather than compromises clinical care
Business resilience - Systematic cybersecurity management typically protects your business continuity and reputation
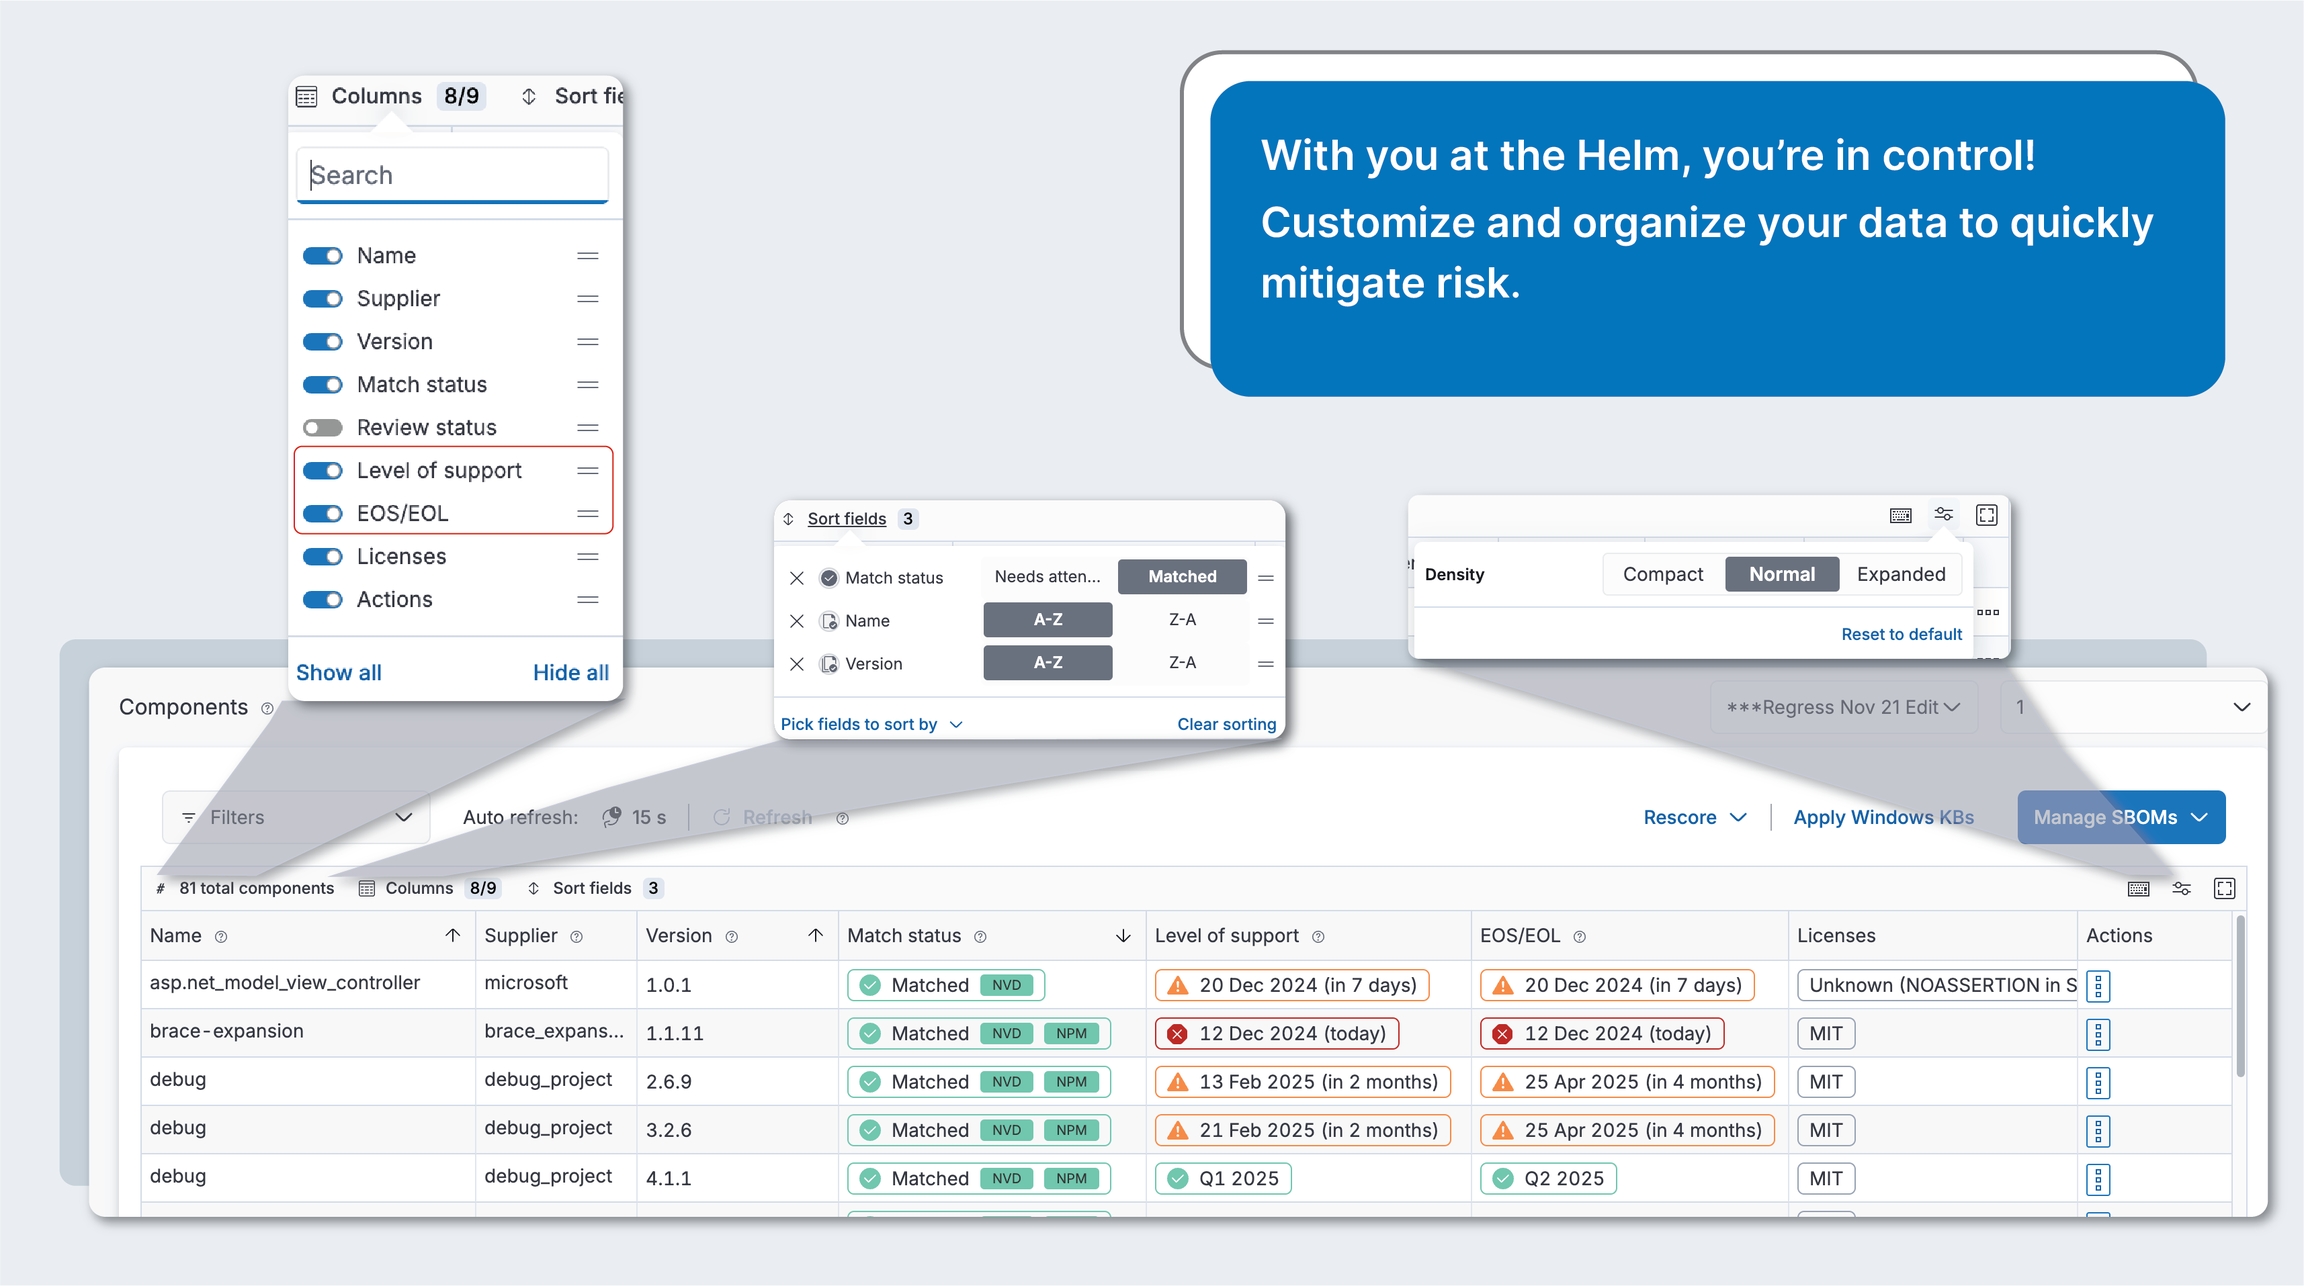
For Windows vulnerabilities, you'll see a shield icon if it has been patched with a Windows KB. These rows will also be "ghosted" to indicate that you no longer need to worry about them. You will still need to add a remediation status for these vulnerabilities, though.
Any Ubuntu vulnerabilities that have already been fixed in your current version show as automatically patched. You cannot apply Ubuntu patches.
Product name: This is the product that contains all of the components from that product’s SBOM. This column will only display if you have not selected a particular product and version.
Product version: This is the product version. This column will only display if you have not selected a particular product and version.
Dependency: This is what may be referred to as a component in other systems. It is the firmware, software, patches, or operating system that is installed on the physical representations of your device (e.g., Windows, OpenSSL).
Dependency version: This is the component version (e.g., 10.1 for Windows).
Dependency supplier: This is the supplier name (e.g., Microsoft for Windows).
Detected on: This initially just shows the date on which the vendor detected the vulnerability in their software. If the vendor, NIST, or someone else makes an update to the vulnerability, you’ll see an Updated on date that displays beneath the Detected on date.
Date updated: This will show the last time the vulnerability was updated by the vendor, NIST, or other party.
NVD: Vulnerabilities retrieved directly from the National Vulnerability Database (NVD).
AI: Vulnerabilities enriched by our Large Language Model (LLM) AI. When a vulnerability from the NVD lacks CPE data, our AI enriches it, identifying the vulnerability as impacting your product. These AI badges highlight vulnerabilities that would otherwise go unnoticed, ensuring you have a complete view of your overall risk.
Exploits/Threats: If there are known exploits and threats corresponding to this vulnerability, you will see indicators.
CISA KEV: This vulnerability is in the Cybersecurity & Infrastructure Security Agency's Known Exploited Vulnerabilities list
TOP CWE: This vulnerability meets the criteria of the top 25 CWE list.
EXPLOIT DB: This vulnerability has a known exploit in the
METASPLOIT: This vulnerability is in the and has a kit available in the hackers' tool, making it easier to attack.
EPSS: This indicates the Exploit Prediction Scoring System likelihood that this vulnerability will be exploited. The higher the score, the greater the probability that a vulnerability will be exploited in the next 30 days. This percentage is based on a number of sources and data calculations from first.org.
CVSS vector columns: Add the CVSS vector information most important to you, such as Attack vector (AV). Click the Columns link to add these columns.
Impacted tech stacks: View impacted tech stacks in your products. Click each of these tags to open the vulnerability details modal. Scroll down to the AI recommendations section to access detailed information about affected tech stacks, upgrade recommendations, and short-term mitigations, all backed by source documentation. Click the Columns link on the vulnerabilities table, then enable the tech stack tags column to view this information.
If you see a high-severity orange badge in the Affected (Impacted) tech stacks column, click that badge to get upgrade and short-term mitigations, as well as sources referenced in these recommendations.
Export vulns: Export the currently filtered set of vulns. If no filters are applied, will export all vulns.
View details: View vulnerability details.
Email vulnerability: Generate an email including the vulnerability details to send to your ticketing system.
Resolved_with_pedigree: Your team has remediated this vulnerability so that it no longer affects any dependency components for this product version. If you select this, you need to provide information in the Evidence field. Evidence of the changes made to resolve this vulnerability for the affected components' pedigree must contain verifiable commit history and/or diff(s).
Resolved: Your team has remediated this vulnerability so that it no longer affects any dependency components for this product version.
Medium scores: 4-6
Low scores: 1-3
None: 0
EPSS: Search for all EPSS scores greater than or equal to a particular number. For example, searching on 80 will return all vulnerabilities with EPSS scores of 80% or higher.
Only Account owners can create and manage alias and lifecycle rules
When creating and managing alias rules:
Organization-wide benefit: Alias rules apply to components across all workspaces
Rule management: All Workspace admins can view the organization's alias rules regardless of their current workspace
Centralized rule management: Manage both alias rules and EOS/EOL lifecycle rules from a single location
Enhanced matching capabilities: Create conditions using Component name, Supplier, CPE, PURL, and Version information
Improved transparency: View detailed information about potential matches including vulnerability counts, known versions, CPEs, PURLs, and references
Impact visibility: See the number of affected products, versions, and components across all workspaces before making changes to existing rules.
Conflict handling: System detects potential rule conflicts
Automatic application: Rules are automatically applied to both existing and future SBOMs
When alias rules are applied, they affect:
Existing SBOMs: All matching components in previously uploaded SBOMs will have the alias rule applied
Future SBOMs: Any new uploads with matching components will automatically have the rule applied
Match status: Components will change from unmatched statuses to "Matched" with an "ALIAS" badge
Vulnerability data: If the known software has vulnerabilities in the NVD, these will now be associated with your components
Reporting: Components matched via alias rules will appear in vulnerability reports with their assigned matches
Override hierarchy: Manual matches always take precedence over alias rules
When you edit or delete an alias rule:
Components previously matched by that rule will return to their previous unmatched status
Any vulnerability data associated through that match will no longer be linked to the component
You'll need to create a new alias rule or manually match affected components to restore vulnerability data
To view aliases, click the Rules item in the sidebar. If you have appropriate permissions, you will see existing alias rules in the Alias rules tab.
For all components that have been matched with an alias, you'll see a Matched status with an ALIAS badge in the Match status column of the Products page.
To resolve Select match, Not found, and other match statuses, the Helm Account owner can create alias rules directly from the unknown component or from the Rules item in the sidebar.
When creating an alias rule from the Rules manager, you’ll need to specify the component matching conditions under which the alias rule will be applied.
Click the Rules item in the sidebar. This will display the Rules page, where you can manage alias and lifecycle rules.
Click the Add alias rule button in the Alias rules tab. This will display the Create alias rule wizard.
In the first step, specify the conditions for which you want this alias rule to be automatically applied. You can add one condition for each metadata field.
Each condition uses AND logic, so everything must be true for the effects to apply.
If there is an existing alias rule that exactly matches your criteria, you'll be prompted to discard this pending edit or change the criteria.
In the second step, specify the known component name and/or supplier, then click Search known software.
If you know which software you are looking for, click the option button next to that software, then click Create alias rule.
If you're not certain which software is the best match, click the option button to review the details for that known software component, including any vulnerability information, associated CPEs and PURLs, and references. Once you've identified and selected the correct match, click Create alias rule.
The new alias rule will display at the bottom of your rule list. If you want this rule to have higher priority, you can drag-and-drop it higher in the rules list.
The Match status for components that match this criteria will be updated to Matched with an ALIAS badge. This may take a while, since Helm is running this new alias rule against all of your SBOMs and evaluating it against all existing alias rules. If the known software is in the NVD or is in a package manager that has known vulnerabilities, it will be updated with these associated vulnerabilities.
When creating an alias rule from a component on the Products page, the component matching conditions will be automatically populated, which you can modify as necessary. The Helm Account owner can create alias rules directly from the unknown component or from the Rules item in the sidebar.
Click Products in the sidebar. This will display the Products page, which is a list of all components in this SBOM.
For any non-matched component status, click the badge in the Match status column or the primary button in the Actions column. Alternately, you can select View match suggestions from the ... actions overflow button. This will display the Select match suggestions panel.
If you want to change the component matching conditions, you can do so in step 1, then click Continue to update the possible matches in step 2. If there is an existing alias rule that exactly matches your criteria, you'll be prompted to discard this pending edit or change the criteria.
In the Component name field, enter at least three characters to start filtering down the list. All condition rules must be alphanumeric. Enter any other information you have for the component, then click Continue. If there is an existing alias rule that exactly matches your criteria, you'll be prompted to keep the existing rule or replace it with the new rule.
In the next section, enter the known software component name and/or supplier, then click Search known software to return potential matches.
If you know which software you are looking for, click the option button next to that software, then click Create alias rule.
If you're not certain which software is the best match, click the option button to review the details for that known software component, including any vulnerability information, associated CPEs and PURLs, and references. Once you've identified and selected the correct match, click Create alias rule.
The new alias rule will display at the bottom of your rule list. If you want this rule to have higher priority, you can drag-and-drop it higher in the rules list.
The Match status for this component and all components that match this criteria will be updated to Matched with an ALIAS badge. Updating all of the components may take awhile, since Helm is running this new alias rule against all of your SBOMs and evaluating it against all existing alias rules. If the known software is in the NVD or is in a package manager that has known vulnerabilities, it will be updated with these associated vulnerabilities.
Rules are named according to the criteria specified for them, for example: [Supplier name]/[Component name]/[Version]. You cannot currently edit rule names. If this is important to you, let us know.
If you need to edit an alias rule, note that any changes will be applied to both existing and future SBOMs.
Click the Rules item in the sidebar.
Click the Alias rules tab.
In the Alias rules tab, click Edit on any rule you want to modify. This will display the Manage alias rule wizard. This will display the current component matching conditions and the selected known software match.
If you want to change the component matching conditions, you can do so in step 1, then click Continue to update the possible matches in step 2.
If there is an existing alias rule that exactly matches your criteria, you'll be prompted to discard this pending edit or change the criteria.
In the second step, you will see the currently selected match, as well as other possible matches based on that search criteria. In the details section for the selected match, you'll see several tabs to help you understand the impact of the existing rule across your portfolio, known vulnerabilities, known CPEs and PURLs, as well as additional references.
If you want to change the match criteria, enter part or all of the known software you are looking for, then click Search known software.
If you change matching conditions or the selected known match, you will not be able to see the impact of this change until you apply it, then go back in to edit the rule.
Click Save & apply changes. You'll see a success notification when the change has been applied. Editing a rule will not change its current position in the list, so drag-and-drop it higher or lower to change its priority.
Alias rules are applied according to their position on the rules list.
Drag-and-drop them higher to increase their priority or lower to decrease their priority.
If you have only reprioritized rule order, but haven't marked any rules for deletion, click Save & apply changes. This will apply the reprioritizations.
If you've marked rules for deletion in addition to reprioritizing rules, this button will be Review changes to give you an opportunity to view the impact of these pending deletions before confirming these changes.
If you find that your team has added an incorrect alias rule, you can easily remove it if you are an Administrator.
Click the Rules item in the sidebar.
Click the Alias rules tab.
Click Mark for deletion on the alias rules you want to delete.
If you need to change priority of any rules as a result of these impending deletions, drag-and-drop the respective rules higher or lower in the list.
Click Review changes button.
This will display a confirmation panel showing the impact of your potential deletions across your portfolio. If you have multiple pending deletions, click Continue to move to the next one. You can also click Save & apply changes if you don’t need to examine your deletion impacts. You can't currently change this impact. if this is something that you need!
After making your changes, click the global Save & apply changes button at the bottom of the aliases rule list. The rule will no longer be associated to existing SBOMs and will not be applied to future ones.
Rule naming: You cannot currently edit rule names. They are automatically generated based on conditions.
Rule conflicts: When creating rules with similar conditions, ensure they don't unintentionally overlap. The system will warn about exact duplicates.
Session persistence: Always save your changes before navigating away, as unsaved changes will be lost.
Rule prioritization: Place more specific rules higher in the list, as they take precedence over more general rules.
Performance considerations:
Creating many rules with complex conditions may increase processing time
Large-scale rule changes may take time to propagate across all SBOMs
Verification: After applying rules, check a sample of components to verify the rules are working as expected.
Maintenance: Periodically review your alias rules to ensure they still reflect your current software matching needs.
Account owner: This user can view and edit all products, as well as create aliases and use existing aliases to link software in their SBOMs to known software in the NVD. There is only one Account owner.
Workspace admin: This user can view and edit all products and use existing aliases.
User: Only users with SBOM modification permissions can use existing aliases. Users with SBOM view permission will be able to see aliases, but not use them.
Ready to leverage the power of Helm to streamline your vulnerability management? Let's get you up and running!
Ready to upload your first SBOM, or not sure what an SBOM is? We’re here to help! Helm supports both CycloneDX and SPDX SBOM formats, making it easy for you to manage your software components.
A workspace is basically a division within your organization, such as a department, business unitWhen uploading SBOMs:
Products are workspace-specific: All products you create during upload belong to your current workspace. Products cannot be moved to another workspace after creation. If you want to create a product in a different workspace,

Your sign-in process depends on how your organization has configured authentication. When you visit your organization's sign-in page, you'll see either:
If your organization isn't using Helm yet, contact us to get your account created.
If your organization already has a Helm account, you can sign up directly from the sign in page of Helm. Your Account owner will need to send you your organization-specific sign in page URL.
Standard sign-in form: Email and password fields with optional "Sign up" link
Sign in with SSO: Sign in with SSO button to direct to your organization's Sign in page
If your organization already has a Helm account, you can sign up directly from the sign in page of Helm. Your Account owner will need to send you your organization-specific sign in page URL.
If your organization isn't using Helm yet, contact us to get your account created.
Check your email for the invitation from Medcrypt containing your new organization-specific URL.
Click the invitation link in the email to display the Sign in page.
Click the Sign up link??
Complete the sign up form, then click Sign up. You'll need to enter your email address and create a password, then specify your job role.
Verify your email account:
Check your email for a verification message (check spam folder if needed).
Click Verify account button in the email. This will direct you to the Sign in page.
If you don't receive the email, for assistance.
On the Sign in page, enter your email address and the password you created, then click Sign in.
Upon sign in, you'll be prompted to set up MFA (Multi-Factor Authentication):
Install an authentication app on your smartphone (e.g., Google Authenticator, Authy)
Scan the QR code or enter the setup key provided
Save your recovery codes in a secure location
Use this process if your organization uses standard email and password authentication and your organization has an existing Helm account.
Check your email for the invitation from your Account owner containing your organization-specific URL.
Click the invitation link in the email. This will bring you to your organization's sign-in page.
Click the Sign up link on the sign in page to display the Sign up form.
Complete the sign up form, then click Sign up. You'll need to enter your email address and create a password, then specify your job role.
Verify your email account:
Check your email for a verification message (check spam folder if needed).
Click Verify account button in the email. This will direct you to the Sign in page.
If you don't receive the email, for assistance.
On the Sign in page, enter your email address and the password you created, then click Sign in.
Upon sign in, you'll be prompted to set up MFA (Multi-Factor Authentication):
Install an authentication app on your smartphone (e.g., Google Authenticator, Authy)
Scan the QR code or enter the setup key provided
Save your recovery codes in a secure location
Use this process if your organization uses Single Sign-On with an identity provider (like Azure AD, Okta, Google Workspace, etc.). Contact us to enable SSO for your account.
Check your email for the invitation from your Account owner containing your organization-specific URL.
Click the invitation link in the email. This will bring you to your organization's sign in page.
Click the Sign in with SSO button.
Authenticate with your identity provider:
You'll be automatically redirected to your organization's identity provider sign in page
Enter your company credentials (the same username/password you use for other work applications)
Complete any additional authentication steps required by your organization. SSO users typically have MFA handled by their company's identity provider and will likely not see the step to configure MFA
Automatic account creation:
Your Helm account will be created automatically using your SSO profile information
You'll be redirected back to Helm and signed in immediately
No separate password creation or email verification needed
When you successfully sign in for the first time:
You'll land in your assigned workspace - Your Account owner will have assigned you to one or more workspaces
Check your workspace access - You can see which workspace you're in via the Account drop-down and breadcrumb trail. If you have access to multiple workspaces, you can switch between them using these controls
Choose a path on the Get started page that best suits your needs. You can always access this page from the Help > Get started item in the sidebar.
Version management: Product versions are also workspace-scoped
Component visibility: Uploaded components and their vulnerabilities are visible only within the workspace
This ensures proper data isolation between different business units or teams.
If you haven't added any SBOMs yet, click the Upload SBOM button.
If your team has already uploaded SBOMs, click Manage SBOMs > Upload SBOM.
If you are uploading a compressed SPDX SBOM file, follow these steps.
Supported SBOM versions and formats
Versions:
CycloneDX: 1.3 (import only), 1.4 (import and export), 1.5 (import only)
SPDX: 2.2, 2.3
Formats:
CycloneDX: .json, .xml
Single SPDX files: .spdx, .json, .yaml, .xml
Compressed SPDX files: .gz, .tgz, .zip, .zst, .tzst
Excel:
File size: 50MB
In the SBOM type drop-down, select Document.
Select or drag and drop a file in the SBOM file field.
Excel or CSV: Uploading one of these files will display a Generate CycloneDX button.
Click Upload SBOM.
Need to include EOS/EOL information? You can import your CycloneDX SBOM with EOS/EOL information included in .
Need to include Windows KB patch information? You can import your CycloneDX SBOM with WinKBs included in .
If you're not seeing your SBOM components loading, check that you have Auto-refresh turned on, or manually refresh the page. Larger SBOMs will take a bit more time.
If you're still not seeing your SBOM, click Manage SBOMs > View file upload status. If you see a Failed status here, click the icon next to that status for more information.
If you can't resolve the issue, for help.
Once you’ve uploaded your SBOM, you will see all of the components that are contained in that product display on the page. We’re already starting to match, drawing data from the NVD, including Package URLs (PURL) of Cargo, NPM, Nuget, or Pypi package manager), CPE strings, component name/version/supplier combo, and alias matches.
If you need to aggregate and merge additional SBOMs to this SBOM, click Manage SBOMs > Upload SBOM. This will add components from that SBOM to your existing SBOM.
If you see any warning or error icons next to your component version, click the icon for more information.
You should be able to just edit the version for a warning scenario, but will need to for an error scenario.
You'll need to resolve this issue before we can match this component and return any vulnerabilities.
If you have a compressed SPDX SBOM file, follow these steps to upload it:
Prepare your files:
Create a directory named after what you want to name your zip file.
Navigate into that directory and create a subdirectory named packages in this directory.
Copy your individual SBOM files into the packages directory.
Compress your files:
Use the following commands to compress your files into a .tar.gz or .zip format:
Create .tar.gz: COPYFILE_DISABLE=1 tar -zcvf yourfilename.tar.gz yourdirectory
Upload your file:
Once compressed, go to Helm and upload your .tar.gz or .zip compressed file following the above.
To include lifecycle information, these are the supported properties you can use in your CycloneDX SBOM. This information will be populated into the respective columns in the Products table, as well as in the component details. Note that if your SBOM contains duplicate properties for the same component, Helm will take the first property and discard the rest. For each field, you can only include either date or text value - if you include both, only date will be populated in the Helm UI.
To include lifecycle information, these are the supported properties you can use in your CycloneDX SBOM. This information will be populated into the respective columns in the Products table, as well as in the component details. Note that if your SBOM contains duplicate properties for the same component, Helm will take the first property and discard the rest. For each field, you can only include either date or text value - if you include both, only date will be populated in the Helm UI.
To use any of these properties, you will need to include the whole namespace value (e.g., cdx:lifecyle:milestone.endOfSupport or medcrypt:lifecycle:milestone:endOfLifeText) in the name field and the corresponding value in the value of the property. We will import and export from thecomponent and/or metadata > components array of your CycloneDX SBOM.
Level of support (date): Import will support cdx:lifecycle:milestone:endOfSupport name property or eos_date (Medcrypt-specific name property). Export will be the CycloneDX native property.
EOS/EOL (date): Import will support cdx:lifecycle:milestone:endOfLife name property or eol_date (Medcrypt-specific name property). Export will be the CycloneDX native property.
Level of support (text): Import will support medcrypt:lifecycle:milestone:endOfLifeText or eol_text name property. Export will be `medcrypt:lifecycle:milestone:endOfLifeText.
EOS/EOL (text): Import will support medcrypt:lifecycle:milestone:levelOfSupportText or eos_text name property. Export will be `medcrypt:lifecycle:milestone:levelOfSupportText.
End of support example with component array
Check the CycloneDX GitHub repo for more information on their native properties.
End of support example with component array
Check the CycloneDX GitHub repo for more information on their native properties.
CycloneDX does not support Windows KB information natively, so to include Windows KB patch information, this is the Medcrypt-specific property you can use in your CycloneDX SBOM.
To use this property, you will need to include the whole namespace value (e.g., medcrypt:vulnerability:remediation:mskb in the name field and the corresponding value in the value of the property. of the component or metadata > components array of your CycloneDX SBOM. We will import and export from thecomponent and/or metadata > components array of your CycloneDX SBOM.
Import and export will support the medcrypt:vulnerability:remediation:mskb name property, but regardless of where the KBs appeared in the original SBOM, they will be exported to metadata > component only.
Windows KB example with component array
To include lifecycle information, these are the supported properties. This information will be populated into the respective columns in the Products table, as well as in the component details. Note that if your SBOM contains duplicate properties for the same component, Helm will take the first property and discard the rest. For each field, you can only include either date or text value - if you include both, only one will be uploaded.
Level of support (date): Import will support cdx:lifecycle:milestone:endOfSupport property or eos_date (Medcrypt-specific property). Export will be the CycloneDX native property.
EOS/EOL (date): Import will support cdx:lifecycle:milestone:endOfLife property or eol_date (Medcrypt-specific property). Export will be the CycloneDX native property.
Level of support (text): Import will support medcrypt:lifecycle:milestone:endOfLifeText or eol_text. Export will be `medcrypt:lifecycle:milestone:endOfLifeText.
EOS/EOL (text): Import will support medcrypt:lifecycle:milestone:levelOfSupportText or eos_text. Export will be `medcrypt:lifecycle:milestone:levelOfSupportText.
If you have dependency data for your components in your CycloneDX SBOM, Helm captures and preserves these dependency relationships, and includes it when you export back to CycloneDX format. This ensures fidelity and completeness when working with CycloneDX SBOMs that include component relationship data.
Once you’ve uploaded your SBOM, Helm will automatically start matching your components with known software in the NVD (National Vulnerability Database). This leverages several match sources, such as Package URLs (PURLs), CPE strings, component names, and alias matches. Refer to Match statutes and Resolve match statuses for more information.
Check out Match sources for more information on sources we consult, and Match statuses to understand how we determine match statuses and suggest possible matches.
In the Select product drop-down, choose Create product, specify the product name, then click Save. This product will be created within your current workspace and cannot be moved to another workspace after creation. If you want to create it in a different workspace, you'll need to switch workspaces first.
In the Select version drop-down, choose Create version, specify the version, and click Save.
When you have an SBOM ready, just click the Add SBOM drop-down button (Manage SBOM if you already have uploaded other SBOMs), then select Upload SBOM when you’re ready to add your SBOM file.
You may have turned off auto-refresh. You can either turn it back on from the Auto-refresh switch above the table, or you can click Refresh to manually refresh the page.
You may have turned off auto-refresh. You can either turn it back on from the Auto-refresh switch above the table, or you can click Refresh to manually refresh the page. If you're still not seeing your SBOM, check the status of your SBOM file upload via the Manage SBOMs drop-down button > View file upload status. In the status modal, click the icon next to the Failed status to get more information. If you need help, contact us.
If Helm can’t find an exact match in the NVD, refer to Resolve match statuses for further instructions.
Have a large SBOM file?
If you have a larger SBOM file, this could take a little longer to upload. Get a cup of coffee or tea while we process your SBOM! We'll automatically start matching to known software in the NVD as soon as your upload is completed successfully.
Don't think your SBOM uploaded successfully?
If you're still not seeing your SBOM, check the status of your SBOM file upload via the Manage SBOMs drop-down button > View file upload status. In the status modal, click the icon next to the Failed status to get more information. If you need help, contact us.
SBOM contains component hashes
Although you can't currently view masked component hashes in Helm, rest assured that the component hash information in your SBOM has been retained and will be exported intact to any SBOM report.
If you have another format (e.g., Word, CSV), contact us so we can convert it for you. We’re in the process of adding more complete support for all of the data in your CycloneDX format of SBOM, as well as adding support for the SPDX SBOM format.
Don’t worry – we’ve got you covered! We can provide expert assessment, guidance, and design of anything from building cybersecurity and continuous improvement into your product development lifecycle to your Public Key Infrastructure cryptography to FDA letters and most anything in between.
We've worked with a lot of open-source tools ourselves and have also provided any other tools we know of for generating a CycloneDX SBOM or a SPDX SBOM.
Take our FDA readiness assessment survey to start down your path to a smooth FDA submission process!
This feature is in beta. Let us know your feedback and what we can do to enhance this experience!
You can upload CSV and Excel files directly to Helm and have them automatically converted to a CycloneDX SBOM. This eliminates the need for .
Click the Upload SBOM button.
In the modal that displays, specify a product name and version.
Helm supports the ingestion of licensing information from CycloneDX and SPDX SBOMs, and enriches this information via our partnership integration with Tidelift. You can also manually enter or modify license details as needed.
For each component, you can view its details or manually modify it to add licensing information. All licensing information displays in the License details section of the component details panel.
For active SPDX licenses, these will be automatically linked to the corresponding license URL from the .
If you have deprecated SPDX licenses in your SBOM, Helm will retain the URL.
Helm also handles .
Helm populates license information from the following sections in a CycloneDX SBOM:
components > licenses: The primary source for license information. Each component must include either a license ID, name, or SPDX expression.
components > pedigree > notes: This will be populated into the License comments field. Because this notes field applies to all components in a CycloneDX SBOM, the information in this field will be applied to all licenses for a particular component.
Helm does not support license information populated from other sections of a CycloneDX SBOM. Any such information will be retained in exports but ignored in the UI.
A SPDX SBOM contains packages, each of which could be a file or set of files, grouped by the SBOM author. These files could be one or more files of any type including but not limited to source, documents, binaries, etc. Helm processes each package as a component. A SPDX SBOM can contain licensing information at the package, file, or even code snippet level. For every package that contains licensing, Helm populates that license information into the dependency component's details in the Licenses section.
Helm processes each package as a component and populates license information from the following fields:
PackageLicenseConcluded: The primary field for populating the license name. If missing, Helm will use the PackageLicenseDeclared field.
ExtractedLicensingInfo: If present, this section provides license names and text for custom or non-SPDX licenses. When a custom license is added, you can manually enter the license name, but the URL will not display.
Helm does not currently handle file-level licensing. If you need this, ! If your SBOM includes file-level license information, it will be included in the export but not displayed in the UI.
Helm has partnered with Tidelift to enrich license information for open-source components that lack licensing details:
Component license is set to No license (NONE in SPDX): If a component in your SBOM lacks a license but has a unique PURL or Helm can generate the correct PURL, Helm will check with Tidelift to determine if any licenses are associated with that component. If so, Helm will add those licenses to provide you with a comprehensive view of licensing info and identify licensing risks across your supply chain.
Component license is set to Unknown (NOASSERTION in SPDX): If your SBOM component license is set to Unknown (NOASSERTION in SPDX), but Tidelift indicates that there is one or more licenses associated with that component, we will add those licenses for you.
Component has one or more licenses: If your SBOM component has at least one license, but Tidelift shows that it is inaccurate or that there are additional licenses associated with this component, we will not update this license information. If this is something that you would like us to add,
For existing components, you can have Helm automatically add license information. In the components table, click Actions > Reload component. Note that reloading will discard any metadata you may have added to this component, such as review information, and will re-identify associated vulnerabilities, so you may see some discrepancy in your number of vulnerabilities for that component. This reduces your manual effort of tracking down licensing information, ensuring you have the latest license information available from our data sources.
The Licenses section of the component details panel displays the following fields:
License type: This field is populated from the license information in your SBOM.
License expression:
For components combining multiple SPDX licenses with AND or OR, or using a SPDX license exception.
Individual licenses: If your SBOM component contains multiple SPDX licenses that are not combined with AND or OR (or +) or if your component has custom licenses, choose this option.
License name:
SPDX SBOMs
For SPDX SBOMs, this field is populated from the SBOM’s PackageLicenseConcluded, PackageLicenseDeclared, or ExtractedLicensingInfo sections. PackageLicenseDeclared will only be used if PackageLicenseConcluded field in the SBOM is blank or omitted.
If the package-level licensing has a LicenseRef[idstring] and that LicenseRef[idstring] matches one in the ExtractedLicensingInfo section, the license name and full license text will be populated from that section into License name and License text, respectively. If the license name is missing, the term Custom license will be used as the license name.
Non-SPDX license in your SPDX SBOM: If your SPDX SBOM contained the ExtractedLicensingInfo section, the License name field will be populated with the corresponding license name from ExtractedLicensingInfo > name
CycloneDX SBOMs
This field is populated from the components > licenses > license > id field if the id field in used in the SBOM, or the components > licenses > license > name field if it exists.
CycloneDX SBOM does not contain licensing info or licensing info is empty: Since there is no corresponding defined term for missing CycloneDX licensing information, this will show as Not set.
License URL:
For SPDX licenses, this field is automatically populated from the SPDX license list and is uneditable.
The URL does not display for custom licenses. If this is something that you would like us to add, .
CycloneDX SBOM: This is populated from the components > licenses > license url field.
License text:
SPDX SBOM: For custom licenses, this will be populated from the ExtractedLicensingInfo > text section of SPDX SBOMs.
You can add or modify license text for both SPDX and custom licenses.
License comments:
SPDX SBOM: This is only populated from the package-level PackageLicenseComment field.
CycloneDX SBOM: There is at least one SPDX license ID in the components > pedigree > notes field. Some automatic scanning tools will automatically populate either the SPDX license full name or an AND/OR SPDX expression here. If the notes field exists in your SBOM file, it will be added as License comments for all of the licenses for that particular SBOM component.
License source:
SBOM: The license information was populated directly from your SBOM.
System: For open-source components that have unique PURLs but do not have license information, Helm checks Tidelift to determine if there are known licenses for those components. If so, Helm enriches the component with that information. Helm will only for components that do not have any license information; it will not add licenses to components that already have one or more licenses, nor will it replace existing licenses.
User: License was added or modified by a user.
Click Add dependency component from the Add SBOM (Manage SBOMs) drop-down button.
Specify the required fields.
In the License details section, select a License type. Choose License expression if you have one or more SPDX licenses in an expression (e.g., connected with AND, OR, or WITH) or Individual licenses if you have one or more SPDX or custom licenses (not in an expression) that you want to add to a component. You can also select Unknown or No license.
Click Actions > Edit details to open the component details.
In the License details section, click Edit in the license section you want to edit.
If you just want to edit license type, license text or license comments, click the edit icon next to that field. Any edits you make to the license comments will be applied to all other licenses for this component.
Click Actions > Edit details to open the component details.
In the License details section, click Edit in the license section you want to edit. This will display a Delete action.
Click Delete, then confirm the deletion. You cannot recover a deleted license or its related data. If you are deleting the only license associated with this component, this will also delete any license comments.
You can ingest or manually add or edit deprecated SPDX licenses. Deprecated SPDX licenses are available in the Deprecated licenses section of the License type drop-down.
You can filter licenses on the SBOM page to narrow down your view:
SPDX license ID
License name
No license (NONE for SPDX)
Unknown (NOASSERTION for SPDX)
You can export your SBOM with enriched license information in the following formats. Click Reports in the sidebar, then select your preferred format.
FDA SBOM: Excel format.
Vulnerability Disclosure Report (VDR): JSON format. Missing license information will be noted as Unknown (NOASSERTION in SPDX) in the export.
CycloneDX SBOM: JSON format. Missing license information will be noted as Unknown (NOASSERTION in SPDX) in the export.
"Resilience is the capacity to recover quickly from difficulties. This should be the essence of your cybersecurity strategy"
-Stephane Nappo, 2018 CISO of the year
Cybersecurity teams across all industries face mounting challenges, but medical device manufacturers face unique pressures that require organization-wide collaboration:
Legacy and technical debt: Older devices that weren't designed with current security standards.
Complex dependency relationships: Understanding vulnerabilities across interconnected software components
AI/ML security concerns: New attack vectors targeting artificial intelligence in medical devices.
Supply chain vulnerabilities: Third-party software and hardware components introducing unknown risks.
Resource constraints: Doing more with smaller budgets, fewer cybersecurity specialists, and limited tools
Regulatory complexity: Navigating FDA cybersecurity requirements, CISA reporting, and international standards
Last-minute priorities: Security often competing with feature delivery and time-to-market pressures
Remote work security: Securing development and support activities across distributed teams
Ransomware sophistication: Attackers specifically targeting healthcare infrastructure
Zero-day vulnerabilities: Unknown exploits requiring rapid response capabilities
Nation-state attacks: Advanced persistent threats targeting critical infrastructure
Social engineering evolution: Increasingly sophisticated phishing and manipulation tactics
Vendor transparency issues: Difficulty getting timely vulnerability information from suppliers
Audit and compliance burden: Demonstrating cybersecurity effectiveness to regulators and customers
Skills shortage: Limited cybersecurity expertise within medical device organizations
Paradigm shift requirements: Moving from customer-managed security to manufacturer-assured security
Why it matters: FDA now requires "reasonable assurance of cybersecurity" - this is a business and legal responsibility
Your role:
Resource allocation: Ensure adequate budget and personnel for cybersecurity initiatives
Strategic integration: Make cybersecurity part of business strategy, not just IT function
Culture setting: Demonstrate that security is a core value through actions and decisions
Regulatory accountability: Understand that cybersecurity failures can result in FDA enforcement
Why it matters: "Security by design" is now required under 21 CFR Part 820
Your role:
Secure coding practices: Follow established secure development guidelines and training
Threat modeling participation: Contribute domain expertise to identify potential attack vectors
Security requirement implementation: Build security controls as primary features, not add-ons
Vulnerability reporting: Immediately escalate potential security issues discovered during development
Why it matters: Cybersecurity documentation is now mandatory for FDA submissions
Your role:
SPDF integration: Ensure Secure Product Development Framework is embedded in quality processes
Documentation management: Maintain comprehensive cybersecurity evidence for regulatory submissions
Risk assessment coordination: Integrate cybersecurity risk with traditional safety risk management
Compliance monitoring: Track evolving regulatory requirements and ensure organizational alignment
Why it matters: Compromised manufacturing systems can inject malware into medical devices
Your role:
Secure production environments: Implement and maintain cybersecurity controls in manufacturing systems
Supply chain verification: Validate security of components and materials from suppliers
Configuration management: Ensure devices are deployed with secure, validated configurations
Incident detection: Monitor for and report potential cybersecurity incidents in operations
Why it matters: You're often the first to learn about customer cybersecurity concerns
Your role:
Customer education: Help customers understand and implement device security requirements
Incident identification: Recognize and escalate potential cybersecurity issues reported by customers
Security communication: Provide accurate information about device security capabilities and limitations
Feedback collection:
Why it matters: Social engineering attacks target everyone, and insider threats are a major concern
Your role:
Security awareness: Recognize and report phishing, suspicious activities, and potential threats
Policy compliance: Follow established cybersecurity policies and procedures consistently
Continuous learning: Stay informed about cybersecurity threats and best practices
Incident reporting: Immediately report suspected cybersecurity incidents without fear of blame
"Resilience is how we go on the offensive in Information Security." —Leigh McMullen, Gartner
Regular training programs: Cybersecurity education tailored to different roles and responsibilities
Medical device-specific scenarios: Training that addresses healthcare cybersecurity challenges
Current threat briefings: Regular updates on evolving cybersecurity threats and attack methods
Hands-on exercises: Simulated phishing attacks and incident response drills
Clear escalation paths: Everyone knows how to report cybersecurity concerns quickly
Blame-free reporting: Encourage reporting of mistakes and potential incidents without punishment
Security champions: Identify and empower cybersecurity advocates within each team
Cross-functional collaboration: Break down silos between cybersecurity, quality, engineering, and operations
Defined responsibilities: Clear cybersecurity expectations for every role in the organization
Performance integration: Include cybersecurity responsibilities in job descriptions and reviews
Positive reinforcement: Recognize and reward good cybersecurity behaviors and incident reporting
Continuous improvement: Regular assessment and enhancement of cybersecurity culture
Integrated risk assessment: Combine cybersecurity risks with traditional safety and quality risks
Threat modeling participation: Include diverse perspectives in identifying potential attack vectors
Vulnerability management: Systematic processes for identifying, assessing, and addressing vulnerabilities
Incident preparedness: Regular testing and refinement of cybersecurity incident response procedures
Clinical impact assessment: Understand how cybersecurity failures could affect patient care
Healthcare workflow security: Design security controls that work within clinical environments
Emergency access procedures: Ensure cybersecurity doesn't prevent critical patient care
Provider communication: Clear guidance on cybersecurity responsibilities for healthcare customers
FDA guidance implementation: Systematic approach to meeting evolving cybersecurity requirements
Documentation culture: Everyone understands their role in creating regulatory evidence
CISA reporting preparedness: Organization-wide awareness of incident reporting requirements
International considerations: Cybersecurity compliance across global markets and regulations
Development to deployment: Security responsibilities across entire product lifecycle
Post-market monitoring: Everyone's role in identifying and addressing field cybersecurity issues
Legacy device management: Strategies for maintaining security of older devices
End-of-life planning: Secure decommissioning and data protection procedures
Assess current culture: Survey employees on cybersecurity awareness and responsibilities
Define role-specific expectations: Document cybersecurity responsibilities for each position
Establish communication channels: Clear, accessible paths for reporting cybersecurity concerns
Start training programs: Begin with basic cybersecurity awareness for all employees
Integrate with business processes: Embed cybersecurity into existing workflows and procedures
Develop internal champions: Identify and train cybersecurity advocates within each team
Create feedback loops: Regular assessment of cybersecurity culture effectiveness
Enhance technical capabilities: Provide role-specific cybersecurity tools and training
Leadership modeling: Executives consistently demonstrate cybersecurity commitment
Performance integration: Cybersecurity becomes part of regular performance management
Continuous evolution: Culture adapts to changing threats and regulatory requirements
Industry engagement: Participate in cybersecurity information sharing and best practice development
Bottom line: In today's threat environment, medical device cybersecurity cannot be delegated to a single team. Organizations that successfully integrate cybersecurity into their culture will be better positioned to protect patients, comply with regulations, and maintain business resilience in an increasingly complex digital healthcare ecosystem.
Cybersecurity is a business imperative: Not just an IT problem, but essential for regulatory compliance and patient safety
Everyone has a role: From executives setting strategy to employees recognizing phishing attempts, security is everyone's responsibility
Medical devices are special: Healthcare cybersecurity requires unique considerations for patient safety and clinical workflows
Culture enables technology:
Manage component: This will display all details for this component in view mode. This will also show how Helm matched the component, as well as any review information from your team. If you edit the component, you'll be prompted to confirm this change. This is because Helm will reload the component and rematch it, which will discard any review information you may have added.
Add review note: Add a review note, then change the review status to Reviewed. You'll see this updated status in the Review status column, along with a note icon.
Review history: This will show any analysis notes or review status changes your team has made. You can also add a review note from here.
Reload component: If a component is in an error state that is not caused by an inaccurate or unsupported version, you can reload it, but you should rarely, if ever, need to do this. This is a backup action in case you run into an error state. Helm will discard any previous information for the component, and attempt to match it to known software.
Auto-enrich CPEs and PURLs: Helm automatically updates and for more precise matching.
Add missing license information: with missing license data from Helm's data sources.
Create lifecycle rules: to manage Level of support and EOS/EOL information across products (via Rules manager).
Click Match status badge: Match status badges in Helm tables are clickable, enabling you to quickly drill down for more information, such as disambiguating a match, fixing a version, contacting us and more.
Clear next step: For each component, if there is a clear next step you need to take, that will be in the Actions column. If not, you'll just see the actions overflow ... button.
Delete components: from a product version.
Bulk component actions
across multiple components.
Create lifecycle rules: to manage Level of support and EOS/EOL information across products (via Rules manager).
IMPORTANT: This topic was last updated July 2025. Although Medcrypt attempts to keep this up-to-date, you should always check the latest FDA guidances and consult with qualified regulatory professionals for your specific situation. This content provides general information about cybersecurity V&V considerations and is not intended as regulatory consulting advice.
...
"component" : {
"name" : "[PRODUCT_NAME]",
"version" : "2.2.3".
"type" : "application",
"bom-ref" : "dd8fc70b-767a-4398-885c-bbd0e8f6c68",
"properties" : [
{
"name" : "cdx:lifecycle:milestone:endOfSupport",
"value" : "2026-02-07T22:00:0Z"
},
{{
"name" : "medcrypt:lifecycle:milestone:levelOfSupportText",
"value" : "Q1 2026"
}
...
...
"component" : {
"name" : "[PRODUCT_NAME]",
"version" : "2.2.3".
"type" : "application",
"bom-ref" : "dd8fc70b-767a-4398-885c-bbd0e8f6c68",
"properties" : [
{
"name" : "medcrypt:vulnerability:remediation:mskb",
"value" : "KB12849"
},
{{
"name" : "medcrypt:vulnerability:remediation:mskb",
"value" : "KB994849"
}
...
Cloud and hybrid environments: Securing data across multiple platforms and service providers.
IoT proliferation: Medical devices that are always, periodically, or accidentally connected to networks.
Unscheduled downtime: Ransomware and cyber attacks disrupting operations and patient care
Insider threats: Unintentional or malicious actions by employees and contractors
Continuous adaptation required: Threats evolve rapidly, requiring ongoing organizational learning and improvement
The Project Management Body of Knowledge (PMBOK) defines V&V thusly:
"Validation: The assurance that a product, service or system meets the needs of the customer and other identified stakeholders. It often involves acceptance and suitability with external customers."
"Verification: The evaluation of whether or not a product, service, or system complies with a regulation, requirement, specification, or imposed condition. This is often an internal process."
Cybersecurity validation: Are you building the right security controls for your device?
Do the security controls actually protect against the threats your device will face in clinical environments?
Can healthcare users realistically implement and maintain these security measures?
Do the controls work effectively in the intended healthcare setting without interfering with clinical workflows?
Cybersecurity verification: Are you building the security controls correctly?
Do the implemented security controls meet the technical specifications and requirements?
Have the controls been correctly coded, configured, and integrated?
Do the controls function as designed under various conditions and attack scenarios?
Based on current FDA guidance, cybersecurity V&V should typically demonstrate:
Security by design: Controls built into the device architecture
Risk-based approach: V&V depth matching the cybersecurity risk level
Threat model alignment: Testing against identified attack vectors
Clinical context: Security that works in healthcare environments
Testing standards:
AAMI/UL 2900-1:2017, Clauses 13-19: Security testing requirements
IEC 81001-5-1:2021, Clauses 5.5-5.7: Verification and validation for health software
ISO 14971: Risk management for medical devices (security risk integration)
AAMI TIR 57: Security risk management principles
What to verify:
Authentication mechanisms function as specified
Authorization controls properly restrict access
Encryption implementation meets design requirements
Secure communication protocols operate correctly
Security logging captures required events
Methods:
Code reviews - Static analysis of security-critical code
Configuration audits - Verification of security settings and parameters
Interface testing - Security boundary and API validation
Cryptographic validation - Algorithm implementation and key management verification
What to verify:
Input validation prevents malicious data processing
Access controls enforce intended permissions
Secure update mechanisms function properly
Error handling doesn't leak sensitive information
Security monitoring and alerting work as designed
Methods:
Unit testing - Individual security component verification
Integration testing - Security control interaction validation
Regression testing - Security preservation across software updates
Boundary testing - Security limits and edge case handling
What to verify:
Implementation meets regulatory requirements (FDA, IEC, etc.)
Security controls align with industry standards
Documentation accurately reflects implemented security
Configuration matches security specifications
Methods:
Requirements traceability - Mapping security requirements to implementation
Audit trails - Documentation of security decisions and implementations
Standards compliance testing - Verification against applicable cybersecurity standards
Gap analysis - Identification of missing or incomplete security controls
What to validate:
Device resilience against identified threats
Effectiveness of security controls in real-world attack scenarios
Ability to detect and respond to cybersecurity incidents
Continued operation under attack conditions
Methods:
Penetration testing: Simulated attacks against the device
Vulnerability scanning: Automated identification of potential weaknesses
Red team exercises: Comprehensive adversarial testing
Threat modeling validation: Confirmation that identified threats are properly addressed
What to validate:
Security controls work in typical healthcare settings
Healthcare workers can successfully operate security features
Clinical workflows aren't disrupted by security measures
Interoperability with other medical devices and systems
Methods:
Usability testing: Healthcare user interaction with security controls
Clinical environment simulation: Testing in realistic healthcare scenarios
Interoperability testing: Security in connected healthcare ecosystems
Workflow integration testing: Security alignment with clinical processes
What to validate:
Security controls perform effectively over time
Maintenance and update procedures work in practice
Incident response procedures are effective
Security monitoring provides actionable information
Methods:
Pilot deployments: Limited field testing of security controls
Long-term monitoring: Security effectiveness over extended periods
Incident simulation: Testing of cybersecurity response procedures
Update validation: Security patch and update process testing
Critical validation areas:
Security controls don't interfere with critical device functions
Emergency access procedures work when security systems fail
Cybersecurity incidents don't compromise patient care
Recovery procedures minimize patient safety impact
Validation methods:
Safety-security interaction testing: Ensuring controls don't create safety hazards
Failure mode analysis: Understanding patient safety implications of security failures
Emergency scenario testing: Security behavior during clinical emergencies
Recovery time validation: Ensuring acceptable restoration of device functionality
Key validation considerations:
Network constraints: Security controls work with hospital network limitations
User capabilities: Healthcare workers can realistically manage security requirements
Maintenance windows: Security updates fit healthcare operational schedules
Legacy integration: Security works with existing healthcare infrastructure
V&V evidence typically needed:
Test plans and protocols: Documented approach to cybersecurity V&V
Test results and analysis: Evidence of security control effectiveness
Traceability matrices: Links between security requirements, controls, and validation
Risk assessment updates: How V&V results inform cybersecurity risk management
High-risk devices (life-sustaining, implantable, critical care):
Comprehensive penetration testing required
Extensive threat modeling validation
Clinical environment testing essential
Independent security assessment recommended
Moderate-risk devices:
Focused security testing on key attack vectors
Standard vulnerability scanning and assessment
Basic clinical workflow validation
Internal security review processes
Lower-risk devices:
Essential security control verification
Automated security scanning
Configuration and compliance checking
Documentation of security design decisions
Development phase:
Security architecture verification
Security control unit testing
Threat model validation
Early penetration testing
Pre-market phase:
Comprehensive security testing
Clinical environment validation
Regulatory submission preparation
Final security assessment
Post-market phase:
Ongoing vulnerability monitoring
Security update validation
Incident response testing
Continuous security assessment
Solutions:
Partner with specialized cybersecurity testing firms
Invest in internal cybersecurity testing capabilities
Leverage industry standards and testing frameworks
Participate in information sharing organizations (like MedISAO)
Solutions:
Include healthcare users in security control validation
Test security measures in realistic clinical scenarios
Design security that enhances rather than hinders clinical workflows
Iterative testing and refinement of security controls
Solutions:
Regular threat model updates and revalidation
Continuous vulnerability monitoring and assessment
Industry threat intelligence integration
Periodic security testing and assessment updates
Bottom line: Cybersecurity V&V for medical devices requires specialized approaches that consider patient safety, healthcare environments, and evolving threat landscapes. A systematic, risk-based approach to V&V can help demonstrate regulatory compliance while ensuring security controls actually protect patients and healthcare organizations. Consult with cybersecurity and regulatory experts to develop appropriate V&V strategies for your specific devices and risk profile.
V&V is essential for cybersecurity assurance: Cannot demonstrate "reasonable assurance of cybersecurity" without systematic validation
Medical devices require specialized approaches: Healthcare environment and patient safety considerations demand unique V&V methods
Risk-based scaling: V&V depth and methods should match the cybersecurity risk profile of your device
Continuous process: Cybersecurity V&V extends beyond initial development through entire device lifecycle
Multi-stakeholder involvement: Effective V&V requires collaboration between security, quality, clinical, and regulatory teams
Handle unmatched components: Try to resolve any Not found statuses, as this indicates Helm was unable to find a match in the NVD.
When you determine the appropriate matches, create an alias for each component so that these will be auto-matched for all future SBOMs.
No license (NONE in SPDX): If you are certain that your SBOM component does not have an associated license, choose this option. In a SPDX SBOM, this is indicated with the NONE value.
Unknown (NOASSERTION in SPDX): If you are not sure whether your SBOM has an associated license, choose this option. In a SPDX SBOM, this is indicated with the NOASSERTION value. In a CycloneDX SBOM, if your SBOM does not contain licensing information or licensing info is empty, it will display as Unknown
Individual licenses: For components with multiple SPDX licenses not combined, or for custom licenses.
No license (NONE in SPDX): The component has no associated license. In a SPDX SBOM, this is indicated with the NONE value.
CycloneDX SBOM: There is no corresponding value for this in CycloneDX 1.4 or 1.5 specs. If you manually add this for a license, then export your CycloneDX SBOM, the licensing information for this component will have this value in the components > licenses > license name field.
SPDX SBOM: Indicates that the SPDX SBOM author provided NONE as the package-level license information. The SPDX spec requires that when the info is not provided, it be set to NOASSERTION.
For open-source dependency components, Helm will attempt to identify if there actually is an associated license for you.
Unknown (NOASSERTION in SPDX):
Use this if you are unsure whether the component has an associated license. For open-source dependency components, Helm will attempt to identify this license for you.
SPDX SBOM: Indicates that the SPDX SBOM author provided NOASSERTION or did not provide package-level license information.
CycloneDX SBOM: Indicates that the CycloneDX SBOM did not contain any licensing information or the licensing information was empty.
SPDX SBOM has NONE or NOASSERTION in the package: If the PackageLicenseConcluded field contains NONE or NOASSERTION, that value will be populated here. If the component is open-source and has a unique PURL, then we will check whether there is license information for that component and if so, enrich it with the missing information.
SPDX SBOM contains no package-level licensing information: NOASSERTION will be populated into the License name field.
SPDX licenses combined with +: We do not currently support adding licenses combined with a +, such as Apache-2.0+MIT. However, we will import it from your SBOM. However, if you need to edit this, Helm will automatically convert the + expression to use AND. If you need support for +, let us know!
SPDX license exceptions: If you need to add a SPDX license exception, type WITH after your first SPDX license, such as GPL-2.0-or-later WITH Bison-exception-2.2. Make sure to observe spacing. After you type WITH, followed by a space, then you can either click the drop-down to view only valid SPDX license exceptions or start typing to filter the exceptions.
Comments are applied to all licenses associated with a dependency component.
If you're adding a license expression, click the License expression drop-down to show the SPDX license list or start typing to filter the list. You can use AND, OR, or WITH. For example, typing Ap would give you applicable Apache licenses for the first half of the expression, while typing Apache-2.0 AND MI would give you any available MIT licenses for the second half. Make sure to observe spacing.
If you want to add a nested expression, such as MIT AND (LGPL-2.1-or-later OR BSD-3-Clause), type ( to display the SPDX license list or start typing to filter the list. Note that the expression in the parentheses will be processed first.
If you want to add a SPDX license exception, type WITH after the license, then select the exception from the drop-down (e.g., GPL-2.0-or-later WITH Bison-exception-2.2). Make sure to observe spacing.
If you're adding one or more individual licenses, click the License name drop-down to show the SPDX license list, start typing to filter the list, or keep typing to enter a custom license.
If you need to clear a license value, click the x icon in the field.
If you need to remove a license before you've saved, click Remove in the license section.
For individual custom licenses, specify any license text. You cannot add text for a SPDX license.
Add any license comments in the License comments field. License comments will be associated with all licenses for that component.
For individual licenses, click Add another license to add a new license. You cannot add individual licenses to a License expression. You can add as many licenses as you want. Your first license will show License 1, then your second will show License 2. When you save, these section names will change to the license name or expression itself.
Click Add component. You'll see a success message. If you don't see your component, you may have a sort applied.
Custom licenses
SPDX SBOM: JSON or XML format. Any file-level licensing details will also be included in the export, though they will not display in the Helm UI.
CSV format: Export your SBOM data, including CPE/PURL and license information, as a CSV file.
CSV
Create .zip: zip -r yourfilename.zip yourdirectory -x '**/.*'
In the SBOM type drop-down, select Document.
Select or drag and drop a file in the SBOM file field.
Click Generate CycloneDX SBOM.
Preview your data before uploading. Review the component information to ensure everything looks correct and catch any formatting issues.
Click Upload to convert and import your SBOM.
Once imported, your SBOM will be ready for vulnerability analysis and remediation, and can be exported in CycloneDX, SPDX, or CSV format, plus our expert-crafted FDA SBOM. You can also export VEX and VDR reports.
IMPORTANT: This topic was last updated following the June 2025 major FDA guidance update. Although Medcrypt attempts to keep this up-to-date, you should always check the latest guidances.
"The future of cybersecurity is not in building higher walls but in building smarter systems that can adapt and learn from each new challenge".
-Dan Schulman, CEO of Paypal
Critical changes you need to know:
New expanded "cyber device" definition - devices meeting all three criteria now qualify
Secure Product Development Framework (SPDF) strongly encouraged for all submissions
Enhanced documentation requirements for eSTAR submissions
"Security by design" now legally required under 21 CFR Part 820
For devices submitted before March 29, 2023: The cybersecurity requirements do not apply to applications submitted before this date.
For previously authorized devices: If you're making changes that require premarket review, the cybersecurity requirements apply to the new submission.
Important exceptions:
Class III devices or changes requiring new 510(k): Almost all changes must be reviewed, and unreported changes must still be documented annually
Post-market requirements still apply: You're still required under 21 CFR 820 and 806 (corrections/removals) to manage post-market cybersecurity issues per the post-market guidance
This is not intended to be an exhaustive list. We recommend that you consult FDA resources to plan and implement risk mitigation strategies.
According to the FDA's latest guidance, you must now demonstrate "reasonable assurance of cybersecurity" through:
Secure Product Development Framework (SPDF) integrated into your quality management system
Strategy for identifying, monitoring, and addressing cybersecurity vulnerabilities and exploits
Plan for coordinated vulnerability disclosure and incident response protocols
Plan for post-market updates and patches on both regular and emergency cycles
Software Bill of Materials (SBOM) for all commercial, open-source, and off-the-shelf components
Final Rule: Expected October 2025
Implementation: 2026
Applies to: 316K+ entities including hospitals and medical device manufacturers
Major cyber incidents: Report to CISA within 72 hours
Ransomware payments: Report to CISA within 24 hours
Affected entities: Critical infrastructure including healthcare facilities and device manufacturers
Determine if you're a "covered entity" under CIRCIA
Establish incident response procedures with these tight timelines
Set up reporting capabilities through CISA's new portal
Train your team on rapid incident identification and reporting
"The pace of technological change requires us to rethink our strategies for security, and embrace a proactive, not reactive, mindset."
-Bruce Schnier
Key takeaway: If you didn't specifically design your device to NOT be connected, FDA assumes it CAN be connected.
The FDA now considers a device a "cyber device" if it meets the following three criteria:
Contains software (validated, installed, or authorized by sponsor)
Has ability to connect to internet (intentionally OR unintentionally)
Contains technological characteristics that could be vulnerable to cybersecurity threats
ANY of these interfaces now make your device "connectable" unless you can prove otherwise:
USB ports, Ethernet connections, serial ports
Wi-Fi, Bluetooth, Bluetooth Low Energy, cellular
RF communications, cloud connections
Any hardware connector capable of internet connectivity
Must be integrated into your quality management system
Covers entire Total Product Lifecycle (TPLC)
Requires "security by design" from first line of code
Must demonstrate cybersecurity design controls under 21 CFR Part 820
Your submission must include comprehensive cybersecurity documentation scaling with your device's risk level:
Core documents:
Cybersecurity risk assessment and management plan
Threat modeling analysis
SPDF implementation evidence
SBOM (following NTIA minimal requirements)
Vulnerability monitoring and management plan
Penetration testing reports
Security architecture documentation
Your device must address:
Authenticity: Verify device/user identity
Authorization: Control access appropriately
Availability: Maintain device functionality
Confidentiality: Protect sensitive data
Secure updatability: Enable safe patches/updates
"The definition of a medical device encompasses not only capital equipment, but also surgical instruments, patient monitoring, and even software. The breadth and variety of the field, combined with the critical importance of med devices to life and safety, requires a deliberate, focused approach to cybersecurity to ensure that they are resilient throughout their lifecycle." —Nancy Brainerd (CISSP/CIPP), Senior Director of Product Security
Medical device scope includes:
Capital medical equipment
Surgical instruments with electronic components
Patient monitoring devices
Medical software applications
Connected diagnostic equipment
Any device with software components and connectivity potential
Section 524B(b)(1) of the FD&C Act requires that you provide a plan to monitor, identify, and address, as appropriate, in a reasonable time, postmarket cybersecurity vulnerabilities and exploits, including coordinated vulnerability disclosure and related procedures.
Known acceptable vulnerabilities: Section 524B(b)(2) and 524B(b)(2)(A) requires that you make available postmarket updates and patches to the device and related systems to address these, on a reasonably justified regular schedule.
Critical vulnerabilities that could cause uncontrolled risks: Section 524B(b)(2) and 524B(b)(2)(B) requires that you make available postmarket updates and patches to the device and related systems to address these, as soon as possible out of cycle.
Must demonstrate capability for both routine and emergency patching throughout the device lifecycle.
The 2025 guidance emphasizes risk-based documentation, thus your submission depth must match your device's cybersecurity risk level, not arbitrary documentation requirements.
"The pace of technological change requires us to rethink our strategies for security, and embrace a proactive, not reactive, mindset." —Bruce Schneier
Using proprietary authentication: FDA prefers widely-tested, standard methods
Shared keys across devices: Each device needs unique cryptographic keys
Unprotected NFC/RFID interfaces: Can create unexpected vulnerabilities
Missing channel authentication: Communications must be signed and encrypted
Inadequate threat modeling: Must cover your specific device and use environment
Comprehensive threat modeling using recognized frameworks
Evidence of security testing including penetration testing
Clear vulnerability management process with timelines
User security information in device labeling
Participation in Information Sharing and Analysis Organization (ISAO)
Your cybersecurity program must address labeling including:
Recommended cybersecurity controls for intended use environment
Security controls users interact with (passwords, updates, etc.)
Configuration requirements (firewall recommendations, etc.)
Manufacturer Disclosure Statement for Medical Device Security (MDS2)
Complete SBOM: SBOM must be complete and all required documentation prepared for regulatory submission. While the FDA recommends SBOMs be provided to customers for transparency, this creates additional attack surface exposure that your company must carefully weigh.
Logging capabilities and forensic log capture instructions
Review the June 2025 FDA guidance: Download from FDA.gov
Assess if you're a "cyber device" under expanded definition.
Implement SPDF into your quality management system.
Prepare for CISA reporting: Establish incident response procedures.
Update documentation to meet 12-document requirement for eSTAR submission
AAMI SW96 (now recognized by FDA)
ISO 14971 (safety risk management)
AAMI TIR 57 (security risk management)
IEC 81001-5-1 (health software security)
Choose widely-tested encryption algorithms
Implement proper key management with unique device keys
Plan for secure update mechanisms
Design with hardware resource constraints in mind
Ensure audit logging capabilities
SBOM disclosure trade-offs: Balance FDA's transparency recommendations against increased attack surface exposure from revealing component details to potential threat actors.
June 2025 FDA Guidance:
June 2025 guidance (PDF): https://www.fda.gov/media/173516/download
FDA Cybersecurity main page: https://www.fda.gov/medical-devices/digital-health-center-excellence/cybersecurity
CISA Services portal: For incident reporting when requirements take effect
MITRE Medical Device Playbooks: Incident response and threat modeling guidance (https://www.mitre.org/news-insights/publication/medical-device-cybersecurity-regional-incident-preparedness-and-response - playbook PDF must be downloaded from site)
MedISAO: Information sharing organization for medical device cybersecurity (https://www.medisao.com/)
Bottom line: Cybersecurity is now inseparable from device safety and effectiveness. The FDA's 2025 guidance makes this a central pillar of medical device compliance requiring proactive, lifecycle-integrated security management.
The cybersecurity landscape has fundamentally shifted: This is no longer optional compliance but a core safety requirement.
"Security by design" is now law: Integrate SPDF into your development process immediately.
CISA reporting is coming fast: Prepare your incident response procedures now.
Documentation requirements have expanded significantly: Budget time and resources accordingly.
Device connectivity definitions are much broader: Assume your device is "connectable" unless you can prove otherwise.
CA
Certificate Authority. This is the organization which issues a certificate.
CEP
Component Environment Profile. This includes characteristics such as maximum impact of the component, whether the component is on the attack surface, whether there is data flow (and what data) to the component, etc.
CeQ
Our Cybersecurity-Enabled Quality System is a Medcrypt service offering.
CISA KEV
Cybersecurity & Infrastructure Security Agency Known Exploit Vulnerabilities
COTS
Commercial Off-the-Shelf Software. This is a software or hardware product that is commercially ready-made and can be bought, licensed, or rented by the general public. This is also referred to as Off-the-Shelf Software. See that definition in this table for more information.
CNA
CVE Numbering Authority, such as Microsoft.
CPE
Common Platform Enumeration.
Vulnerabilities can be identified through the use of three fields: CPE, PURL, and SWID. Helm supports CPE and PURL.
NIST defines CPE as a structured naming scheme for IT systems, software, and packages. It is based on the generic syntax for Uniform Resource Identifiers (URI) and includes a formal name format, a method for checking names against a system, and a description format for binding text and tests to a name. The CPE specification was designed for operating systems, applications, and hardware devices. It is maintained by the NVD.
CPE is recommended for use in identifying a client or server application, firmware, or operating system.
CQI
Continuous Quality Improvement
CSAF
Common Security Advisory Framework is a standard for machine-readable security advisories developed by the OASIS Open CSAF Technical Committee.
CSR
Certificate signing request
CycloneDX
This is derived from CycloneDX specification and use case information.
CycloneDX is a machine-readable SBOM format that describes the following types of components: applications, containers, devices, libraries, files, firmware, frameworks, operating systems. It also describes services. Helm supports CycloneDX.
CWE
Component Weakness Enumeration
EPSS
Model that tries to predict how often a vulnerability could be exploited in the wild.
HDO
Health Delivery Organization, such as a group of physicians working together.
HSM
Hardware Security Module. An HSM is a special 'trusted' computer performing a variety of cryptographic operations such as key management, key exchange, encryption/decryption etc.
NTIA
National Telecommunications and Information Administration
OSS
Open-Source Software. The FDA wants to make sure that you know what components are COTS or OSS. OSS and SOUP are often incorrectly used interchangeably. If you have OSS components, you will need to provide documentation to the FDA that it is either being actively maintained, or if it not being actively maintained or is EOL, you’ll need to provide information on how you are mitigating any vulnerabilities with that component.
OTS
Off-the-Shelf Software.
This information is derived from the FDA’s “Off-the-Shelf Software Use in Medical Devices” guidance.
As the use of general-purpose computer hardware becomes more prevalent, OTS software is being used more often in medical devices. However, it may not be appropriate for a specific use in a medical device. As an MDM, you give up software lifecycle control with OTS, but are still responsible for your device to continue to operate safely and effectively.
What do I need to document?
This will differ depending on your medical device and the impact on the patient, operator, or bystander safety if the OTS software fails. You will need to do a risk analysis to determine the level of documentation detail you need to provide to the FDA and the level of lifecycle control you will need as the severity of harm from OTA software increases.
PKI
Public Key Infrastructure provides secure encrypted communications and mutual authentication between devices, services and users. Through the use of digital certificates every connected 'thing' can be bound, by the use of public keys, to entities such as people and organizations. The use of these certificates creates a chain of trust between the connected device and a certificate authority that issued the certificates.
For PKI to work, you need a randomly generated cryptographic key pair to be generated for every single device manufactured. The key pair must be provisioned into the Root of Trust (RoT) of the microcontroller. The private key must be protected by the hardware RoT and the public part is held in a certificate, both of which are provisioned during manufacturing. The certificate will be signed by a certificate authority, thus providing a means of authentication for the identity.
Thus, the identity is not a unique ID or a Universal Unique Identifier (UUID), but the way in which the device or other component is identified by a randomly generated key pair. The public part of the key pair is provided in the form of a certificate which has been signed (authenticated) by a trusted certificate authority. The private part of the key pair is used to prove the identity.
PURL
Vulnerabilities can be identified through the use of three fields: CPE, PURL, and SWID. Helm supports CPE and PURL.
Package URL (PURL) standardizes how software package metadata is represented so that packages can universally be located regardless of what vendor, project, or ecosystem the packages belongs to. A PURL is an attempt to standardize existing approaches to reliably identify and locate software packages. It is a URL string used to identify and locate a software package in a mostly universal and uniform way across programming languages, package managers, packaging conventions, tools, APIs and databases.
QMS
Quality Management System. This is a structured system that documents processes, procedures, and responsibilities for continuously delivering high-quality products and services that meet regulatory and customer requirements. Its objective is to provide a framework that improves communication, collaboration, and consistency across your company, while also reducing waste and promoting a culture of continuous improvement.
QSR
Quality System Regulations
RA
Registration Authority
RDP
Remote Desktop Protocol. Allows users to remotely connect to and control another computer or device.
RoT
Root of Trust
SBOM
Software Bill of Materials. This encompasses all components that exist across your software supply chain, including components, licenses, copyrights, and security references.
SMB
Server Message Block is Windows computers in file, port, and printer sharing and other network services. If these protocols are not properly secured, an attacker could potentially gain access to a network and cause significant damage.
SOUP
Software of Unknown (or Uncertain) Pedigree (or Provenance) is a term often used in the context of safety-critical and safety-involved systems such as medical software. SOUP is software that has not been developed with a known software development process or methodology, or which has unknown or no safety-related properties.
SPDX
Software Package Data Exchange. SPDX is an international open standard from Linux enabling communication of SBOM information, including provenance, license, security, and other related information. It provides a machine-readable SBOM, as well as a human-readable one enabling you to share important data about your software ecosystem and improve transparency and cybersecurity risk mitigation.
SPDX is recognized as the international open standard for security, license compliance, and other software supply chain artifacts as ISO/IEC 5962:2021.
Helm does not currently support SPDX, though it is currently in design.
SSVC
Stakeholder-Specific Vulnerability Categorization. This is derived from CISA’s Stakeholder-Specific Vulnerability Categorization document.
This vulnerability analysis methodology accounts for a vulnerability’s exploitation status, impacts to safety, and prevalence of the affected product in a singular system.
CISA uses its own SSVC decision tree to prioritize relevant vulnerabilities into four possible decisions:
Track: Vulnerability does not require action at this time. Continue to track the vulnerability and reassess if new information becomes available. CISA recommends remediating these vulnerabilities within standard update timelines.
Track*: Vulnerability contains specific characteristics that may require closer monitoring for changes. CISA recommends remediating these vulnerabilities within standard update timelines.
Attend: Vulnerability requires attention from your internal supervisors, including requesting assistance or information about the vulnerability. This may involve publishing an internal or external notification. CISA recommends remediating these vulnerabilities sooner than standard update timelines.
Act: Vulnerability requires attention from internal supervisors and leaders, including requesting assistance or information about the vulnerability. This may involve publishing an internal or external notification. CISA recommends remediating these vulnerabilities as soon as possible.
These decisions are based on the following values: exploitation status, technical impact, automatable, mission prevalence, and public well-being impact.
SWID
Software ID (SWID) as defined in ISO/IEC 19770-2:2015 is used primarily to identify installed software.
Vulnerabilities can be identified through the use of three fields: CPE, PURL, and SWID. Helm supports CPE and PURL Helm does not currently support SWID.
SWID is recommended to be used for a container (as is PURL, which we do support), firmware (as is CPE, which we do support), library or framework (non-package), operating system (as is CPE), and operating system package (as is PURL).
TQM
Total Quality Management. This focuses on quality throughout your company, from design to customer satisfaction.
UUID
Universally Unique ID that is readable from most microcontrollers available today. This is not an identity, only an identifier. See PKI definition for more information.
V&V
Verification and Validation methods are used to ensure that a product, service, or system meets requirements and specifications and that it fulfills its intended purpose. V&V are critical to a quality management system (such as IO 9000).
VEX
Vulnerability Exploitability eXchange. This is the security advisory that a supplier will communicate regarding their analysis on a particular vulnerability as it relates to their software. Suppliers’ customers, such as hospitals, need to know whether this vulnerability is impacting the use of the device or not. Helm does not use VEX status conventions, but it is currently in design.
A VEX provides additional information on whether a product is impacted by a specific vulnerability in a dependency. If so, recommends actions to remediate. For example, a vulnerability in an upstream dependency is likely not exploitable in the final product for reasons including the affected code not being loaded by the computer or inline protections existing elsewhere in the software. Dependency suppliers issue a VEX to assert the status of a vulnerability in specific products. These statuses are:
Not affected: No remediation is required for this vulnerability
Affected: Actions are recommended to remediate or address this vulnerability.
Fixed: These product versions contain a fix for the vulnerability.
Under investigation: It is not yet known whether these product versions are affected by this vulnerability. An update will be provided in a future release.
VEXes are machine-readable, so users can integrate dependency data from SBOMs with vulnerability status information from VEXes to provide a current view of vulnerability status. This enables users to take a much more targeted approach to finding and remediating vulnerabilities in their software.
A VEX can cover more than one vulnerability in a product or across multiple products.
These are defined by CSAF, and can provide information such as remediation, workarounds, restart/downtime required, scores, and risks provided from vendors, system integrators, and operators.
VLCDB
Vulnerability Lifecycle Database
Helm uses enterprise-grade access control designed for growing organizations managing vulnerability data across departments, business units, and teams while maintaining security and compliance.
Workspaces bring organizational structure to Helm with granular permissions, enabling you to control exactly who accesses which products and vulnerability data across your entire portfolio.
Helm uses a three-level permission system to control who can access your products and vulnerability data:
Org owner: Has complete access to everything in your organization. Creates workspaces and assigns Workspace admins and Users to workspaces.
Workspace admin: Has full control within assigned workspaces. Can create products, invite users, and set all permissions within their workspace(s).
User: Has specific permissions you assign. Gets access to particular products within a workspace, with separate permissions for SBOM and vulnerability data.
Workspaces are organizational containers that separate different areas of your business - departments, teams, or business units. This ensures that only people in your workspace can access your products, SBOMs, and vulnerability data.
Each product belongs to exactly one workspace and cannot be moved between workspaces. This ensures clear organizational boundaries, prevents accidental data exposure, and maintains audit trail integrity.
Team members are assigned roles within each workspace they have access to. The same person might be a Workspace admin in Engineering but a User in the Marketing workspace.
Access control follows a specific sequence:
Team members are assigned a role within a workspace (Workspace admin or User)
Workspace admins automatically get full access to all products in their workspace
Team members with the User role get no access until you specifically assign them to products
For each User, you will add each user to the product, then set their SBOM permissions and vulnerability permissions (Modify, View, or None), respectively.
Organize by department: Separate teams into distinct workspaces (Engineering, R&D, Marketing) ensuring teams only access their relevant products, SBOMs, and vulnerability data.
Flexible permission combinations: Assign any combination of SBOM and vulnerability permissions per product - modify both, view both, modify one and view the other, or grant access to only one area.
Centralized user management: Invite and manage users from a single location, assign them to multiple workspaces at once, and track pending invitations with automatic 7-day expiration for security.
If you have the role of Org owner or Workspace admin, you’ll see an Administration icon on the sidebar. You can manage your workspaces, users and products from here.
Create and manage workspaces
Create products within workspaces
Invite users to workspaces
When you click into a specific workspace, you'll see Workspace users and Workspace products subtabs for that workspace.
Workspace users subtab: Invite users to a workspace and manage users and their roles in this workspace.
Workspace products subtab: Create products, rename products, set product access
View all users across the organization
Org owners can invite users to multiple workspaces
Only org owners can remove users from the Users tab, which will remove the user from the organization
Workspace admins can view users across the organization, but will only see the workspace access of users in workspaces that the Workspace admin has control of.
As Org owner, you are the only one who can create workspaces, but your workspace admins can take care of everything else.
As the Org owner, you'll first need to .
During workspace creation, you can invite users to your workspace, and set their respective role in that workspace. You can also skip this step and invite them later.
Workspace admins automatically get full access to all products in their workspace, so you only need to set specific permissions for User-role members.
In the Users tab, permission vary by role:
Org owner:
Remove users from the Users tab - this will revoke all access and remove them from the organization. You can re-invite them, but cannot undo this change.
Both org owner and workspace admins can:
The Org owner can invite users to a workspace from the Users tab.
In the Users tab, click Invite users.
Enter the user's email.
When the user accepts the invite and signs in for the first time, they will be prompted to provide their full name.
Select the this user should have access to.
In the Users tab, you will see a list of all users.
You can filter down to a particular workspace to see those assigned users.
You can manage user access to products within the workspace the product is assigned to.
Team members with higher permissions can change the role or with lower permissions, thus:
Org owner can change the role or remove anyone from the user list
Workspace admins must go into a workspace to manage users (e.g., change role, remove, set product access)
Change user role or product access: When you change role or product access permissions for a team member, you will need to let them know about this change.
Only org owners can remove users from the organization list.
On each user you want to remove, click the action overflow ... button > Remove from organization. This will display a confirmation modal.
Confirm the access revocation. You'll see a toast notification that the users were removed.
Removed users will not get an email notification of this change.
You can always re-invite a user that has been removed.
You can assign users full workspace privileges as Workspace admins, or you can assign them the User role, then configure their permissions to view and modify your SBOM and vulnerabilities.
There is only one Org owner. This user has full access to all workspaces within your organization, and can:
Manage all users across organization, including removing user access completely.
Invite new and add existing users to one or more workspaces, and set their roles within each workspace.
to automatically link software across all workspaces to known software in the NVD.
to automate population of level of support and EOS/EOL information.
This user has full admin permissions to a workspace and can:
Invite new or add existing users to a workspace, and set their roles within the workspace
and products and product versions in any workspace.
Change the role of team members with the User role or remove them from the workspace.
Be a Workspace admin in multiple workspaces, or have a lower role in another workspace. Their permissions must be set in each workspace they will have access to.
This role cannot:
Create workspaces
Create alias or lifecycle rules
Change the role of other workspace admins
Remove users from the organization
Has to selected products only
A workspace is a way of separating areas of a business, such as departments, teams, business units. This ensures that only people in your workspace can access your products, SBOMs, and vulnerability data.
From the Workspaces tab, you can:
Create and manage workspaces
Create products within a workspace
Invite new or add existing to each product in the workspace
Manage existing users and their product access for each workspace
Org owner role
If you're the Org owner, you can view and manage all workspaces.
Click Administration in the sidebar, then click the Workspaces tab.
Click the Create workspace action link in the toolbar. This will display the Create workspace panel.
You can invite new or add existing users now or at a later time.
Workspace admin role
If you're a Workspace admin, you will need to contact your Org owner to create another workspace and assign you to it. You can see who your Org owner is in your user avatar drop-down in the main navigation.
In the Workspaces tab, click the Manage products link on a workspace card.
If you do not have products in this workspace yet, click the Go to products page button. You can add products and product versions from this page.
On the Products page, click the Upload SBOM button or Create product link to create your first product.
Users can be granted permissions to view or modify SBOMs and vulnerabilities within a workspace. Their permissions must be set in each workspace they will have access to. Users can be assigned SBOM and vulnerability modification or viewing permissions for each product they are assigned to.
Navigate to Administration > Workspaces tab.
This will display the card list of workspaces.
Workspaces are ordered alphabetically.
Click Manage products on the workspace card. This will display the Workspace products tab and the
As an Org owner or Workspace admin, you can invite new users into a particular workspace from the Workspace users tab within that workspace or can .
Navigate to Administration > Workspaces tab.
Click the Manage users link on the workspace card. This will display the Workspace products and Workspace users tabs, with the Workspace users tab selected.
In the Workspace users tab, click Invite new users. This will display the Invite users wizard.
Modify SBOMs and vulnerabilities: This user has full access to that product. All workspace admins will be automatically set to this.
Modify SBOMs, view vulnerabilities: This user has the following permissions:
Upload SBOMs
Create and manage components, as well as apply suggested matches for components
In the Workspaces tab, click the actions overflow ... button > Rename workspace.
In the panel that displays, edit the workspace name, then click Rename workspace.
You'll see a toast notification that your workspace was updated.
To remove users from a workspace, go to the Workspaces tab.
If user only has access to one workspace, this will remove them from Users tab as well. You can always send them a new invite.
Click Manage users link on the workspace card. This will display the Users tab with all users in this workspace.
If you need to transfer org ownership, so we can make this adjustment for you.
FDA submission readiness: Control which team members can generate and access FDA-ready reports (VEX, VDR, SBOM exports) based on their permissions, ensuring proper oversight of regulatory documentation.
Both org owner and workspace admins can resend invites
For each product, you can then add from the existing workspace users the ones that should have access to each product, and set what SBOM and vulnerability permissions each will have.
If you want to add product versions or upload SBOMs for this product, you can do so from the Products page.
On the Products page, make sure your product is selected in the product drop-down.
Click the Add version button in the empty state or upload an SBOM (which will enable you to create a version).
Resend invites
Search and filter users
After sending this invite, you can add the user to other workspaces from the Users tab
Specify the user role for the workspace.
Workspace admin: Give the new user full permissions to that workspace.
User: You will need to set SBOM and vulnerability modification or viewing permissions for all products within that workspace.
Click Add another user to invite another user. You can invite as many users as needed.
Click Invite X users.
You will see an on-screen success notification, reminding you to set the users' product access so that when they accept the invite, they'll be ready to go.
Your team members will be sent invites, which will contain their workspace and role.
After sending invites, these users will display in the tab with a Pending status. As soon as they accept their invite, their status will change to Active.
You will not receive an email notification at this time, so make sure to keep track of this.
If a user hasn't accepted within 3 days, the invite link will expire for your security.
You can click the actions overflow ... button > Resend invite at any time.
If you need to change permissions for a Pending user, you'll need to remove them from the users list, then re-add them with the adjusted permissions. This will send out a new invite.
For team members with the User role:
Workspaces and roles you selected during the invite process will be shown in the Workspace access drop-down of the Users tab.
For each user, it will show each workspace paired with its role, such as Engineering: Workspace admin.
Add or remove users from workspaces: Users will receive an email only if they have been invited to additional workspaces, not when they have been removed from them. You will need to let them know about that change.
In the Invite users section, specify the email of each user, as well as their role within this workspace. Click Continue to move to the next step.
Click Skip for now to invite new or add existing users later.
In the Add existing users section, click the Add existing users drop-down multi-select. As soon as you select each user, they will display below in A-Z order.
Set the role for each user.
Workspace admin: Has full access to this workspace.
User: Has access to specified products in this workspace.
Click Create workspace. The new workspace card will display in alphabetical order in the workspaces list.
Each workspace card has a link to Manage users and Manage products.
Click Manage users to display a list of users assigned to this workspace. You can also invite new users or add existing ones.
Click Manage products to display a list of products in this workspace, where you can set each user's SBOM and vulnerability access within each product.
If you click Upload SBOM, you'll create a version during this upload process. If you just want to create products and versions, click the Add version button in the empty state or upload an SBOM (which will enable you to create a version).
If you already have products in this workspace, this will display a list of all associated products in this workspace,
Products are organized alphabetically.
If you want to add product versions or upload SBOMs for this product, you can do so from the Products page.
On the Products page, make sure your product is selected in the product drop-down.
Click the Add version button in the empty state or upload an SBOM (which will enable you to create a version).
Products are ordered alphabetically.
You can create additional products in the workspace.
The breadcrumb trail workspace drop-down will update to the selected workspace. You can select the < All workspaces link to return to the list of workspaces.
For each product, click the Available users multi-select drop-down.
The drop-down is grouped into Workspace users and Available users. This enables you to add users in this workspace to this product, or to add users that are in the organization to this workspace.
If you need to invite new users to a workspace, click the Workspace users tab, then click the Invite new users link in the toolbar. In the wizard that displays, provide the user information, then assign each user to one or more workspaces and set their respective role in each workspace.
As you click each user, they will appear below where you can set their SBOM and vulnerability access to Modify, View, or None, respectively.
If you set the user role to Workspace admin, these will default to Modify for both, and will be disabled.
Removing users:
To remove users that have already been granted access to this workspace, click the Remove action. This will prompt you to confirm removing that user.
If you add users from the drop-down, but haven't saved these changes yet, click Remove. These users will automatically be removed since they have not received any invite yet.
When you have added users to each desired product, click Save changes at the bottom of the list.
You'll see a success toast notification.
Newly-added users will be sent email invites to join your workspace.
Removed users will not get a notification of their changed access, so you should contact them to let them know.
Enter the user's email.
When the user accepts the invite, they will be prompted to provide their full name.
Select the workspace this user should have access to.
If you have access to only one workspace, that workspace is selected by default.
Specify the user role for the workspace.
Workspace admin: Give the new user full permissions to that workspace.
User: You will need to set SBOM and vulnerability modification or viewing permissions for all products within that workspace.
Click Add another user to invite another user. You can invite as many users as needed.
Click Invite X users.
You will see an on-screen success notification, reminding you to set the users' product access so that when they accept the invite, they'll be ready to go.
Your team members will be sent invites, which will contain their role and any product access information.
After sending invites, these users will display in the tab with a Pending status. As soon as they accept their invite, their status will change to Active.
You will not receive an email notification at this time, so make sure to keep track of this.
If a user hasn't accepted within 7 business days, the invite link will expire for your security.
You can click the actions overflow ... button > Resend invite at any time.
If you need to change permissions for a Pending user, you'll need to remove them from the users list, then re-add them with the adjusted permissions. This will send out a new invite.
For team members with the User role:
Workspaces and roles you selected during the invite process will be shown in the Workspace access drop-down of the Users tab.
For each user, it will show each workspace paired with its role, such as Engineering: Workspace admin.
View vulnerabilities and recommended Windows KB patches for vulnerabilities
View Dashboard
Export all FDA-ready reports and download previously run reports
View SBOMs, modify vulnerabilities: This user has the following permissions:
View products and their components, as well as suggested matches for components
Rescore and remediate vulnerabilities, as well as apply recommended Windows KB patches to vulns
View Dashboard
Export all FDA-ready reports and download previously run reports
View SBOMs, view vulnerabilities: This user has the following permissions:
View products and their components, as well as suggested matches for components
View vulnerabilities and recommended Windows KB patches for vulnerabilities
View Dashboard
Export all FDA-ready reports and download previously run reports
Modify SBOMs only: This user has SBOM modify and Vuln none permissions. This role has the following permissions:
Upload SBOMs
Create and manage products and components, as well as apply suggested matches for components
View product information on Dashboard for that workspace
Export these FDA-ready reports: SBOM in JSON, SBOM in CSV, and download these previously run reports.
View SBOMs only: Requires SBOM view and Vuln none permissions. This user has the following permissions:
View products and components
Export these FDA-ready reports: SBOM in JSON, SBOM in CSV, and download these previously run reports.
Modify vulnerabilities only: This role has SBOM none and Vuln modify permissions. This user has the following permissions:
View vulnerabilities list
Rescore and remediate vulnerabilities, as well as apply recommended Windows KB patches to vulns
View vulnerability information on Dashboard
Export these FDA-ready reports: VEX, vulnerabilities CSV, and download these previously run reports.
View vulnerabilities only: Requires SBOM none and Vuln view permissions. This user has the following permissions:
View vulnerabilities list, as well as recommended Windows KB patches to resolve vulnerabilities
View vulnerability information on Dashboard for products
Export these FDA-ready reports for products: VEX, vulnerabilities CSV, and download these previously run reports.
Click Save changes. You'll be prompted to confirm the removal.
You'll see a toast notification.
Users will not be notified of their revoked access. You'll need to contact your users separately to let them know about access changes.
Helm returns the (CVSS) to provide numerical ratings corresponding to critical, high, medium, and low scores to ensure you understand your current vulnerability risk. Because older devices may only have a CVSS v2 score, while newer devices may only have a v3 score, Helm provides both CVSS v2 and v3 scores, enabling you to assess risk across the spectrum of your legacy and new devices.
This score incorporates a number of factors assessing the exploitability of a vulnerability.
For CVSS v3 scores, you can use a number of calculators to understand how the CVSS score for a particular vulnerability was calculated:
Hover over each metric classification value to get more information on how to determine which value applies to your situation. For your convenience, we've also provided those metric and value definitions below.
You can rescore all vulnerabilities associated with a particular product version or rescore individual vulnerabilities.
Every vulnerability in the NVD starts with a base CVSS score. You cannot modify this base score, but you can modify the temporal and environmental scores by assessing your particular device's situation. Every metric in these two sections is set to Not defined (X) by default, which has the highest impact on the CVSS score.
All definitions are extracted from first.org's CVSS 3.1 calculator.
The Temporal metrics measure the current state of exploit techniques or code availability, the existence of any patches or workarounds, or the confidence that one has in the description of a vulnerability.
These metrics enable the analyst to customize the CVSS score depending on the importance of the affected IT asset to a user’s organization, measured in terms of complementary/alternative security controls in place, Confidentiality, Integrity, and Availability. The metrics are the modified equivalent of base metrics and are assigned metric values based on the component placement in organization infrastructure.
Every vulnerability in the NVD starts with a base CVSS score. The base metric group captures the characteristics of a vulnerability that are constant with time and across user environments. The Access Vector, Access Complexity, and Authentication metrics capture how the vulnerability is accessed and whether or not extra conditions are required to exploit it. The three impact metrics measure how a vulnerability, if exploited, will directly affect an IT asset, where the impacts are independently defined as the degree of loss of confidentiality, integrity, and availability. For example, a vulnerability could cause a partial loss of integrity and availability, but no loss of confidentiality.
You cannot modify this base score, but you can modify the temporal and environmental scores by assessing your particular device's situation. Every metric in these two sections is set to Not defined (X) by default, which has the highest impact on the CVSS score.
All definitions are extracted from first.org's CVSS v2 calculator.
CVSS base score is divided into Exploitability and Impact metrics. Exploitability metrics include Attack vector, Access complexity, and Authentication, while Impact metrics include Confidentiality impact, Integrity impact, and Availability impact.
The threat posed by a vulnerability may change over time. Three such factors that CVSS captures are: confirmation of the technical details of a vulnerability, the remediation status of the vulnerability, and the availability of exploit code or techniques. Since temporal metrics are optional they each include a metric value that has no effect on the score. This value is used when the user feels the particular metric does not apply and wishes to "skip over" it.
Different environments can have an immense bearing on the risk that a vulnerability poses to an organization and its stakeholders. The CVSS environmental metric group captures the characteristics of a vulnerability that are associated with a user's IT environment. Since environmental metrics are optional they each include a metric value that has no effect on the score. This value is used when the user feels the particular metric does not apply and wishes to 'skip over' it.
CVSS environmental score is divided into General modifiers and Impact subscore modifiers. General modifers include Collateral damage potential and Target distribution, while Impact subscore modifiers include Confidentiality requirement, Integrity requirement, and Availability requirement.
Dec 9, 2025
Enhancements:
API Key Generation: Removed special characters from the API key generation process for improved consistency and reliability.
FDA Spreadsheet Styling: Fixed header styling issues on the FDA spreadsheet.
SDK Update: Enhanced the VEX reporting functionality by adding the custom property medcrypt:exports:cdxVex:reportId to the SDK. This property allows for a unique ID to be included in the generated VEX report for enhanced tracking.
Nov 20, 2025
Enhancements:
Refined Product Management: The workflow for archiving, unarchiving, and removing products and product versions has been streamlined for better clarity and usability.
Enhanced Global Search: Added the Workspace name column to the global SBOM and CVE search results. Users can now see which workspace an item belongs to in the global search page.
Cloud environment migration for MCAI enhanced features.
Nov 6, 2025
We've fixed several issues to improve your Workspaces experience:
Navigation & permissions
Fixed tab logic on the Administration page when workspace admins navigate between workspaces and the All Workspaces view
Workspace admins can now only invite users to workspaces they control (fixed workspace drop-down filtering in the Invite user panel)
Organization owners can no longer be removed from workspaces
Access management
Adding users to workspaces from the Add to workspace button no longer disrupts the Invite user panel's existing users section
Workspace admins can now create and remove products within their own workspace
UI improvements
You can now remove products and product versions from their respective drop-downs in the breadcrumb trail
Empty rows no longer appear in the Import remediations table
Oct 31, 2025
Scale your security operations with enterprise-grade access control designed for growing organizations managing vulnerability data across departments, business units, and teams.
Three-tier permission system Assign roles at the organization, workspace, and product levels with granular SBOM and vulnerability permissions (None, View, Modify) for each product, ensuring team members have exactly the access they need.
Complete access control Create separate workspaces for departments, business units, or teams, ensuring users only see products and vulnerability data relevant to their role while maintaining clear organizational boundaries.
FDA submission readiness Control which team members can generate and access FDA-ready reports (VEX, VDR, SBOM exports) based on their permissions, ensuring proper oversight of regulatory documentation.
Find out more about workspaces:
Oct 12, 2025
We've improved our to give you more precise control when automating SBOM uploads. Admin users now have the ability to create products as well using below parameter.
create-product-if-not-found: Set to true to automatically create the product if it doesn't exist in Helm
create-version-if-not-found: Set to true to automatically create the product version if it doesn't exist in Helm
This enhancement allows you to independently control whether products and versions are created during your CI/CD workflow, providing more flexibility in managing your SBOM automation strategy. Both parameters default to false to prevent unintended product or version creation.
Sept 25, 2025
You can now file to Helm and have it automatically converted to a CycloneDX SBOM. You can preview the data before uploading to Helm. This was one of our most requested features and eliminates the need to manually convert your CSV files. This feature is in beta, so let us know if you experience any issues or have ideas on how we could improve this process to better meet your needs.
Sept 4, 2025
Enhanced CycloneDX SBOM processing with dependency data
UX improvements
Helm now captures and preserves dependency relationships when processing CycloneDX SBOMs. When you upload a CycloneDX SBOM that contains dependency information, this data is now retained and included when you export back to CycloneDX format. This ensures fidelity and completeness when working with CycloneDX SBOMs that include component relationship data.
Enhanced CVSS scoring with third-party scores from the NVD 2.0 feed
Sept 2, 2025
Added ability to skip/override auto-matching by CPE/PURL
Updated dashboard overview cards to represent total values
UX improvements & bug fixes
There is now a Settings drop-down in the components table that allows you to skip/override Helm's auto-matching process if at least one CPE that was manually added by a user is present either before or after an SBOM is loaded. The new SBOM will be merged to whatever SBOM has already been created/uploaded.
The Total products, Ratio of product versions with SBOMs, and Total dependencies cards in the Dashboard now represent total values over time. All active products that have not been archived are calculated in these totals.
Enhanced accuracy of the Ratio of product versions with SBOMs card on the Dashboard.
Fixed issue in Administration > Manage users where not all users were displaying in the list.
Aug 27, 2025
Added ability to bulk rescore vulnerabilities across all or selected vulnerabilities in a product portfolio
Added ability to bulk rescore vulnerabilities across selected components in a product version
Added ability to bulk update components
Added custom license filtering
You can now select multiple vulnerabilities across products and versions, then click Rescore X vulns. As with rescoring vulnerabilities within a product version, you can set the Temporal score and Environmental score values, then click Save & apply. If you turn on Auto-update all vulnerabilities, all of these vulnerabilities will be automatically rescored whenever there are Temporal updates.
You can now select multiple vulnerabilities across products and versions, then click Rescore all vulnerabilities. As with rescoring vulnerabilities within a product version or across product versions, you can set the Temporal score and Environmental score values, then click Save & apply. If you turn on Auto-update all vulnerabilities, all of these vulnerabilities will be automatically rescored whenever there are Temporal updates.
You can now bulk update lifecycle details (level of support and EOS/EOL info) on components, as well as bulk update license info. Select multiple components in the components table, then click Update X dependencies (we are in the process of changing the term, dependencies, to components throughout our UI to handle the updated NTIA minimum requirements). Set the lifecycle details and license details as desired, then click Save.
You can now filter on custom licenses. In the Filters drop-down of the components table, select Custom license for the License ID or name field in the License details section.
Fixed error where remediation imports would fail when the list was too large (200+ remediations)
Fixed license management white screen when license expressions were longer than 3 licenses
Fixed license expressions having incorrect or missing reference links
Fixed save button not showing when changing license types
Oct 30, 2025
Added Workspaces for enterprise-grade access control
Three-tier permission system with granular product-level access
Complete audit trails for compliance tracking
Scale your security operations with enterprise-grade access control designed for growing organizations managing vulnerability data across departments, business units, and teams while maintaining security and compliance.
Workspaces bring organizational structure to Helm with granular permissions, enabling you to control exactly who accesses which products and vulnerability data across your entire portfolio.
Organize by department: Separate teams into distinct workspaces (Engineering, R&D, Marketing) ensuring teams only access their relevant products, SBOMs, and vulnerability data
Flexible role assignment: Assign team members as Org owners, Workspace admins, or Users with customized permissions - the same person can have different roles in different workspaces
Granular product-level control: Set SBOM and vulnerability permissions (Modify, View, or None) individually per product for each User
Workspaces represent a significant step toward supporting enterprise-scale medical device portfolios, designed based on requests from growing teams who needed better access control without compromising security or compliance.
Sept 25, 2025
You can now file to Helm and have it automatically converted to a CycloneDX SBOM. You can preview the data before uploading to Helm. This was one of our most requested features and eliminates the need to manually convert your CSV files. This feature is in beta, so let us know if you experience any issues or have ideas on how we could improve this process to better meet your needs.
Sept 4, 2025
Enhanced CycloneDX SBOM processing with dependency data
UX improvements
Helm now captures and preserves dependency relationships when processing CycloneDX SBOMs. When you upload a CycloneDX SBOM that contains dependency information, this data is now retained and included when you export back to CycloneDX format. This ensures fidelity and completeness when working with CycloneDX SBOMs that include component relationship data.
Enhanced CVSS scoring with third-party scores from the NVD 2.0 feed
Sept 2, 2025
Added ability to skip/override auto-matching by CPE/PURL
Updated dashboard overview cards to represent total values
UX improvements & bug fixes
There is now a Settings drop-down in the components table that allows you to skip/override Helm's auto-matching process if at least one CPE that was manually added by a user is present either before or after an SBOM is loaded. The new SBOM will be merged to whatever SBOM has already been created/uploaded.
The Total products, Ratio of product versions with SBOMs, and Total dependencies cards in the Dashboard now represent total values over time. All active products that have not been archived are calculated in these totals.
Enhanced accuracy of the Ratio of product versions with SBOMs card on the Dashboard.
Fixed issue in Administration > Manage users where not all users were displaying in the list.
Aug 27, 2025
Added ability to bulk rescore vulnerabilities across all or selected vulnerabilities in a product portfolio
Added ability to bulk rescore vulnerabilities across selected components in a product version
Added ability to bulk update components
Added custom license filtering
You can now select multiple vulnerabilities across products and versions, then click Rescore X vulns. As with rescoring vulnerabilities within a product version, you can set the Temporal score and Environmental score values, then click Save & apply. If you turn on Auto-update all vulnerabilities, all of these vulnerabilities will be automatically rescored whenever there are Temporal updates.
You can now select multiple vulnerabilities across products and versions, then click Rescore all vulnerabilities. As with rescoring vulnerabilities within a product version or across product versions, you can set the Temporal score and Environmental score values, then click Save & apply. If you turn on Auto-update all vulnerabilities, all of these vulnerabilities will be automatically rescored whenever there are Temporal updates.
You can now bulk update lifecycle details (level of support and EOS/EOL info) on components, as well as bulk update license info. Select multiple components in the components table, then click Update X dependencies (we are in the process of changing the term, dependencies, to components throughout our UI to handle the updated NTIA minimum requirements). Set the lifecycle details and license details as desired, then click Save.
You can now filter on custom licenses. In the Filters drop-down of the components table, select Custom license for the License ID or name field in the License details section.
Fixed error where remediation imports would fail when the list was too large (200+ remediations)
Fixed license management white screen when license expressions were longer than 3 licenses
Fixed license expressions having incorrect or missing reference links
Fixed save button not showing when changing license types
Aug 3, 2025
Added ability to import remediations from another source
Vulnerability CSV reports now display in the new Report history
UX improvements and bug fix
Accelerate your vulnerability remediation workflow with the new feature. Seamlessly transfer CycloneDX and VEX remediation statuses from a source product version to your target version, eliminating redundant remediation work and ensuring consistent vulnerability management practices across your product lifecycle.
Key benefits:
Reduce duplicate effort: Import remediations for specific vulnerabilities or carry forward all previously remediated statuses
Focus on new threats: Spend your security resources on newly discovered vulnerabilities rather than re-analyzing previously assessed ones
Maintain consistency: Ensure uniform vulnerability management practices across product versions
Seamless integration
Enhanced generation and export process of Vulnerability CSV reports. Newly-run reports will now display in the Report history view.
Enhanced user experience for managing alias rules
Fixed issue with Report history filtering when multiple products were selected
July 21, 2025
Added Integrations page
Added Get started page
UX improvements and bug fixes
Helm provides many ways to ensure you have a comprehensive and accurate view of your overall risk that is tailored to your product's particular security posture, enabling you to spend your limited time on the vulnerabilities that matter most. The new page provides a centralized location to discover and configure all available integrations, including our , , and . You can also preview upcoming integrations that we are currently working on and that should be available in future releases.
Whether you're just starting out or looking to enhance your cybersecurity efforts, we have the tools and expertise to help you succeed. The new provides comprehensive guidance for taking control of your cybersecurity risk, , and accessing help resources. This centralized hub includes everything from and to , making it easier than ever to get up and running with Helm.
Fixed sidebar icon display issue in dark mode
Improved frontend release process for more consistent version management, making it easier for customers to track versions in their QMS.
July 3, 2025
Added ability to view and download previous reports via Report history
Automatic Ubuntu vulnerability patching based on official Ubuntu security databases
Bug fixes
When you go to run your next report, you'll now see a Report history tab. This feature enables users with appropriate permissions to retrieve an exact copy of any report from the moment it was originally generated. You can access historical versions of your FDA SBOM, VEX, VDR, and other reports, ensuring you have complete audit trails for compliance requirements.
Helm now automatically monitors official Ubuntu security databases (including OVAL feeds and CVE tracking) to identify when vulnerabilities have been officially marked as fixed for your specific Ubuntu version. When Ubuntu's security team confirms a CVE has been patched and the fix is available in your current Ubuntu version, Helm automatically marks the vulnerability as patched in your system (displaying the shield icon and graying out the vulnerability row). This eliminates manual tracking of Ubuntu security updates and ensures your vulnerability assessments accurately reflect the latest official Ubuntu security guidance.
Modified export process to export your original SBOM component version string only, rather than the enriched version, to prevent loss of information during the export workflow.
Resolved issues with vulnerability exploit and source filters, which were not filtering results properly across the vulnerability dashboard.
Fixed vulnerability patch tooltip display issue when hovering over patch information in the Vuln ID column.
Corrected issue where escape characters were being interpreted in uploaded SBOMs. Helm now ingests the exact string content as provided.
The Vulnerabilities list now provides AI-powered guidance to fix or mitigate vulnerabilities. Select one or more vulnerabilities, then click the Get AI guidance action in the toolbar to display a comprehensive panel with short-term and long-term mitigation strategies, including specific upgrade recommendations for each selected vulnerability. Sources are also provided when viewing mitigation and upgrade recommendations for individual vulnerabilities, enabling further research and validation.
In the Vulnerabilities list, you can now see which tech stacks (e.g., Windows, Redhat, SQL, Git, GRPC, Wordpress, and many more) are impacted. Click each of these tags to open the vulnerability details modal, which has a new AI recommendations section. Scroll down to access detailed information about affected tech stacks, upgrade recommendations, and short-term mitigations, all backed by source documentation. This functionality is still in beta, so click the Columns link on the vulnerabilities table, then enable the tech stack tags column to view this information.
Simplified version validation to accept any version string length less than 1024 characters when creating or editing components
June 19, 2025
Export multiple product versions in one report
Improvements & bug fix
You can now select multiple product versions simultaneously from the version dropdown in the Reports page and export all selected versions into a single consolidated report. This feature supports all report formats including Medcrypt FDA SBOM, SBOMs in CycloneDX, SPDX and CSV format, as well as VDR and VEX reports. This significantly streamlines compliance workflows, reducing the time needed to generate comprehensive documentation across product lines.
Made numerous improvements to enhance the user experience
June 12, 2025
Improvements & bug fix
Fixed infinite loop issue with dashboard continually loading
Made numerous improvements to enhance the user experience
May 20, 2025
Global aliases to further automate component matching
We've leveraged our deep medical component expertise to automatically match even more components, ensuring you have a comprehensive view of your overall risk. Components matched with a Global alias will show Matched with the relevant source badges. For any component, click Actions > Manage component to view component details. For any component that is matched with a global alias, you will see a System alias badge in the Matched by field of the Match details section. You can override these alias matches by either selecting another match or by creating your own alias. Any aliases you and your team create are known as Organizational aliases.
May 3, 2025
Performance improvements & bug fix
Fixed issue with exporting complex license expressions to SPDX
Significantly improved performance and overall stability
Apr 21, 2025
Aligned Lifecycle rules with Alias rules in Rules manager
Improvements & bug fixes
We have aligned our Lifecycle rules look-and-feel with our new Alias rules in the Rules manager, so that you can more easily manage both matching and EOS/EOL rules. We've also made it easier to understand when components have been matched with alias and/or lifecycle rules, with informational banners at the component detail level, to ensure you understand the impact of modifying a matched component.
Improved sorting for component licenses by treating the default Not set value as an empty string so that alphabetical sort works as expected.
Increased character limit for searching known software to create or edit alias rules
Streamlined version management by focusing on exact version matches for both types of rules
Enhanced component editing to prevent unnecessary table reloads
Mar 31, 2025
Added CVSS score persistence for consistent vulnerability assessment
Bug fix
We've implemented a system to maintain the original CVSS v2 and v3 severity scores assigned by the NVD, even when these scores are later removed from the NVD feed. This enhancement provides several benefits:
Maintains consistent vulnerability severity ratings over time
Prevents vulnerability assessments from unexpectedly changing due to NVD data updates
Ensures historical vulnerability records remain intact with their original severity classifications
Provides more stable reporting for compliance and audit purposes
Originally assigned CVSS v2 and v3 scores are retained in our database and continue to be displayed in the vulnerability information, even when they no longer appear in the latest NVD feed.
Fixed issue where vulnerabilities were not showing up for SBOM component that was matched to an alias via the Rules manager.
Mar 24, 2025
Added new alias rules manager
Distribute SBOM processing across all organizations
Added automatic cancellation of SBOM processing when archiving product versions
Bug fixes
We’ve replaced our previous aliases feature with a comprehensive new alias rules manager that transforms how you match components to known software in the NVD. Key improvements:
Centralized rule management: Manage both alias rules and EOS/EOL rules from a single location.
Enhanced matching capabilities: Set robust matching conditions across Component name, Supplier, CPE, PURL, and Version.
Transparent matching process: Enhanced Manage match panel shows how components were matched and the impact of modifications.
Components must be matched to known software in the NVD to view vulnerabilities, making this enhancement critical for effective vulnerability management. Alias rules respect manual matches and won’t override user decisions. All current active aliases have been migrated to the new rules manager. This enhancement also lays the foundation for future global aliases functionality, which will simplify software matching across multiple organizations.
SBOM processing is now distributed across all user organizations. This improvement ensures that large customer SBOMs won’t block processing for other customers, resulting in faster and more reliable processing for everyone.
Fixed issue with FDA SBOM export where End of Support (EOS) and End of Life (EOL) data were incorrectly switched
Added automatic cancellation of SBOM processing when archiving product versions. This prevents potential bugs that could occur when unarchiving versions that had SBOM files that had not completed processing.
Fixed issue where product list was not displaying properly on initial page load.
Mar 3, 2025
Added original SBOM file name column to Products page
Added columns for original component name and supplier to Products page
Support for importing and exporting Windows KB patch info to CycloneDX
Bug fixes
Added Original file name column, showing the originating SBOM file name, to the Products page. This feature allows you to identify which SBOM a particular component was uploaded from, especially useful when consolidating multiple SBOMs for a product version. It enables teams to quickly prioritize and assign vulnerability remediation tasks to the appropriate team members. To show this column in your view, click the Columns link at the top of the table, then enable the Original file name column.
The Component name, Version, and Supplier columns on the Products page now display the original values from your SBOM, rather than the enriched data Helm uses to enhance match accuracy. The enriched information remains accessible in the Manage component panel under Matched dependency name, Matched dependency version, and Matched dependency supplier. This update enhances transparency and precision in component identification.
You can now import and export Microsoft Windows KB patching info data to your CycloneDX SBOM. This enhancement ensures consistency of patching information from one product version to the next. This reduces manual effort and streamlines your workflow, enabling you to import existing Windows KBs applied to an SBOM, to an SBOM, to quickly remediate vulnerabilities, and then export all of your existing and new patching efforts, ensuring an accurate view of your device's current security posture. Refer to for more details.
Fixed customer issue wherein a component name and supplier matched two different known software components, which should have resulted in a Select match state, for the user to choose the correct match. In this example, Debian Linux was erroneously associated with Progeny and could not be modified.
Fixed a problem where previously matched components, when rematched to other known software, did not update their Enriched PURL and/or Enriched CPE fields accordingly.
Feb 21, 2024
Added Microsoft Azure DevOps extension for Helm
We are excited to announce the release of our new for Helm, automating product version creation and SBOM ingestions into your CI/CD pipeline. To start using this extension, to get access to our , as you will need your Helm API client id and client secret to get started. These are the Helm email address that has access to our API and your API key, respectively.
Feb 19, 2025
Support for exporting EOS/EOL data to CycloneDX
Support for processing non-compliant SPDX SBOMs
Enable reloading of components in any state
Bug fixes and performance improvements
You can now export Level of support and EOS/EOL data to your CycloneDX SBOM. This enhancement ensures consistency of lifecycle information from one product version to the next. You can also use our existing to set conditions for components, which will automatically add the specified level of support and EOS/EOL information to matching components. This feature streamlines your workflow by allowing you to import, manually or automatically modify, and export lifecycle data to your CycloneDX SBOM, ensuring consistency across product versions. Refer to for more information.
Our system now. processes SPDX SBOMs that do not fully adhere to the SPDX specification. This improvement increases compatibility with a wider range of SBOMs, ensuring more comprehensive analysis and integration.
You can now reload components -- regardless of their match status — by selecting Actions > ... > Reload component. This functionality applies to components matched in the NVD or a package manager. Previously, reloading was limited to unmatched components or those in an error state.
Improved load performance of the vulnerabilities list, resulting in faster data retrieval and display.
Enhanced AI-driven CVE identification for more accurate and timely vulnerability detection.
Fixed customer issue wherein modifying component metadata, such as version, that had either Level of support or EOS/EOL field already populated would not save updates correctly.
Jan 28, 2025
Bug fixes and UI improvements
Fixed the issue where the CSV export displayed an incorrect EOS time.
FIxed the issue where multiple vulnerability digest emails were sent erroneously.
Fixed the issue where EOL/EOS data was rejected during SBOM upload if it contained a single quote (').
Added filter persistence so that applied filters are retained when switching between products and product versions. To ensure users understand when filters are still applied, added a blue circle indicator next to Filters.
Jan 9, 2025
Bug fixes and UI improvements
Fixed issue where hovering on indicator that a Windows vulnerability had been patched would cause a 504 error. This was an RBAC issue that occurred if the user had edit access on SBOM and vulnerabilities, but not for users with view-only permissions for both.
Fixed issue in the Lifecycle details section of Add component detail where the Date/Text drop-down was not populating.
Removed "undefined" placeholder values from blank form fields in Add component panel.
Fixed issue where the component review status history was not displaying in the Manage component panel.
Jan 7, 2025
Bug fixes and UI improvements
Fixed issue where switching to view mode for Rule manager was prompting to save when there hadn't been any changes made.
Fine-tuned UI and user experience
Dec 19, 2024
Identify and prioritize risk by Attack Vector (AV) and other CVSS metrics
Bug fixes and UI improvements
You can use our powerful to remediate large groups of vulnerabilities within a product, across products, or target a particular component's vulnerabilities with the click of a button, enabling you to speed triage and ensure remediation consistency of particular vulnerabilities across your product portfolio. Select the vulnerabilities you want to bulk remediate, assign their CycloneDX and/or VEX statuses for that group of vulnerabilities and that’s it — you’re done! You can also ensure consistent remediation of a particular vulnerability or group of vulnerabilities across your products, smoothing your way to a FDA submission. This powerful new feature saves time, freeing your team to focus on clinical innovation.
We’ve added Attack vector (AV) and other CVSS v3 metric columns to the vulnerabilities table, complete with color-coded badges to enable you to quickly identify and prioritize risk mitigation by attack vector and component criticality. Pair this new visibility with our powerful rescore feature to or , ensuring that you have a complete view of your device’s actual attack vector according to its unique security posture and environment.
Click the Columns link at the top of the Vulnerabilities table to enable the new Attack vector and other CVSS v3 metric columns.
We’re continuing to enhance our filtering mechanism and have added the oft-requested ability to drill down on component information and attack vector from the vulnerabilities table, as well as other CVSS v3 metrics. Stay tuned for more filtering updates soon!
Fixed scrollbar issue for new filter drop-down panels for vulnerabilities and components
Adjusted lifecycle date filters to have past and future dates in months
Fixed saving logic for Manage component panel
Fixed toasts that display if Lifecycle details section is modified
Dec 13, 2024
View and manage level of support and EOS/EOL data for all components
Specify lifecycle details for each component
to consistently apply lifecycle information across all components in your portfolio
Enhanced component filtering
We’ve added columns for Level of support and EOS/EOL to the components table, as well as providing color-coded badges to let you know what’s currently actively supported and what’s nearing or has passed its support or maintenance date. We’ve also begun ingesting lifecycle information from our partner, Tidelift, as well as the endoflife.date site, and will likely provide some automation for this in an upcoming release.
You can specify Level of support and EOS/EOL information in a date or text format for each component in the new Lifecycle details section of the component details panel. You can then set component rules to apply this information across all products, so you only have to do this once!
You can now to set conditions for supplier name, component name, and version, then automatically apply the Level of support and EOS/EOL information across all of your products when conditions are met. With consistent EOS/EOL data, you minimize discrepancies across your portfolio, ensuring accurate reporting and compliance. Stay tuned for more rules-based workflow enhancements!
After applying your Level of support and EOS/EOL information across your components, quickly to ensure you have everything you need for FDA submission! You can also export your with lifecycle data.
To enable you to quickly find what you need, we’ve enhanced our filtering mechanism and added lifecycle management filters. You can now filter components on Level of support and EOS/EOL information to ensure you understand which are supported and which are nearing end-of-life, enabling you to prioritize upgrades in critical areas. Stay tuned for more filtering updates soon!
All CycloneDX remediation justification values should now be accurately exported in your FDA SBOM report.
All products should now display accurately on the components page.
Global search improvements
Fixed issue wherein components from archived products were being returned in the global search.
A huge thank you to all of our customers who take the time to provide feedback on how we can continue to improve your SBOM vulnerability management experience! We’d love to on these features, as well as other features you’d like to see in the future!
November 21, 2024
Automatically generate component license information
Encode pURLs with spaces during exports
Import and export component hashes
Filter on CISA KEV and remediation through our API
You can now have Helm automatically add license information for your components. For any component that you want to enrich with license information, click Actions > Reload component. Note that reloading will discard any metadata you may have added to this component, such as review information, and will re-identify associated vulnerabilities, so you may see some discrepancy in your number of vulnerabilities for that component. This reduces your manual effort of tracking down licensing information, ensuring you have the latest license information available from our data sources.
If your SBOM has a Package URL (pURL) that contains spaces, we'll now automatically encode those when exporting. This ensures compatibility with third-party tools and eliminates issues caused by improperly formatted pURLs.
You can now import and export component hashes in your SBOMs, and can export them in any SBOM format, as well as our FDA SBOM, improving validation and tracking of SBOM component integrity across products.
You can now filter vulnerabilities that are the CISA KEV list or based on their remediation via our Helm API, making it easier than ever for you to identify and prioritize high-impact vulnerabilities.
To align with industry standards, the SBOM CSV export now labels the Vendor column as Supplier. This terminology update improves consistency and clarity.
November 7, 2024
Export EOS/EOL data to FDA SBOM report
Enhanced CPE parsing and matching
Added ability to filter components by licenses
Re-added match and review information to component details
If you have uploaded an SBOM that contains end-of-support (EOS) or end-of-life (EOL) data, this information will be automatically populated in your FDA SBOM report. We're in the process of adding the ability to manually add EOS/EOL info, so stay tuned!
We've enhanced CPE parsing to enable the matching of incomplete CPEs to components. Although a CPE has 13 segments, not all CPEs contain all of those segments, thus Helm will now interpret CPEs that have at least 5 of the expected segments, filling in missing segments with a wildcard (*).
We've enhanced CPE enrichment to enable component matching even in scenarios where the components have the scenario wherein CPEs have multiple vendors.
You can now filter your components by license, including those with specific licenses, no license, or unknown license status. This filtering capability helps quickly identify and mitigate license-related risks, such as copyleft licenses or unknown license statuses that may impact IP.
The match and review details have been re-added to the component details panel to help you quickly access key information.
Resolved intermittent failure of large CycloneDX and SPDX SBOMs due to timeouts.
Improved load time of vulnerability and component pages.
Fixed display issue with rescored CVSS vector strings, ensuring accurate low, high, and none values.
October 4, 2024
Enhanced component panel
License management is now available!
Customize your FDA SBOM export
Bug fixes, UX enhancements, and help updates
Manage your components more easily with our unified details panel, providing a comprehensive view of each component. You can now quickly scan information in view mode, then switch to edit mode if you need to make any modifications.
Helm now supports the ingestion of licensing information from CycloneDX and SPDX SBOMs. Via our partnership integration with Tidelift, Helm will analyze your components to determine if you are missing license information, then will automatically fix that for you, ensuring you have a comprehensive view of your legal risk. We support both SPDX and custom licenses. You can also manually enter or modify license details as needed. Check out for complete information on our new licensing feature!
We've just made our expert FDA SBOM even better! When exporting your FDA SBOM, you can now include CycloneDX and VEX vulnerability remediation analysis, as well as review information for components. These enhancements will help ensure you're ready for your FDA submission. Thank you to our customers for highlighting their need to include review statuses and notes! We very much appreciate your insights and expertise in continuing to enhance your SBOM vulnerability management and streamline your FDA submission process!
Bug fixes:
Fixed the date filter on the Vulnerabilities page such that the start date is now midnight and end date is 11:59:59 pm. This fixes both the date range presets as well as the timeframes covered in the new vulnerability emails.
UI enhancements
Improved component matching to handle component names prepended with special characters, such as "@".
Updated component lists to show all components, even when they match the same NVD product and version. Your SBOM export will also include this higher level of specificity.
Help updates: To quickly get you up to speed on these new updates, we've added or extensively revised the following topics:
September 24, 2024
Implemented human-readable URL parameters
Bug fixes and performance enhancements
We've implemented human-readable URL parameters across the entire UI, which now reference unique IDs of products, product versions, components, and vulnerabilities, as well as applied filters and searches, and more. You'll also see this improvement when you sign in to Helm from new vulnerability emails you receive. This deep linking enables you to more easily share information. These enhancements prepare Helm for upcoming features like breadcrumb navigation and expanded bulk actions, beginning with bulk remediation.
Resolved a performance issue to enable Helm to handle large volumes of vulnerabilities, minimizing timeouts and unexpected errors.
Fixed issue wherein some SPDX exports were failing under specific conditions, particularly with larger SBOMs.
Enhanced SBOM component rescanning and matching, improving reliability when the initial scanning process fails during an SBOM upload or when the component is manually added.
September 9, 2024
Enhanced matching for Linux packages
We’re excited to announce a major improvement to our Linux package matching process, increasing efficiency by reducing manual work for users.
Previously, some Linux packages without identifiers in SBOMs were challenging to match. After collaborating with customers to address this issue, we’ve just released a solution that delivers a 29% improvement in matching accuracy.
As shown in the graph below, you can see a significant reduction in unmatched components and a clear increase in matched components after applying this enhancement. This means fewer manual interventions and more streamlined package management.
August 30, 2024
Helm's new design system is live: Work smarter and stay focused
Multi-task and remediate risk faster across multiple Helm tabs
Help updates
We’re thrilled to announce that Helm’s new design system is now live! 🎉
When you next sign in to Helm, you’ll notice a refreshed look-and-feel to enhance your experience and streamline your workflow. Here’s a quick overview of what you’ll see:
Light and dark themes: Choose between our newly updated dark theme or our brand-new light theme. To switch themes, click the sun/moon icon in the main navigation bar.
More intuitive badges and colors: We’ve standardized and enhanced our badges and color schemes for quicker component matching and vulnerability prioritization.
Enhanced UI elements: Enjoy a cleaner and more intuitive interface with refined controls, error handling, and new icons to improve navigation and usability.
Our new design offers even more flexibility in how you view and manage your data:
Content refresh setting: Take charge of your data updates by setting auto-refresh intervals or turning it off entirely. You can also refresh manually refresh.
Pagination: Navigate large datasets with ease using our new pagination feature, ensuring you don’t lose your place.
Customizable columns: Tailor your tables to display exactly what you need. Use the Columns link to show or hide specific columns and hover over column headers to drag and drop them into your preferred order with the … icon.
If you’ve tried to have multiple Helm tabs open, you may have found yourself signed out. Great news! You can now work in Helm across multiple browser tabs.
As part of our new design system, we've completely revised several related topics to help you match components and remediate vulnerabilities faster:
August 13, 2024
Automated enrichment of missing CPEs and PURLs
Automated enrichment of missing licenses for open-source components
During the component matching process, if a component in your SBOM does not have a CPE or PURL (not ingested or manually added), Helm's AI copilot will now automatically generate and assign the appropriate enriched CPE or PURL to that component. You can view any Enriched CPE or Enriched PURL in the component details. This information will be included see this information in the components table in now export this enriched info for any FDA reports that include SBOM components, including your enriched SBOM, FDA SBOM, or VDR report.
For your open-source SBOM components that have PURLs, but do not have licenses identified yet, Helm will check whether those components have licenses. If so, Helm will automatically enrich those components with that license information. Helm will not change the license information for any components that already have one or more licenses identified. This information will be included in any FDA reports that include SBOM components, including your enriched SBOM, FDA SBOM, or VDR report. As mentioned in our last release, we are in the process of adding this functionality to the UI, and you will soon be able to view, edit, and track software licenses across your supply chain.
July 15, 2024
Export license information in SBOM
Bug fixes
You can now export license information for any FDA reports that include SBOM components, including your original or enriched SBOM, your FDA SBOM, or your VDR report. We are in the process of adding this functionality to the UI, and you will soon be able to view, edit, and track software licenses across your supply chain.
Fixed issue where CPE or PURL information would not display in some instances
June 21, 2024
Added remediation evidence to vuln export
Enhanced severity filtering
Ingest CycloneDX SBOM entries that have an empty or omitted Type field
Ignore vendors set to OpenEmbedded() in SPDX SBOMs generated with Yocto Linux
We've enhanced our vulnerability export functionality to include remediation evidence for each vulnerability. This provides a clearer picture of the actions taken to address vulnerabilities, enabling you to more easily demonstrate compliance and the remediation steps taken or planned to secure your products.
We've refined vulnerability severity filtering to prioritize rescores over base scores. This ensures that you can better prioritize vulnerabilities based on their actual risk, helping you focus on the most exploitable issues first.
We now support the ingestion of CycloneDX SBOM entries that have an empty or omitted Type field.
If you are generating your SPDX SBOM using Yocto on Linux, it will often generate OpenEmbedded() as a vendor, which is not helpful for matching purposes. We will now ignore this value, maintaining a cleaner and more relevant database.
Fixed exporting CVSS scores in VEX and VDR reports for SBOM entries that do not have a CVSS score. Our exports now reflect a blank score field instead of the previous default of -1.0 when a CVSS score is not available.
Enhanced new vulnerability email subject to handle edge cases, including ensuring that vulnerability emails are sent on the expected day, regardless of time zone.
June 6, 2024
Automatic enrichment of CVE vulnerabilities with CPEs
Automatically create product versions and upload SBOMs with our GitHub action
Enhanced information in vulnerability emails
Fixes for SPDX SBOM upload failures
Our advanced Large Language Model (LLM) now enriches vulnerability data from the National Vulnerability Database (NVD), which has not kept pace with CPE and other data enrichment for the past six months, leaving those of us in the cybersecurity space in a bit of a quandary.
To remedy this issue, we have fine-tuned an LLM to replicate and possibly enhance the data processing traditionally performed by the NVD. Below you can see how this interim approach can help you to deal with this gap. Refer to our for more details.
Our approach identifies vulnerabilities impacting your products and automatically enriches the information retrieved from the NVD with CPE data, aiding in more precise identification of vulnerabilities. This provides you with a more complete view of your overall risk, and ensures that you're focusing your time and effort on the most exploitable vulnerabilities that are affecting your product. Vulnerabilities that came from the NVD, and through our CPE enrichment, were identified as impacting your products will have an AI badge in the new Source column on the page.
You can easily integrate Helm into your CI/CD process to streamline and automate the process of creating product versions and uploading SBOMs to Helm. You can either use our GitHub action independently or integrate it into your existing GitHub action workflow, enabling you to maintain comprehensive and up-to-date documentation of your product's components, dependencies, and vulnerabilities with minimal effort.
If you're one of the cybersecurity experts who doesn't have any new vulnerabilities for the day/week/month cycle, congratulations! These updates include handling the scenario of zero new vulnerabilities and providing clearer details on the period covered by each email.
We've made a number of back-end improvements to help ensure that your SPDX SBOMs upload successfully.
We now treat suppliers set to NOASSERTION in SPDX SBOM files as undefined when importing this information into Helm, thus the Supplier column for that vulnerability will show as a blank.
You can now based on their CycloneDX and CycloneDX VEX remediation statuses, enabling more precise vulnerability management.
We've added a Source column to the Vulnerabilities page. This allows you to identify whether a vulnerability originated from an external data source (currently only NVD) or came from the NVD, but was enriched via our LLM AI. Vulnerabilities enriched with CPE data and identified as impacting your products will display an AI badge in this column on the page.
Helm now supports SPDX SBOMs that are in .zst compressed files, which are automatically created when using Yocto Linux native SBOM generation capabilities."
Fixed issues with multiple toast notifications for some SBOM uploads
New topic:
May 13, 2024
Auto-update vulnerability temporal metrics across product version
Enhanced omponent matching for fewer unmatched components
Purl and cpe id’s now considered in sbom entry uniqueness
Enhanced CycloneDX SBOM and VDR reports with bom-refs for unmatched components
Let us take some of the load of managing vulnerabilities off of you! When you create or modify a rescoring profile for product version, you can set all V3 vulnerabilities for that version to automatically rescore with any changes to their temporal score metrics coming from the NVD. This enhancement streamlines your vulnerability management process, ensuring that temporal scores reflect the most up-to-date information, saving you time spent manually monitoring and updating this information, thereby reducing the risk of missing critical updates, so you can ensure you're focusing on the vulnerabilities that matter most.
You can also set individual vulnerabilities to automatically update their temporal scores based on NVD data refreshes. This timesaving feature ensures your vulnerability information stays current with minimal manual effort.
We've improved our component matching algorithm to better handle scenarios where a vendor of an unknown component doesn't directly match known software. We will now automatically match unknown components that have CPE and PURL matches, but have an incorrect supplier. Previously, these components were initially marked with a Not found in NVD status, but could actually be resolved to the correct component via our match suggestions. Helm now identifies the corresponding known software, which will either be uniquely identified or will have a Multiple matches status (if there are still multiple possibilities). Our enhanced matching process should result in fewer unmatched components, thus ensuring more accurate and efficient component resolution.
We have added CPE and PURL IDs when determining if an SBOM component is unique or is a duplicate.
In response to feedback, we've added the CycloneDX bom-ref parameter to all components in your SBOM export, enabling you to point each vulnerability back to a component, regardless of whether it is matched to known software. Initially, the bom-ref only displayed for matched components. For any unknown (unmatched or not uniquely matched) software, this will be the unique ID that was generated for that SBOM component when it was added to Helm. This will now be in your SBOM or VDR report.
We've made a number of coding and query improvements to load SBOMs more quickly, which may also improve load time for your vulnerabilities.
If you've rescored your vulnerabilities either across a product version or individually, your CycloneDX VEX and VDR reports will now include vulnerability rescore information. This will now align with the Vulnerabilities report. You will now see a ratings section in your JSON file that will include a rating for any rescore on that vulnerability. For vulnerabilities rescored both at the product version level and individually, all associated scores will be included. While CVSS v2 scores remain static, they are also included in the ratings section to provide a comprehensive view. The source for all score data is set to Medcrypt Helm.
We've replaced our initial sign in page with a new look-and-feel. After clicking Sign in, you'll be prompted to enter your username and password on our authentication page.
April 30, 2024
Rename products and versions
Enhanced granularity for CVSS score filtering
UX improvements
In response to customer feedback, we've added the ability for you to rename products and versions right from the product and version drop-downs on each page of Helm. Simply hover over the product or version in the respective drop-down to display the edit icon, then edit the product name or version.
We've improved the CVSS score filtering functionality to support floating-point values, allowing you to pinpoint vulnerabilities with greater precision. Now you can filter vulnerabilities using specific scores like 7.9, which will return everything from 7.9 to 10. This will enable you to precisely target and remediate vulnerabilities that fall within a more granular threshold.
Enhanced API key generation from the UI
Improved loading performance
April 11, 2024
Enhanced support for large SBOMs
CycloneDX 1.5 support
Daily and monthly digests for new vulnerabilities
Bug fixes, UX and doc improvements
Our platform now let you upload SBOMs of up to 50MB in size. This significant enhancement enables organizations with larger software inventories to efficiently manage and analyze their software bill of materials within our platform.
You can now upload your CycloneDX 1.5 SBOM to Helm. Any information in your file that is not currently supported in Helm will still be retained if you want to export either your original or enhanced SBOM.
In response to customer feedback on our new weekly that keep you informed of the latest new vulnerabilities impacting your products, we've expanded this offering to include daily and monthly digests. You can choose one or more email frequencies based on your needs, and can manage your email preferences in your user profile.
Fixed issue where loading page status displayed on the Vulnerabilities table after sorting columns. The Vulnerabilities Detected/Updated field now sorts only by date detected and not by date updated.
Resolved caching issue where some components would not display when the SBOM page was filtered.
Adjusted permissions to allow non-admin users with SBOM and Vulnerability modification access to create rescore profiles for product versions.
Numerous UI improvements
March 22, 2024
Processing modals
Bug fixes and UI improvements
New & updated docs
For larger SBOMs that can take longer to load, we've added a processing modal so you'll know when your upload is completed and whether it was successful. Similarly, we've added a processing modal for other operations that could take longer, including when you're rescoring a lot of vulnerabilities across an entire product version or if you've just added a component manually and we're attempting to automatically match it to known software in the NVD or package manager.
We've improved performance when filtering your SBOM. We also fixed a bug where filters were not persisting if you copied a Helm URL that included a match status to another tab, or if you navigated from a filtered item from the global search results (Discover) page.
We've added and enhanced "empty state" pages to help you get started quickly, improved visibility of system status, enhanced our , and made other UI improvements.
Since we're continually adding and enhancing great new features, we want to make sure you can take advantage of all the new functionality, so we'll let you know any important doc updates in this section.
Enhanced docs:
: Added to help you manage user permissions
: Added new info on aliasing and removing an alias.
March 14, 2024
Added VDR (Vulnerability Disclosure Report) report
Email notifications for new vulnerabilities
Support for CycloneDX XML SBOMs
Enhanced API documentation
As part of our continuous commitment to fulfill your FDA SBOM and cybersecurity vulnerability needs, we've added VDR (Vulnerability Disclosure Reports) to our suite of reports. Offering comprehensive insights into identified vulnerabilities, these reports equip you with proactive mitigation strategies, bolstering your defense against emerging threats.
Never miss a beat with our notification system. Stay ahead of the curve by receiving timely alerts for any new vulnerabilities impacting your software supply chain. Manage your preferences effortlessly through your user avatar > My profile in the top navigation area of Helm.
You can now in XML format for improved compatibility and versatility.
Automate your calls to our Helm application using our . You can upload an SBOM for a new or existing product and version, get a list of all unmatched entries, and a list of all vulnerabilities.
We've made numerous enhancements to improve the UI and SBOM loading performance.
Thank you for your continued support and feedback as we strive to deliver top-notch solutions to meet your evolving cybersecurity needs! if you have suggestions on how to improve your experience!
February 15, 2024
VEX reports
Improved vulnerability query performance
Introducing (Vulnerability Exploitability eXchange) reports – the latest addition to your cybersecurity arsenal! These reports focus on vulnerability exploitability, ease of exploitation, and potential impact. Now, effortlessly communicate vulnerabilities with a VEX remediation status, empowering your customers to focus on fixing the vulnerabilities that matter most.
Stay tuned! As a part of our continuous commitment to fulfill your FDA SBOM and cybersecurity vulnerability needs, we will be adding VDR (Vulnerability Disclosure Reports) to our suite of reports soon. Offering detailed insights into identified vulnerabilities, VDR reports equip you with comprehensive understanding and proactive mitigation strategies, ensuring robust security posture against emerging threats.
January 29, 2024
FDA-ready reports
Export SDPX SBOM
New About modal
Get the Medcrypt advantage with the only FDA expert-crafted SBOM that ensures you meet FDA SBOM requirements! In addition, you'll now get a to make meeting FDA cybersecurity requirements a breeze, including your enhanced SBOM in CycloneDX or CSV format, as well as your vulnerabilities in CSV format.
In our continuous commitment to fulfill your FDA SBOM and cybersecurity vulnerability needs, we will also be adding VDR (Vulnerability Disclosure Reports) and VEX (Vulnerability Exploitability eXchange) reports to our suite of reports soon. VDR reports provide detailed insights into identified vulnerabilities, providing a comprehensive understanding of vulnerability details, impact, and mitigation strategies to proactively respond to potential security threats. VEX reports focus on the exploitability of vulnerabilities, how easily they can be exploited, and their potential impact.
You can now export your original or enhanced SPDX SBOM in JSON. For an enhanced SBOM, you can also include PURL and CPE info for any matches, as well as include all associated vulnerabilities.
You may have noticed that the bottom bar where your Helm version displays has been removed. Don’t worry, you can still get to your version from the sidebar > Help > About. This will launch an About modal, where you can see your current Helm version.
January 4, 2024
Added ability to remediate vulnerabilities
Bug fixes, UI, and performance improvements
You can now remediate vulnerabilities to add granular status information, including tracking remediation changes and providing evidence for why changes were made. For each vulnerability, you can now set a CycloneDX 1.4 and/or CycloneDX 1.4 VEX status, or both. We're adding a more robust audit trail, and you can see the next step toward this in the Vulnerability details modal. You can see any interim statuses and notes you provided manually, as well as automatic tracking of any new remediation changes. If you set any interim statuses, the last one you set will now be reflected in that vulnerability's VEX status.
Fixed issue where a rescore profile would fail when rescoring large numbers of vulnerabilities
Several UI and experience improvements
December 7, 2023
Rescore all vulnerabilities in a product version via rescore profiles
Rescore individual vulnerabilities
Support for SPDX SBOMs
Enhanced SBOM export now includes CPE and PURL data
You can create and apply rescore profiles to a product version based on your product's particular environment and usage, ensuring you're focusing on the most exploitable and impactful vulnerabilities. Any newly detected vulnerabilities for that product version will be automatically rescored with that profile.
You can now rescore the CVSS v3 score of any individual vulnerability associated with a particular product version so that it reflects your product's particular environment and usage. This will override any rescore profile already applied to the associated product version.
You can now upload SPDX SBOM files, including those generated using Yocto on Linux. You can take all of your generated SPDX files, zip them using WinZip or gzip, then upload that zipped file to Helm. We'll do the rest!
When you upload your SBOM, we'll attempt to find exact matches in the NVD, as well as in supported package managers. If we find an exact CPE or PURL match in a package manager or if you manually specify the CPE and/or PURL for a component, you'll now be able to export an enhanced SBOM that includes CPE and PURL data.
You can now benefit from robust exploit and threat information from a variety of sources, including CISA KEV, ExploitDB, Metasploit, and Top 25 CWEs. You can also ensure that you're focusing on the most impactful and exploitable vulnerabilities via EPSS scores.
Improved performance when loading SBOM and vulnerability information
Improved onboarding to get you started or unstuck quickly. We now provide in-page guidance to help you upload an SBOM, view components for a particular product version, or expand your search criteria when there are no results. You'll see these in our SBOM, Vulnerabilities and Discover (Global search) pages.
Numerous user interface improvements
November 2, 2023
Windows KB patch support
In-app status notifications
Performance and user experience improvements
Although a lot of medical devices run on Microsoft Windows operating systems, the NVD does not account for vulnerabilities having been patched by Windows KBs, making it very difficult to understand what vulnerabilities might still be impacting your device. You can now add KBs to your devices running a Windows OS, aligning your digital product version with your physical test device and thus ensuring that you have an accurate list of vulnerabilities that impact your Windows device.
You’ll now see in-app status notifications in the top-right corner to let you know that an action has been completed, such as uploading an SBOM or applying KBs to a product version.
We’ve made significant performance improvements, as well as several enhancements to improve your user experience.
We on these new features, and would about other feature suggestions that would further enhance your experience.
If you would like a V&V report for your QMS, .
November 2023
Allowing SBOMs that pass NTIA minimum requirements
Performance improvements and bug fixes
We improved our capabilities to handle SBOMs that pass NTIA minimum requirements. If the SBOM you are uploading is an invalid CycloneDX SBOM, Helm will still accept it and process it for vulnerabilities.
This release has improvements to performance and a few bug fixes on the dashboard page.
November 2023
Performance improvements and bug fixes
Online help documentation added
This release has a lot of improvements to performance and a few bug fixes. You should be having a faster, more responsive experience.
We’ve added a lot of great information to ensure you can get started, get your SBOM components matched quickly, and begin (or continue) to assess and mitigate your vulnerability risk across your software supply chain. Check it out on !
November 2023
New Get started modal
Export SBOM with vulnerabilities
Combined Upload SBOM modal
Improved feedback when SBOM fails to upload
If you haven’t uploaded any SBOM yet or created one manually, you will see a new Get started modal pop up when you sign in to Helm. You’ll have four different options:
You need help with your FDA submission: You can request help from our expert Services team and leverage our best practices, templates, and checklists in improving your FDA submission.
You have a CycloneDX format. You can upload your SBOM file all in one step.
You have an SBOM in another format. You can contact us and we’ll get right back to you to get you moving.
You don’t know what an SBOM is or don’t have one yet. We’re here to help. Our expert Services team will help you create your SBOM, assess your current state, and help you identify and mitigate cybersecurity risks.
You can now choose to export your original SBOM or your enhanced SBOM with identified vulnerabilities. This will include the source name (currently always the NVD), a link to the vulnerability, both its v2 and v3 CVSS scores and vector strings, when the vulnerability was first detected, when it was updated, and more. Refer to for more information.
We’ve simplified your upload experience. If you’re uploading your first SBOM, you’ll see an Add SBOM drop-down button, from which you can select Upload SBOM. You can now browse to your SBOM file and specify your product name and product version in one step. Once you’ve uploaded at least one SBOM, this drop-down button changes to Manage SBOMs. In that case, you’ll be able to either select an existing product name and version, or create a new product name/version pair.
If you upload an SBOM file, you can hover over the FAIL status to get more information on why the file failed to upload, including scenarios such as: missing required fields, additional fields present that are not defined in the JSON schema when the schema does not allow additional properties, and field values not matching expected data types.
October 2023
Added match status tokens and enhanced status indicators
Added CPE and PURL package manager support
Enhanced details for components
Enhanced filters for SBOMs
In response to customer feedback on the importance of knowing whether a component is or is not found in the NVD, we’ve added two tokens: NVD and NOT IN NVD. We’ve changed the NVD status column to Match status, and improved the status labels. You’ll now see:
Green checkmark next to Matched status when you have an exact match. You’ll also see the respective tokens that we used to make that match or that a user matched via selecting a match suggestion or creating an alias.
Yellow indicator next to Multiple matches status when you have multiple strong matches. You’ll be able to see the sources that the match suggestions are coming from, and will need to resolve this by selecting one of our suggestions or creating your own alias.
A red error indicator next to Not found status and NOT IN NVD token indicates that weren’t able to find a match in the NVD. This could mean that there are no known vulnerabilities or that your software has a different name in the NVD, so you’ll need to resolve these to make sure that you understand whether it is a risk or not.
Our valued customers asked for this and we delivered! We now support CPE and PURL (Package URL) matching. We support the following PURL package managers: Cargo, NPM, NuGet, and PyPI. If you upload an SBOM, you'll automatically find any matches in these package managers. You'll see a token, such as NPM, next to each component that matches a package manager. See for more information.
Note: This is not retroactive, so in order to take advantage of this cool new feature, you'll need to upload a new version of your SBOM.
We’ve added a lot of information to your component details, so that you can tell exactly how it was matched as well as letting you know the last review note any of your team members added. You can hover over any token
You can now filter by match source, such as NVD, CPE, Alias, one of our supported package managers, user-selected matches, and NOT IN NVD. You can also filter on review status.
We’ve added help icons to many columns and fields throughout the UI to get you started and unstuck. If you need more clarification on the help or if you have a question on something that doesn’t currently have help, so that we can get it clarified or added.
If you run into issues or would like to request new features or feature enhancements, we'd love to ! Thank you so much for taking the time to help us improve your experience!
We are working on adding some great new functionality, including:
Windows KB patching,
a customer-facing API to automatically ingest SBOMs as part of your CI/CD process,
the ability to copy/paste from a CSV or other file to create an SBOM,
more human-readable information,
We'd love to on these to make sure what we're creating will improve your management and mitigation of your software supply chain risk. It will also give you a great opportunity to let us know features and feature enhancements you'd like us to consider adding! Note that this link will create a support ticket that will let us know you're interested, then we'll contact you directly to set up some time to do some feature walkthroughs. Thank you so much for your insights and expertise!
September 2023
Enhanced global search
Changed date first detected time
Added date dashboard was last updated
Removed character restrictions on input fields
Global search is now expanded to include searching across all your Product SBOMs for a particular component. You can still search for a specific CVE via CVE-ID, now you get a summary of the vulnerability as well as a list of any products that might be potentially impacted.
The first detected date in Helm on the Vulnerabilities page now reflects the date when Helm detected the vulnerability for your component.
On the Metrics dashboard you can now see when the dashboard was last updated.
Helm had strict character restrictions in input fields that have now been removed.
Helm supports SSO for organizations on the enterprise plan. We now have a working integration with PingID.
September 2023
Enhanced look-and-feel with new page layouts
Performance improvements and bug fixes
Both the Products page and the Vulnerabilities page now have a new look and feel as well as some new functionality for vulnerability filters.
This release has a lot of improvements to performance and a few bug fixes. You should be having a faster, more responsive experience.
Product isolation Products belong to exactly one workspace and cannot be moved between workspaces, ensuring clear organizational boundaries, preventing accidental data exposure, and maintaining audit trail integrity.
Flexible user management Invite new users or add existing team members to workspaces, assign multiple workspaces to a single user with different roles in each, and maintain complete visibility of access permissions across your organization.
Audit trail transparency View complete workspace history including products added, SBOMs uploaded, user invitations and acceptances, and user removals for full compliance tracking and security oversight.
UX improvements and bug fixes
Centralized user management: Invite and manage users from a single location, assign them to multiple workspaces at once, and track pending invitations with automatic 7-day expiration for security
Complete audit trails: View workspace history showing products added, SBOMs uploaded, user invitations and acceptances, and user removals with timestamps and attribution for complete compliance tracking
FDA submission readiness: Control which team members can generate and access FDA-ready reports (VEX, VDR, SBOM exports) based on their permissions, ensuring proper oversight of regulatory documentation
Product isolation: Products belong to exactly one workspace and cannot be moved between workspaces, ensuring clear organizational boundaries, preventing accidental data exposure, and maintaining audit trail integrity
UX improvements and bug fixes
Automatic updates: Instantly updates vulnerability statuses in both CycloneDX and VEX columns
Fixed text styling for EOS/EOL values
Resolved issue where vulnerability remediation status dropdown extended below the page
Fixed scrolling issue in sidebar that previously hid the "Contact us" option when Help dropdown was expanded
Corrected view/edit modes for alias rules to prevent rule deletion in view mode
Fixed auto-rescore toggle switch display to properly reflect system state
Resolved refresh issue when viewing product SBOM file management upload history multiple times
Fixed component exploits and threats to no longer display an empty Exploits badge when no exploits or threats exist in supported sources (CISA KEV, ExploitDB, Top 25 CWE, NVD)
Corrected component editing behavior to maintain editability of component version after collapsing and expanding component details
Fixed issue where vulnerabilities associated to a component didn't get removed when the matching alias rule was deleted
Fixed component version parsing after matching alias rule applied
Enhanced toast notifications when creating, editing, and deleting alias and lifecycle rules.
Impact visibility: See affected products, versions, and components before making changes.
Better decision support: View vulnerability counts, known versions, CPEs, PURLs, and references for potential matches.
Conflict handling: Built-in detection prevents rule conflicts.
User guidance: Clear next steps and impact information throughout the matching workflow.
Prioritized badge display: When a component matches via an alias rule, the ALIAS badge will display first, even if the match is also associated with additional sources such as a package manager or NVD.
Fixed an issue in the VEX Status Remediation field where selecting one field option would automatically select similar strings (e.g., Affected/Unaffected).
Fixed Upcoming and Expired EOS/EOL filters to accurately return search results.
Added banner to Manage component panel to indicate if a rule is already applied. If you have unsaved changes when you click the Rules manager link in this banner, it will prompt you to save or discard changes.
Export lifecycle information to FDA SBOM or CSV SBOM
Bug fixes and UI improvements
Global search results table display now extends to the bottom of the page.
Updated terminology from Vendor to Supplier in SBOM CSV export
Bug fixes and performance enhancements
Contextual actions: Easily access additional information or perform actions directly from tables by clicking on cell values.
Multi-column sorting: Focus on what’s important by applying complex sorts across multiple columns. Access this feature through the Sort fields link at the top of each table.
Flexible display density: Optimize your view by selecting a compact or expanded display mode and adjusting the number of rows per page to suit your preferences.
Advanced date picker: Gain precise control over date filtering with options for absolute/relative dates, custom ranges, and multi-month views.
Bug fixes and UX improvements
Support for SPDX SBOMs with NOASSERTION in supplier field
Added CycloneDX and VEX remediation status filters
Added Source column for vulnerabilities
Support for .zst SBOMs generated by Yocto on Linux
Bug fixes and UX improvements
Performance improvements on SBOM page loading
Enhanced CycloneDX VEX and VDR reports with vulnerability rescores
New sign in page
Bug fixes and UX improvements
Updated doc: Get email updates on new vulnerabilities
New exploits and threats info, including EPSS and CISA KEV
Bug fixes and other improvements
complete CycloneDX ingestion and export,
SPDX support,
and other cool new things.


July 1, 2025
AI-powered vulnerability guidance with actionable mitigation strategies
Automated AI detection and tagging of impacted technology stacks
UX improvement